
Designing Patios That Drain: How Blaine Landscapers Build Outdoor Living Spaces That Last
Designing Patios That Drain
Here's what I see repeatedly with raised patios: they look great at installation. Five years later, everything has settled. The pitch is gone. Water pools on the surface instead of draining off. The homeowner is left with a patio that sits like an island, disconnected from the yard, with drainage problems that weren't there when it was new.
There's a better approach.
This guide covers how to design patio and outdoor living spaces that integrate drainage from the start—not as an afterthought. For Blaine homeowners, particularly those with walkout basements and existing decks, understanding how patio elevation, drainage routing, and overall yard flow connect is the difference between a project that lasts and one that creates problems.
The question I ask every homeowner is: how do you want to move through this space? A patio should connect you to your whole yard, not trap you on an elevated platform where you're constantly stepping up and down.
Blaine's sandy soil is forgiving for drainage—water moves through it naturally. But that advantage only works if the patio design directs water correctly in the first place. Build it wrong, and even sandy soil can't save you from water pooling against your walkout basement foundation.
The Case for Building Your Patio at Grade
The single most important design decision for a patio is its elevation relative to the surrounding yard.
Build your patio at grade—approximately one inch higher than the surrounding lawn. This slight elevation allows water to drain off the patio surface naturally while maintaining a seamless transition to the yard. No retaining walls. No stepping up and down. Your whole patio is surrounded by grass so you can move through your yard freely.
The Flow Advantage
Think about how you actually use outdoor space. During a party, people move between the patio and lawn constantly. Kids run in and out. You might set up extra tables on the grass for overflow seating. A grade-level patio makes all of this natural—there's no barrier between hardscape and lawn.
Compare this to a raised patio: single entry and exit point, railings blocking movement, constant stepping up and down that breaks foot traffic flow. It becomes an island instead of an extension of your yard.
The Drainage Advantage
Water flows off a grade-level patio in all directions into the surrounding lawn. No walls trapping water. No fill soil to settle and ruin your pitch over time. The surface drains the way it was designed to drain—and stays that way for decades.
The Sightline Advantage
Raised patios require railings for safety. Those railings block sightlines from inside your home. When you're sitting in your living room looking out, you see railing instead of landscape. A grade-level patio with proper steps from the door keeps your views open to the entire yard.
Pro Tip: Before finalizing any patio design, stand at your back door and imagine the finished space. Can you see the yard beyond the patio? Can you picture moving freely between patio and lawn? If the design requires railings or walls that interrupt those views and that flow, consider whether grade-level construction would serve you better.
The Problem with Raised Patio Construction
Understanding why raised patios fail explains why grade-level construction is worth the design effort.
What Less Experienced Contractors Do
Build a retaining wall around the patio perimeter. Fill the interior space with soil. Install the patio surface on top of that fill. The result is a patio elevated twelve to eighteen inches above the surrounding yard.
This approach seems logical—it creates a defined outdoor room. But it creates problems that reveal themselves over time.
The Settling Problem
Here's what actually happens: no one packs the fill soil down correctly. It's nearly impossible to achieve proper compaction in a contained space like this. The soil settles gradually over years.
Ten years later, everything has settled and there's no pitch in the patio anymore. Water sits on the surface instead of draining off. The patio that worked fine initially now has pooling problems that weren't part of the original installation—they developed as the fill compressed beneath the surface.
The Isolation Problem
A raised patio becomes a disconnected space. You're constantly stepping on and off of it. That breaks up the foot traffic flow that makes outdoor entertaining natural and comfortable.
Think about how it works when you're hosting a gathering—or how children move between indoor and outdoor spaces throughout the day. Every transition becomes a step up or step down. The patio stops being part of the yard and becomes a separate platform you visit.
The Visual Problem
Raised patios at standard heights require railings for safety. Those railings block your view from interior rooms. You invest in a beautiful outdoor space and then can't see it properly from inside your home. The connection between indoor and outdoor living that makes patios valuable gets interrupted by the railings the raised design requires.
How Drainage and Patio Design Work Together
Drainage shouldn't be an afterthought added after patio design is complete. It should be part of the initial design conversation.
Where does water currently flow on your property? Where will it flow after the patio is installed? How do downspouts route, and where does that water go? Everything is designed to work together and drain extremely well, making it all last for the long run.
Underground Downspout Routing
Surface downspout extensions are trip hazards and eyesores. More importantly, they often terminate too close to the foundation—six feet isn't far enough to protect your home, especially with a walkout basement.
Underground downspout routing solves multiple problems simultaneously. It eliminates the trip hazard. It removes the visual clutter from your landscape. And most importantly, it routes water to the curb or a drainage area far from your foundation rather than depositing it nearby.
For Blaine walkout basements, proper downspout routing is especially critical. That lower-level foundation wall is vulnerable to water intrusion. Getting water well away from it protects both your foundation and your finished basement space.
Going Under Sidewalks
One specific situation I address frequently: the downspout at the corner of the garage that dumps water onto the front sidewalk. In winter, that water freezes and creates ice at your front entry—a safety hazard every time temperatures drop.
Underground routing can go under the sidewalk, directing water to the curb. This eliminates both the drainage problem and the winter ice hazard with a single solution.
The Pitch Requirement
Underground pipes need proper pitch to drain effectively. Without adequate slope, water sits in the pipe rather than flowing to the outlet. This is measured during installation—not eyeballed. A pipe that looks like it slopes can still trap water if the pitch is insufficient.
Proper installation means verifying the pitch at defined intervals, ensuring water will flow from inlet to outlet without pooling in the pipe.
Pro Tip: If you have a downspout that creates ice problems on your front sidewalk or entry, underground routing that goes under the sidewalk to the curb solves both the drainage issue and the winter safety hazard. It's one project that addresses two persistent problems.
Patio Design for Blaine Walkout Basements
Most newer Blaine homes share a common configuration: two-story construction with walkout basement. The main level has a deck off the back. The walkout basement opens to the yard below. Homeowners want to add a patio at that lower level, creating outdoor living space accessible from both levels.
This is a great configuration for outdoor living—but it requires integrated design thinking.
What Needs to Work Together
Patio elevation and pitch. The patio surface needs proper pitch to drain water away from the walkout basement wall. Building at grade—approximately one inch above the surrounding lawn—with proper slope accomplishes this naturally. Water moves off the patio and into the yard, away from the foundation.
Deck footing protection. The existing deck footings are located in the zone where your new patio will be built. Drainage design must route water away from these footings, not pool water near them. Water collecting around footings undermines the deck structure over time.
Downspout integration. Downspouts from the upper roof may currently discharge near where your patio will go. These need to be rerouted—ideally underground to the curb—to prevent water from flowing across your new patio surface or pooling at the walkout foundation.
Step design from deck. If you want stairs connecting the upper deck to the lower patio, that design affects drainage flow patterns. Steps need to be positioned to account for water movement, not block it. A minimum four-foot landing at the door gives you space to stand, open the door, and close it without being on the steps.
The Integrated Approach
Rather than designing the patio, then figuring out drainage, then dealing with the deck connection as separate problems—design them as one connected system. How does water move across this entire space? How do people move through it? Both questions need to be answered together from the beginning.
Blaine's sandy soil helps once water enters the ground—it drains naturally rather than pooling. But the design still needs to direct water correctly before it infiltrates. Sandy soil is forgiving, but it's not a substitute for proper planning.
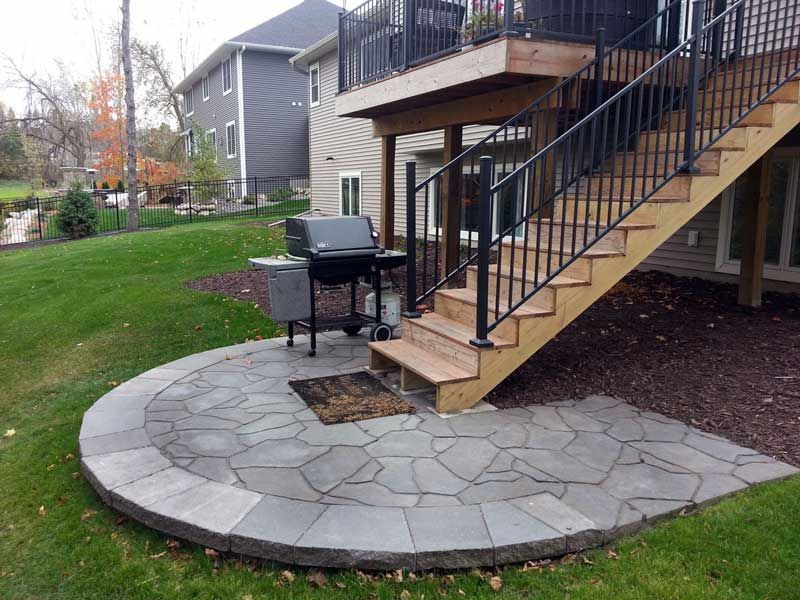
[Photo: Walkout basement with deck and patio configuration] Alt text: Blaine walkout basement home with deck above and paver patio below Caption: The typical Blaine configuration: deck above, patio below, walkout basement opening to outdoor living space.
Design Decisions That Create Problems
Some common choices seem reasonable but cause issues over time. Here's what to avoid.
Don't Plant Immediately Around the Patio Perimeter
The instinct is to soften patio edges with plantings—shrubs or perennials that frame the space. Here's what happens: plants overgrow under and around the patio. You start to feel trapped in there. It cuts off the flow into your yard—the exact flow you wanted when you built at grade.
If you want plantings near your patio, limit them to one section where foot traffic to the yard isn't planned. Or position island plantings away from the patio perimeter entirely. The goal is maintaining that open transition between hardscape and lawn that makes grade-level construction valuable.
Don't Terminate Downspouts Too Close
Six feet from the foundation isn't far enough, especially for walkout basements where that lower wall is particularly vulnerable to water. Extend underground downspouts to the curb or a proper drainage area well away from the foundation. The extra distance protects both your foundation and your finished lower-level space.
Don't Skip the Base Work
Proper patio installation requires approximately nine inches of excavation for a standard paver patio. That includes five to six inches of class five base material compacted in layers, a one-inch bedding layer, and three-inch pavers on top.
For a 500 square foot patio, that's fifteen cubic yards of material—seven to eight pickup truck loads of soil out and base material in. This is substantial work, and it's why proper installation costs what it costs.
Skipping base depth or compaction is why DIY patios and cheap contractor work fail within a few years. The pavers shift and move, creating an uneven surface. That gives pavers a bad reputation they don't deserve—the problem isn't the material, it's the installation shortcuts.
Frequently Asked Questions
How much does a patio with integrated drainage cost in Blaine?
Costs vary based on patio size and drainage complexity. Integrated design often costs less than addressing drainage problems after the fact—fixing pooling issues after a patio is installed requires tearing up finished work. Planning drainage from the beginning avoids that expensive correction and protects both the patio and your walkout foundation.
Can you add a patio below an existing deck?
Yes—this is the most common configuration for Blaine walkout homes. The design must account for existing deck footing locations, and drainage must route water away from those footings and the foundation. Steps connecting levels can be integrated, but the key is planning both as one connected system.
Why do some patios settle and lose their pitch?
Usually because of improper fill soil compaction in raised patio construction. Fill soil settles over five to ten years, ruining the original pitch. Grade-level patios avoid this entirely—no fill soil means no settling. Proper base preparation with compacted class five material prevents the shifting that plagues poorly constructed work.
Should downspouts go underground?
For most properties, yes. Underground routing eliminates trip hazards, removes visual clutter, and routes water farther from the foundation than surface extensions. It can also go under sidewalks, solving ice problems at entries. Installation must include proper pitch verification to ensure water flows through rather than sitting in the pipe.
What Integrated Design Delivers
Picture your finished outdoor space: a patio built at grade, connecting seamlessly to your lawn. No walls trapping you on an island. No railings blocking your view from inside. Water drains off the surface naturally, flows away from your walkout foundation, and disappears into Blaine's sandy soil.
Your downspouts route underground—no more trip hazards, no more ice at the front entry, no more ugly surface extensions cluttering your landscape. The deck above connects to the patio below with steps designed as part of the whole system, and foot traffic flows naturally between levels.
Ten years from now, the patio still has proper pitch because there's no fill soil settling beneath it. The drainage still works because it was designed with the right slope and termination points. The design choices made at the beginning continue to pay off because everything was planned together—not figured out piecemeal as problems emerged.
That's what integrated patio and drainage design delivers. For Blaine homeowners ready to add outdoor living space that works with their walkout basement configuration—not against it—the planning starts with understanding how all the pieces connect.
Contact KG Landscape to discuss patio design with integrated drainage for your Blaine property.
Ready to Start on Your Next Project?
Call us at (763) 568-7251 or visit our quote page.


