How Do Professional Drainage Contractors Determine the Right French Drain Depth for Your St. Paul Property?
How Do St. Paul Professional Drainage Contractors Determine the Right French Drain Depth for Properties?
You're comparing French drain quotes for your St. Paul property and every contractor is telling you something different. One says 18 inches deep. Another says 30 inches. A third recommends 36 inches. Prices vary significantly based on these depth recommendations.
You don't know who's right or if anyone actually knows what they're doing. Maybe you had a French drain installed that isn't working and you're wondering if depth was the problem. Based on what we've seen working throughout St. Paul, most homeowners can't tell the difference between professional expertise and guessing. Understanding how depth is determined helps you evaluate contractors and their recommendations.
Why French Drain Depth Actually Matters
Installing a French drain too shallow causes real problems. It doesn't intercept water at the level where it's actually traveling through your soil. It misses subsurface water flowing below the drain completely. Water bypasses the drain entirely. You've paid for a drainage system that doesn't work, and you still have water problems despite the installation.
Installing too deep creates different problems. Unnecessary excavation costs make the project more expensive. You're paying for deeper installation when shallower would work. You risk hitting obstacles like utilities or encountering bedrock. There's no additional benefit beyond a certain depth for your specific situation. You've paid significantly more than necessary.
The right depth solves your water problem effectively. It intercepts water where it's actually traveling through your soil. It addresses your specific water issue appropriately. It's cost-effective for your situation. It actually works long-term. The investment is worth it because the system functions as intended.
Why does depth vary so much between properties? There's no one-size-fits-all answer. Different properties have genuinely different conditions. Water behaves differently in different soil types. Your specific problem determines what depth you need. Professional assessment is required for each individual property rather than applying standard depths everywhere.
What Determines the Right Depth
The purpose of your French drain significantly affects depth requirements. Foundation drainage typically needs 24-36 inches deep or more. Yard drainage for soggy lawn areas usually works at 12-18 inches. Intercepting water flowing from uphill varies by slope and water depth. Basement water issues require drains below floor level. Different purposes genuinely require different depths.
Soil conditions matter enormously. Clay soil common in St. Paul behaves differently than sandy soil. How water moves through your specific soil determines where you need to intercept it. Water travels at certain depths depending on soil type. Soil stratification means layers of different soil types that affect water movement. Where water accumulates in your soil profile determines effective drain depth.
Water table depth on your property affects what's possible. How deep does groundwater sit? Does it vary seasonally? Some areas of St. Paul have high water tables, others don't. You can't effectively drain below the water table. This reality limits your depth options regardless of what you might want.
Slope and grading determine requirements. Steeper slopes need different approaches than flat areas. Water flows downhill at specific depths depending on slope. You need to intercept where water naturally concentrates. Outlet elevation determines your minimum depth - you need slope for gravity flow. These physical realities dictate what will work.
Existing site conditions create constraints. Underground utilities can't be crossed or require special measures. Some St. Paul areas have bedrock at certain depths. Tree roots and obstacles affect where you can excavate. Proximity to foundations matters for safety and code compliance. Access for excavation equipment determines what's practical.
St. Paul Specific Conditions Affecting Depth
Clay soil throughout St. Paul doesn't absorb water quickly. Water moves laterally through soil rather than percolating down. It often travels at specific layer depths in clay. Clay stratification affects where water actually flows. Your drain depth must intercept water at the travel layer, not just be "somewhere underground."
Water table variations exist across St. Paul. Some areas have high water tables, especially lower-lying locations. Proximity to the Mississippi River affects water table depth in certain neighborhoods. Seasonal fluctuations from spring through summer change water table levels. Professional assessment determines actual water table depth on your specific property rather than assuming.
Soil stratification is common throughout St. Paul. You might have clay over sand over clay in distinct layers. Water travels at the interface between these layers. You must install the drain at the right layer to intercept water flow. Test pits reveal these soil layers. This is exactly why depth can vary dramatically even between neighboring properties that look similar above ground.
Bedrock considerations matter in some St. Paul areas. Shallow bedrock limits how deep you can excavate practically. This requires different drainage approaches when bedrock is encountered. Professionals familiar with St. Paul know which areas tend to have bedrock issues and can plan accordingly.

Foundation vs. Yard Drainage: Different Depth Requirements
Foundation drainage typically requires deeper installation at 24-36 inches or more. It must be below your basement floor level to be effective. If you're protecting the foundation itself, it needs to be at or below footing depth. It directs water away from foundation walls before it can enter. Critical depth is necessary for basement water issues - cutting corners here doesn't work.
Yard drainage typically works at shallower depths of 12-18 inches. It's intercepting surface and near-surface water causing problems. It addresses soggy lawn areas effectively. It collects water from rainfall before it creates standing water. Shallower installation costs less but remains effective for the intended purpose.
Why does this distinction matter when comparing quotes? A contractor quoting 36 inches for simple yard drainage may not understand the difference between foundation and yard applications. Or one quoting 12 inches for a foundation issue won't solve your problem. The depth must match the problem being solved. Evaluate whether the quoted depth makes sense for your specific issue.
How We Determine the Right Depth for Your Property
Our site assessment process starts with walking your property and identifying where water issues occur and what's causing them. We observe where water accumulates and how it flows. We check soil conditions with test pits or probes to see what we're working with. We identify what purpose the drainage system needs to serve. We focus on understanding what problem we're actually solving.
Test pits or soil investigation means digging test holes to see soil layers at different depths. We observe where water is present in the soil profile. We identify soil types at various depths. We check if water table is present and at what level. This reveals actual conditions rather than making assumptions or guessing based on surface appearance.
Evaluating water flow patterns requires understanding where water is coming from, at what depth it's traveling through soil, where it needs to be intercepted to stop problems, and where it can be discharged. Understanding this flow determines what depth will actually intercept the water causing your issues.
Outlet elevation considerations work backwards from where water can discharge. Where can water exit the system? What elevation is that discharge point? The drain must slope downward to the outlet at minimum 1-2% grade. Outlet elevation determines how deep the drain can start. We work backwards from outlet to determine feasible depth at the problem area.
Engineering becomes necessary for complex situations. Professional engineering provides calculations for proper depth and capacity. Foundation protection especially benefits from engineered solutions. Some St. Paul properties have situations requiring formal engineering rather than just experience-based assessment.
Red Flags: Signs a Contractor Is Guessing at Depth
Contractors who give you a depth without visiting your property are guessing. "We always install at 24 inches" stated over the phone means one-size-fits-all approach without assessing your specific conditions. This is guessing dressed up as professional service, not actual professional assessment.
Contractors who don't ask about your specific water problem can't possibly determine correct depth. Not interested in what issue you're trying to solve? Don't ask where water appears or when? No questions about basement versus yard issues? You can't determine right depth without understanding the actual problem.
Contractors who don't discuss soil conditions are skipping critical assessment. No mention of soil type or investigation? Don't dig test holes to check? Assume soil conditions without verification? Soil conditions critically affect depth requirements - ignoring this means guessing.
Contractors who can't explain why that specific depth for your property should raise concerns. "That's what we do" isn't rationale. No explanation based on your property conditions? Can't articulate what determines depth? This indicates lack of expertise rather than confidence from experience.
Contractors with significantly different depth recommendations than competitors without clear explanation deserve scrutiny. Much deeper or shallower than others you've talked to? Can't articulate why their depth differs? May be upselling with unnecessary depth or cutting corners with inadequate depth. Either way, it's concerning.
Questions to Ask Contractors About Depth
Ask "Why is this depth right for my property specifically?" You should get detailed answers about your conditions, not generic "that's standard depth" responses. The explanation should reference your soil, your water issue, and the purpose of the drain. This shows they actually assessed your situation rather than applying cookie-cutter approach.
Ask "How did you determine this depth?" They should describe their assessment process including test pits, observation, and experience with the area. They should demonstrate understanding of where water is traveling on your property. If they can't describe how they arrived at the number, they pulled it out of thin air.
Ask "What happens if we go shallower or deeper?" They should explain trade-offs clearly. Why won't shallower work for your situation? Why isn't deeper necessary if they're recommending moderate depth? Understanding of depth implications demonstrates they've thought through options rather than just picked a number.
Ask "Have you done test pits or soil investigation?" Professional work includes investigation of subsurface conditions. You can't determine right depth without knowing what's below ground. They should be willing to dig test holes before finalizing quotes. Red flag if they resist investigation or claim it's unnecessary.
Ask "What's the water table depth on my property?" They should have assessed this or have knowledge of your area. Water table depth affects what's feasible and practical. Some contractors don't even consider this factor. Whether they've checked shows thoroughness of their assessment.
Why DIY Depth Decisions Usually Fail
Homeowners can't assess subsurface conditions without proper investigation. You don't know where water is actually traveling underground. You can't see soil stratification without excavation. You're guessing at depth based on internet research. You miss critical factors affecting what depth will work.
Homeowners don't understand purpose-specific requirements. Using same depth for foundation drainage as yard drainage doesn't work. Not realizing different problems need different depths leads to wrong installation. Following generic advice that doesn't fit your situation means the drain won't solve your problem.
Homeowners can't properly evaluate water table without professional tools and experience. You don't know how to determine water table depth accurately. Installing a drain below water table doesn't work effectively. Or installing too shallow to reach the water causing problems. Professional assessment tools and experience are necessary.
Homeowners lack experience with local conditions that professionals have. You don't understand St. Paul soil patterns from working throughout the area. You're unaware of bedrock issues in certain neighborhoods. You don't know typical water table depths in different areas. Local knowledge accumulated over years of working in St. Paul matters significantly.
Cost Implications of Wrong Depth
Installing too shallow means you've paid for a French drain that doesn't work. You still have water problems after installation. You need to excavate deeper and reinstall to actually solve the problem. You're spending money twice to solve once. Total cost exceeds doing it right initially because you're paying for removal of failed system plus new installation.
Installing too deep means unnecessary excavation expense. More material costs for pipe and gravel for the extra depth. Higher labor costs for deeper digging that wasn't needed. You could have solved the problem for less money. You've overpaid by hundreds to potentially thousands of dollars for depth that provided no additional benefit.
Installing at the right depth solves your problem effectively. Cost is appropriate for the solution needed. The system works long-term without recurring issues. Money is well-spent on functional drainage. This is exactly what you're paying professional assessment fees for - getting it right the first time.
Foundation Drainage Depth: Critical Considerations
Foundation drainage must be below floor level for basement issues. Typical basement floors sit 6-8 feet below grade. The drain must be deeper than the floor to effectively prevent water intrusion. This usually means 24-36 inches below grade at minimum, sometimes deeper depending on foundation depth and design.
Foundation drainage should be at footing level when protecting the foundation structure itself. Footings typically sit 42 inches or deeper below grade, which is Minnesota's frost line depth. Drain at footing level protects the foundation properly by intercepting water before it reaches the structure. This is why foundation drains are often 36 inches deep or more - they need to be at the actual foundation depth.
Foundation drainage costs more because of required depth. Greater depth means more excavation work. Working near the house requires careful digging to avoid damage. Solutions often need engineering for structural protection. But this investment is necessary for protecting your foundation, which is far more expensive to repair if water damage occurs.
Red flag: contractors quoting 12-18 inches for foundation drainage don't understand the application. This is yard drainage depth, not foundation depth. It won't address basement water issues effectively. This shows fundamental lack of understanding. Find a different contractor who understands foundation drainage requirements.
Yard Drainage Depth: What Actually Works
Yard drainage typically works well at 12-18 inches deep. This intercepts surface and near-surface water causing soggy lawn problems. It addresses standing water in your yard. It collects water from rainfall before major accumulation. This depth range is effective for most yard drainage issues.
Shallower installation works for yard drainage because water causing soggy areas is near the surface. You don't need deep excavation to intercept this water. Shallower depth costs less to install. It remains effective for its intended purpose of preventing standing water and soggy conditions.
Sometimes yard drainage needs to be deeper than typical range. When intercepting water flowing from uphill at depth, when water is traveling deeper through soil layers, when connecting to a deeper outlet point, or when professional assessment reveals deeper water travel. The assessment process determines when typical depth isn't adequate.
Red flag: contractors quoting 36 inches for simple yard drainage may be upselling. Yard drainage rarely needs foundation depth. This increases your cost without providing benefit. Question why they think this depth is necessary for your yard issue. They should be able to explain specific conditions requiring unusual depth.
What Proper Installation Looks Like at Any Depth
Proper installation requires consistent slope to outlet regardless of depth. Minimum 1% grade means 1 inch of drop per 100 feet of length. Preferably 2% grade provides better flow. Slope must be maintained the entire length of the drain. The depth at your outlet point determines what depth you start at to maintain proper slope.
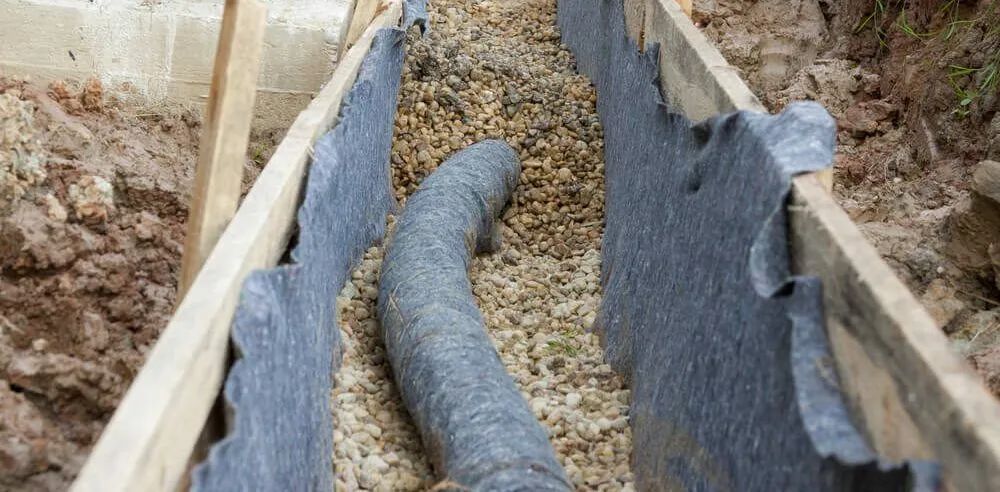
Proper bedding and backfill matter at any depth. Gravel bed below the pipe provides stable foundation. Gravel envelope around the pipe allows water entry. Filtration fabric prevents soil from migrating into the gravel and pipe. These installation details matter regardless of whether you're at 12 inches or 36 inches deep.
Appropriate pipe size depends on water volume, not depth. Four-inch diameter is minimum for most residential applications. Six-inch pipe handles high-volume situations. Depth doesn't determine what size pipe you need. Flow volume and capacity requirements determine pipe sizing.
Installation quality matters as much as correct depth. A poorly installed drain at perfect depth doesn't work properly. A well-installed drain at good depth works great for years. Depth is one important factor among many that determine system success.
When Depth Recommendations Should Vary
Different areas of the same property often need different depths. Foundation side drainage might need 30 inches. Yard side drainage might work at 18 inches. Both can be correct for their specific purposes. Applying one depth to an entire property is often wrong when conditions and purposes vary.
Seasonal water table changes affect depth decisions. Spring water table sits higher than fall levels. Depth recommendations must account for seasonal high water, not just conditions when assessment happens. Some contractors only assess during dry season and miss that water table rises significantly in spring.
Properties with multiple water sources need different solutions. Surface water from roof downspouts requires shallow interception. Subsurface water flowing from uphill requires deeper interception. Foundation water requires deepest installation. You may need drains at multiple depths to address all water sources effectively.
This complexity is exactly why professional expertise matters. Proper assessment identifies different needs across your property. One-size-fits-all approaches fail on properties with varying conditions. The right answer is genuinely "it depends on specific conditions." Cookie-cutter approaches indicate lack of expertise rather than efficiency.
Professional Assessment: What It Should Include
Professional assessment starts with detailed questions about your water issues. When does water appear? Where does it accumulate? Are you dealing with basement issues or yard issues? How long has the problem existed? What have you tried before? These questions provide context for determining solutions.
Physical site investigation means walking your property and observing conditions firsthand. Digging test pits or using probes to check soil. Identifying water flow patterns across your property. Checking elevations to determine outlet options. This investigation takes real time and effort but provides information needed for accurate recommendations.
Written proposals should include specific depth recommendations with rationale. Why is this depth right for your property? What will it accomplish? Not just vague "we'll install French drain" statements. Professional documentation shows thought went into the recommendation.
The proposal and explanation should make sense to you as the homeowner. The contractor should be able to explain their reasoning clearly in terms you understand. You should feel confident they've assessed your situation properly. Trust your instincts if something seems off or if explanations don't add up.
Depth Matters, But Expertise Matters More
French drain depth isn't a standard number that applies everywhere. It's specific to your property's soil conditions, water table depth, slope, and the problem being solved. Contractors giving you a depth without thorough assessment are guessing rather than applying expertise. Contractors with significantly different recommendations who can't explain why should raise concerns about their actual knowledge.
Professional assessment includes site investigation, understanding your specific water problem, checking soil conditions through test pits, evaluating water table and outlet options, and determining depth that will actually work for your situation. This expertise prevents the expensive mistake of installing a French drain at wrong depth that doesn't solve your problem.
When comparing quotes, don't just compare depths and prices. Compare the thoroughness of assessment each contractor performed. Ask how they determined their recommended depth. Ask them to explain why it's right for your property specifically based on conditions they observed. Contractors who can articulate clear rationale based on your conditions demonstrate real expertise. Those who can't are guessing and hoping it works.
The right depth costs no more to install than the wrong depth. But wrong depth means money wasted on a system that doesn't function, while right depth means money well-spent on a solution that actually solves your water problems for years to come.
Need French drain installation in St. Paul with proper depth assessment? Contact KG Landscape for thorough site evaluation. We'll determine the right depth for your specific property conditions and explain exactly why that depth will solve your water issues.
Frequently Asked Questions
What's the standard depth for French drains in St. Paul?
There is no standard depth because proper depth depends on your specific property conditions and what problem you're solving. Yard drainage typically works at 12-18 inches. Foundation drainage usually requires 24-36 inches or deeper. Soil conditions, water table depth, and purpose all affect what depth will work. Contractors claiming one standard depth for all situations don't understand drainage properly. Professional assessment of your property determines appropriate depth rather than applying cookie-cutter approach. St. Paul's clay soils and varying water tables make property-specific assessment essential.
How deep should a French drain be for basement water issues?
French drains addressing basement water must be below your basement floor level to be effective, typically 24-36 inches below grade or deeper. If protecting the foundation structure, drains should be at footing level which is usually 42 inches or deeper. This ensures water is intercepted before reaching your basement. Shallower drains won't prevent basement water intrusion effectively. Foundation drainage costs more due to required depth but is necessary investment for protecting your home. Any contractor recommending 12-18 inch depth for basement issues doesn't understand foundation drainage requirements.
Can a French drain be too deep?
Yes, French drains can be unnecessarily deep, wasting money on extra excavation and materials without additional benefit. Beyond the depth where water is traveling and where you need to intercept it, going deeper doesn't improve performance. Very deep drains risk hitting utilities, bedrock, or water table. They cost significantly more without solving your problem any better. Proper depth intercepts water where it's actually traveling through your soil. Professional assessment determines adequate depth without unnecessary excavation expense. Over-depth often indicates contractor upselling rather than solving your specific problem.
How do you know what depth to install a French drain?
Determining proper depth requires professional assessment of your property including test pits to check soil layers, observing where water accumulates and travels, evaluating water table depth, understanding the specific problem being solved, checking outlet elevation and slope requirements, and considering local soil conditions. This assessment reveals where water is actually traveling through your soil and what depth will intercept it effectively. DIY depth decisions usually fail because homeowners can't assess subsurface conditions. Experience with local soil patterns and drainage also informs depth decisions for your specific St. Paul property.
Why are contractors recommending different depths for my property?
Different depth recommendations can indicate varying levels of expertise and assessment thoroughness. Some contractors guess based on what they "usually do" rather than assessing your property. Some understand foundation vs. yard drainage depth differences. Some have actually investigated your soil conditions while others haven't. Ask each contractor why their specific depth is right for your property and how they determined it. Contractors who can explain their reasoning based on your conditions demonstrate expertise. Those who can't explain or just say "that's standard" are guessing. Proper assessment should lead to appropriate depth with clear rationale you can understand.
Ready to Start on Your Next Project?
Call us at (763) 568-7251 or visit our quote page.