
Outdoor Drainage Project Example
Dry Well to Manage Pooling Water Between House and Garage in Minneapolis
Dry Well To Collect Water in Small Backyard
The Drainage Problem
This customer called because they needed a better walkway from their garage to their home. The customer also needed help to fix the water drainage in this small backyard that was plaguing this area. The retaining wall on the side, along with the general slope of the backyard, leads water to come down and stay in the back door area. While we were fixing the walkway issues, the customer also wanted to fix these water issues at the same time.

Step #1: Outdoor Drainage Consultation
The customer reached out to us at KG Landscape and scheduled an outdoor drainage consolation with Kent, our owner and lead designer. Kent met with the customer at their home to observe the backyard hill drainage issue in person. While there, he collected the site information needed to provide a detailed plan/estimate for a long term solution to the drainage problem.
Step #2: A Detailed Proposal
After careful consideration of the drainage problem and the options available to correct the issue, a detailed plan was put together to solve the customer’s exterior drainage problems in a cost effective and dependable way.
Drainage Solution Objective: Collect and control the water running down the hill toward the back of the house before it can cause damage. The new sidewalk and other plant bed areas must be properly regraded to slope away from the house to prevent water from collecting along the foundation. All of the water collected will be removed from the problem areas and sent to the dry well in the middle.
Below are portions of the proposal used to describe our drainage solutions to the customer:
Landscape Service Description
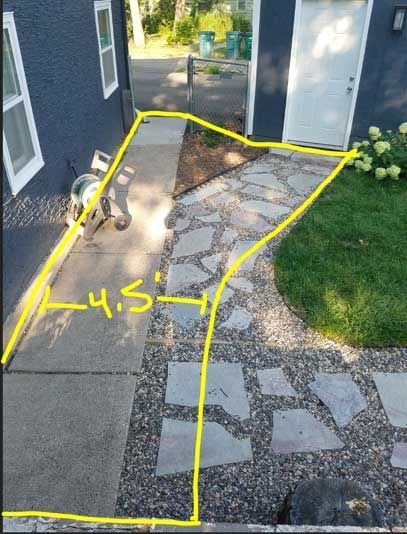
CONCRETE WORK:
Remove existing concrete and landscaping in area marked below in yellow and install new concrete with ¼” per foot slope away from the foundation in area shown below in yellow. Primary sidewalk will be 4.5’ wide until flaring out to garage side door.
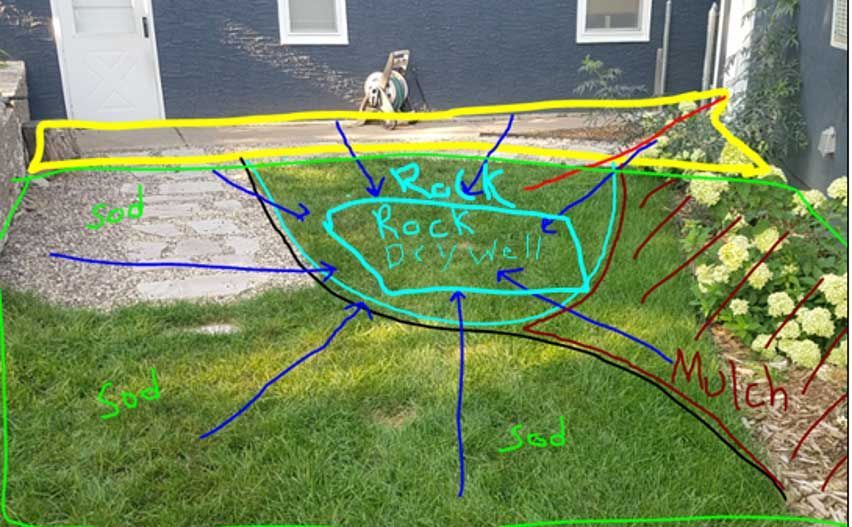
GRADING AND DRY WELL:
Remove gravel/flagstones, sod, and plantings as needed to grade the area circled in green below so that water runs into the dry well shown in light blue below. The dark blue arrows show how this area will be graded to direct water into the rock bed with a dry well. The rock bed space will have a curvilinear shape as shown roughly 10 wide by 12’ long. The entire rock bed will be tapered down to roughly 12” deep with a grade that runs to the center of the rock bed and toward the dry well. A roughly 5’ x 5’ x 4’ deep dry well will be installed on the far end of the rock bed furthest from the house and the entire rocked area will be filled with 1-1/2” river rock so that the finished elevation of the rock bed sits 3-5” lower than the surrounding landscaping that will drain into it. The rock bed will be edged with 6” fieldstone boulders to define the perimeter and poly edging with be installed around the outside perimeter where it meets up with sod. 200 ft2 of new sod will be installed to repair disturbed lawn space. Any additionally disturbed lawn space will be raked smooth and left prepped for the homeowner to seed themselves.
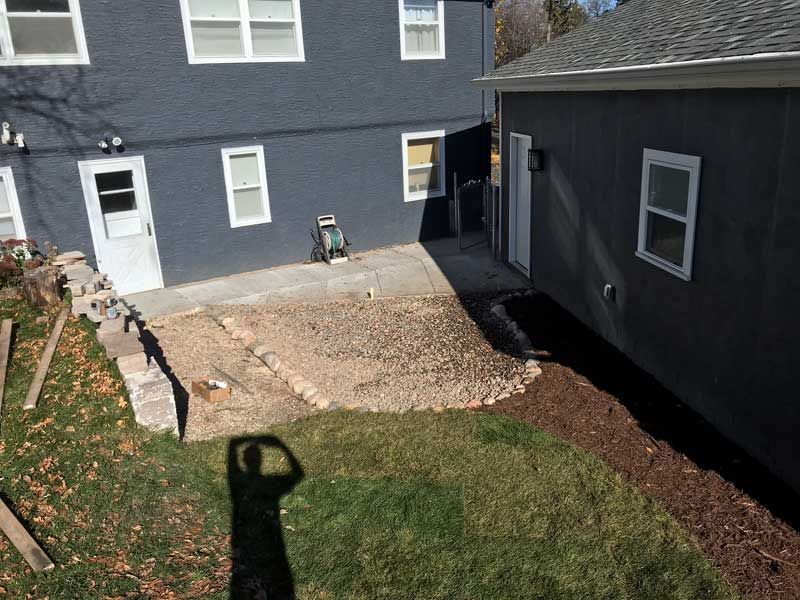
Step # 3: Installation of Drainage Solutions
Step #4: Project Completion
Once all of the work described in the proposal had been completed and thoroughly tested by running water through all components of the system, both we and the customer were 100% confident the drainage issues have been solved in a high quality and reliably way. We’ve kept in touch with the customer and they have had no more puddling and no more erosion issues since this work was completed back in 2018.
We’ve never seen an outdoor drainage issue we couldn’t fix. Do you have an exterior drainage problem? Call us today to schedule an outdoor drainage consultation at 763-568-7251. You can also submit a quote to our website to get in contact with us!