
Outdoor Drainage Project Example
Backyard French Drain, Dry Well, Outdoor Sump-pump, New Steps and Hillside Landscaping in St. Paul, MN
How We Fixed a Wet Backyard and Landscaped a Steep Slope at a Home in St. Paul, MN
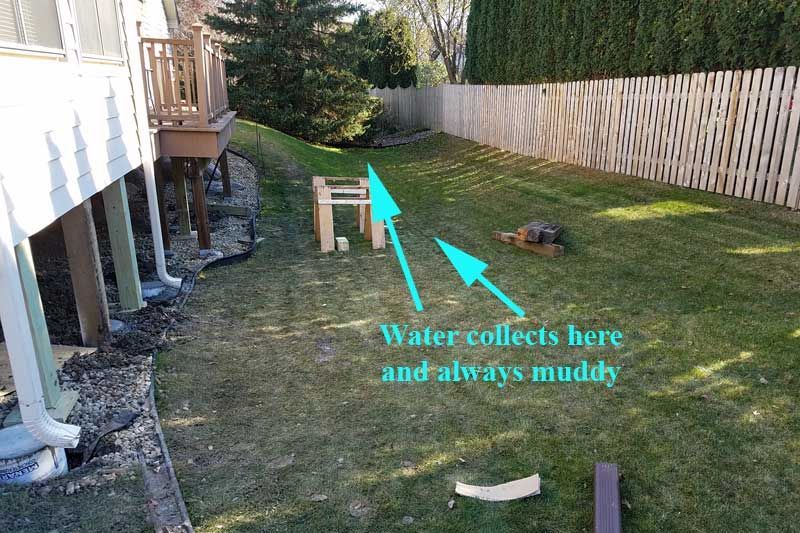
The Drainage Problem
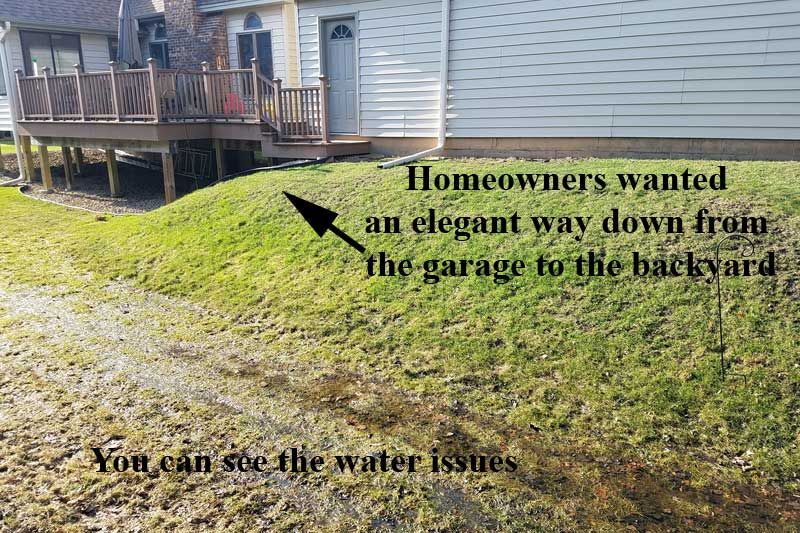
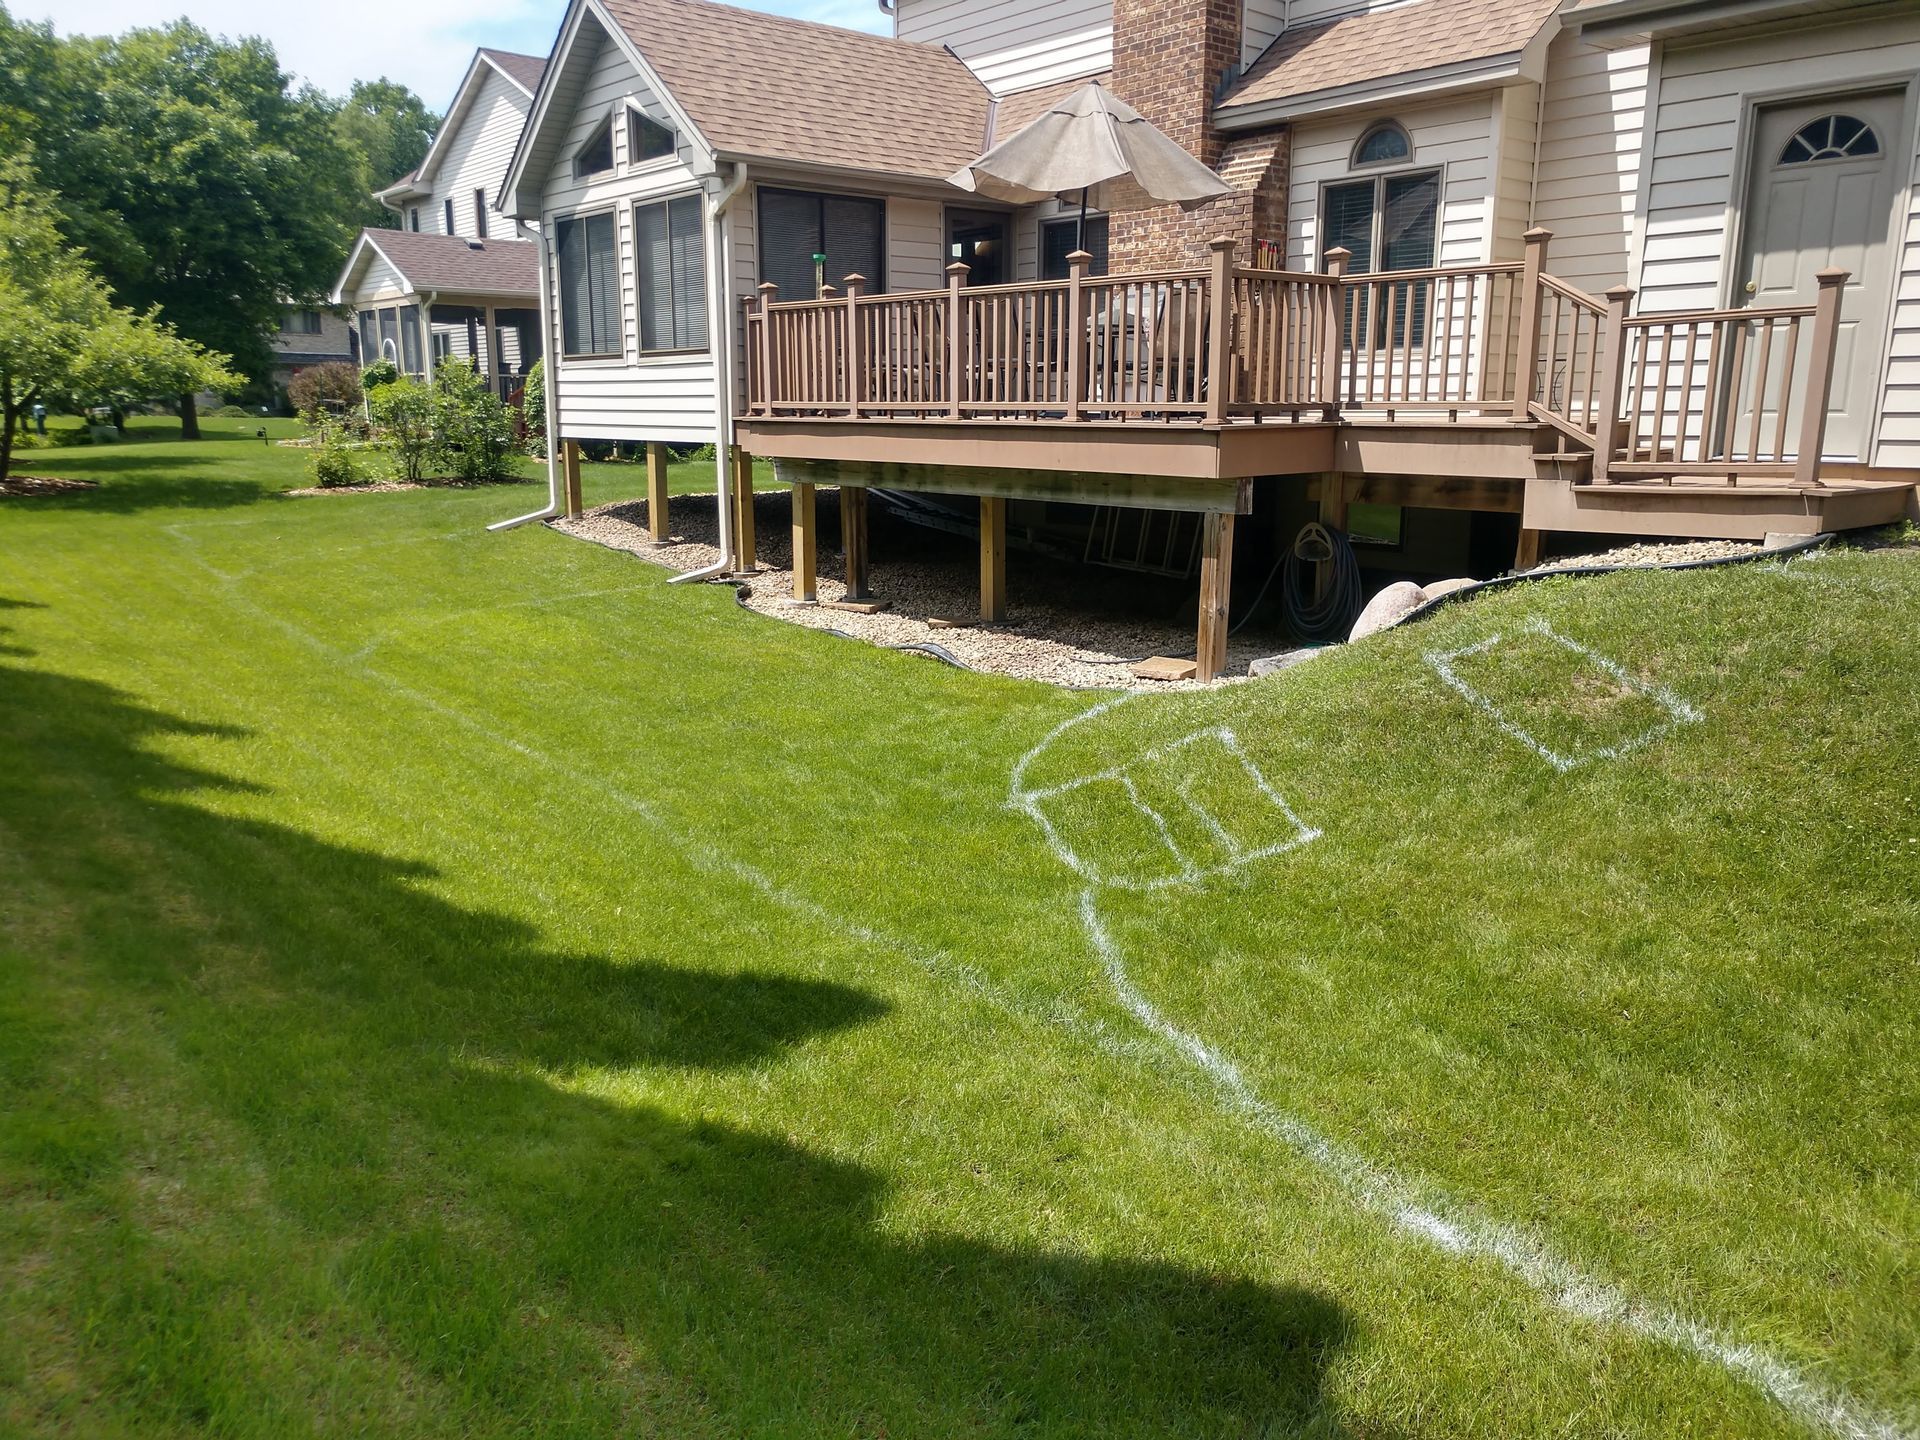
There were 2 goals to this project. The first goal was to fix drainage issues. The customer’s backyard is relatively small and has a hill down from the house and a hill down from the backyard fence. This creates a bowl that keeps water stuck in the middle for extended periods of time. Essentially, the homeowner wanted to use their backyard again. The second goal was to create an elegant and natural transition from the garage down to the backyard itself.
Step # 1: Outdoor Drainage Consultation
The customer reached out to us at KG Landscape and scheduled an outdoor drainage consolation with Kent, our owner and lead designer. Kent met with the customer at her home to observe the backyard hillside drainage issue in person. While there, he collected the site information needed to provide a detailed plan/estimate for a long term solution to the drainage problem.
Step # 2: A Detailed Proposal
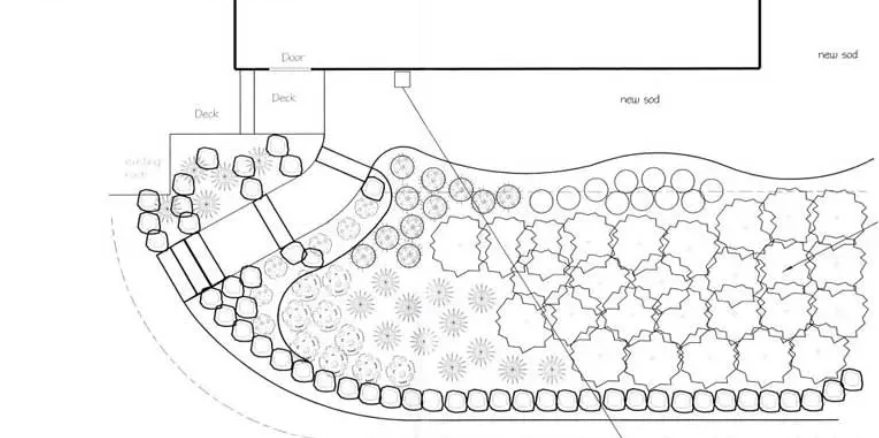
After careful consideration of the drainage problem and the options available to correct the issue, we put together a detailed plan to solve the customer’s backyard drainage problems in a cost effective and dependable way. There were also a number of landscape design options that we discussed before landing on a final design plan for a hillside planting and stone steps down from the back garage door.
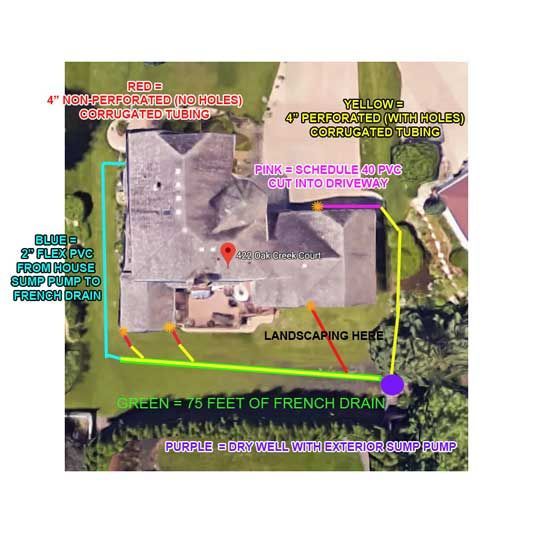
Drainage Solution Objective: We determined that there is no lower point for the water in the backyard to go. When that is the situation, we install a dry well with an exterior sump pump is the answer. The sump pump in the dry well will pump the water out from the collection area in the backyard and push the water into the creek area and off the property. The water from the house sump pump will be collected into a
French drain in back.
Next, 3 catch basins will collect water from the roof and into the French drain as well. Finally, the French drain will collect and transport all the water into the dry well. The water from the driveway will also be collected and stored in the dry well.
Step # 3: Installation of Drainage Solutions
Installation Overview
The project began with a detailed layout, carefully marking the locations of all key landscape features. This included the placement of the new steps, the alignment of the boulder retaining wall, the centerline of the new front swale, and all underground drainage components. Underground downspout connections were also mapped out, showing how they would tie into the primary French drain system.
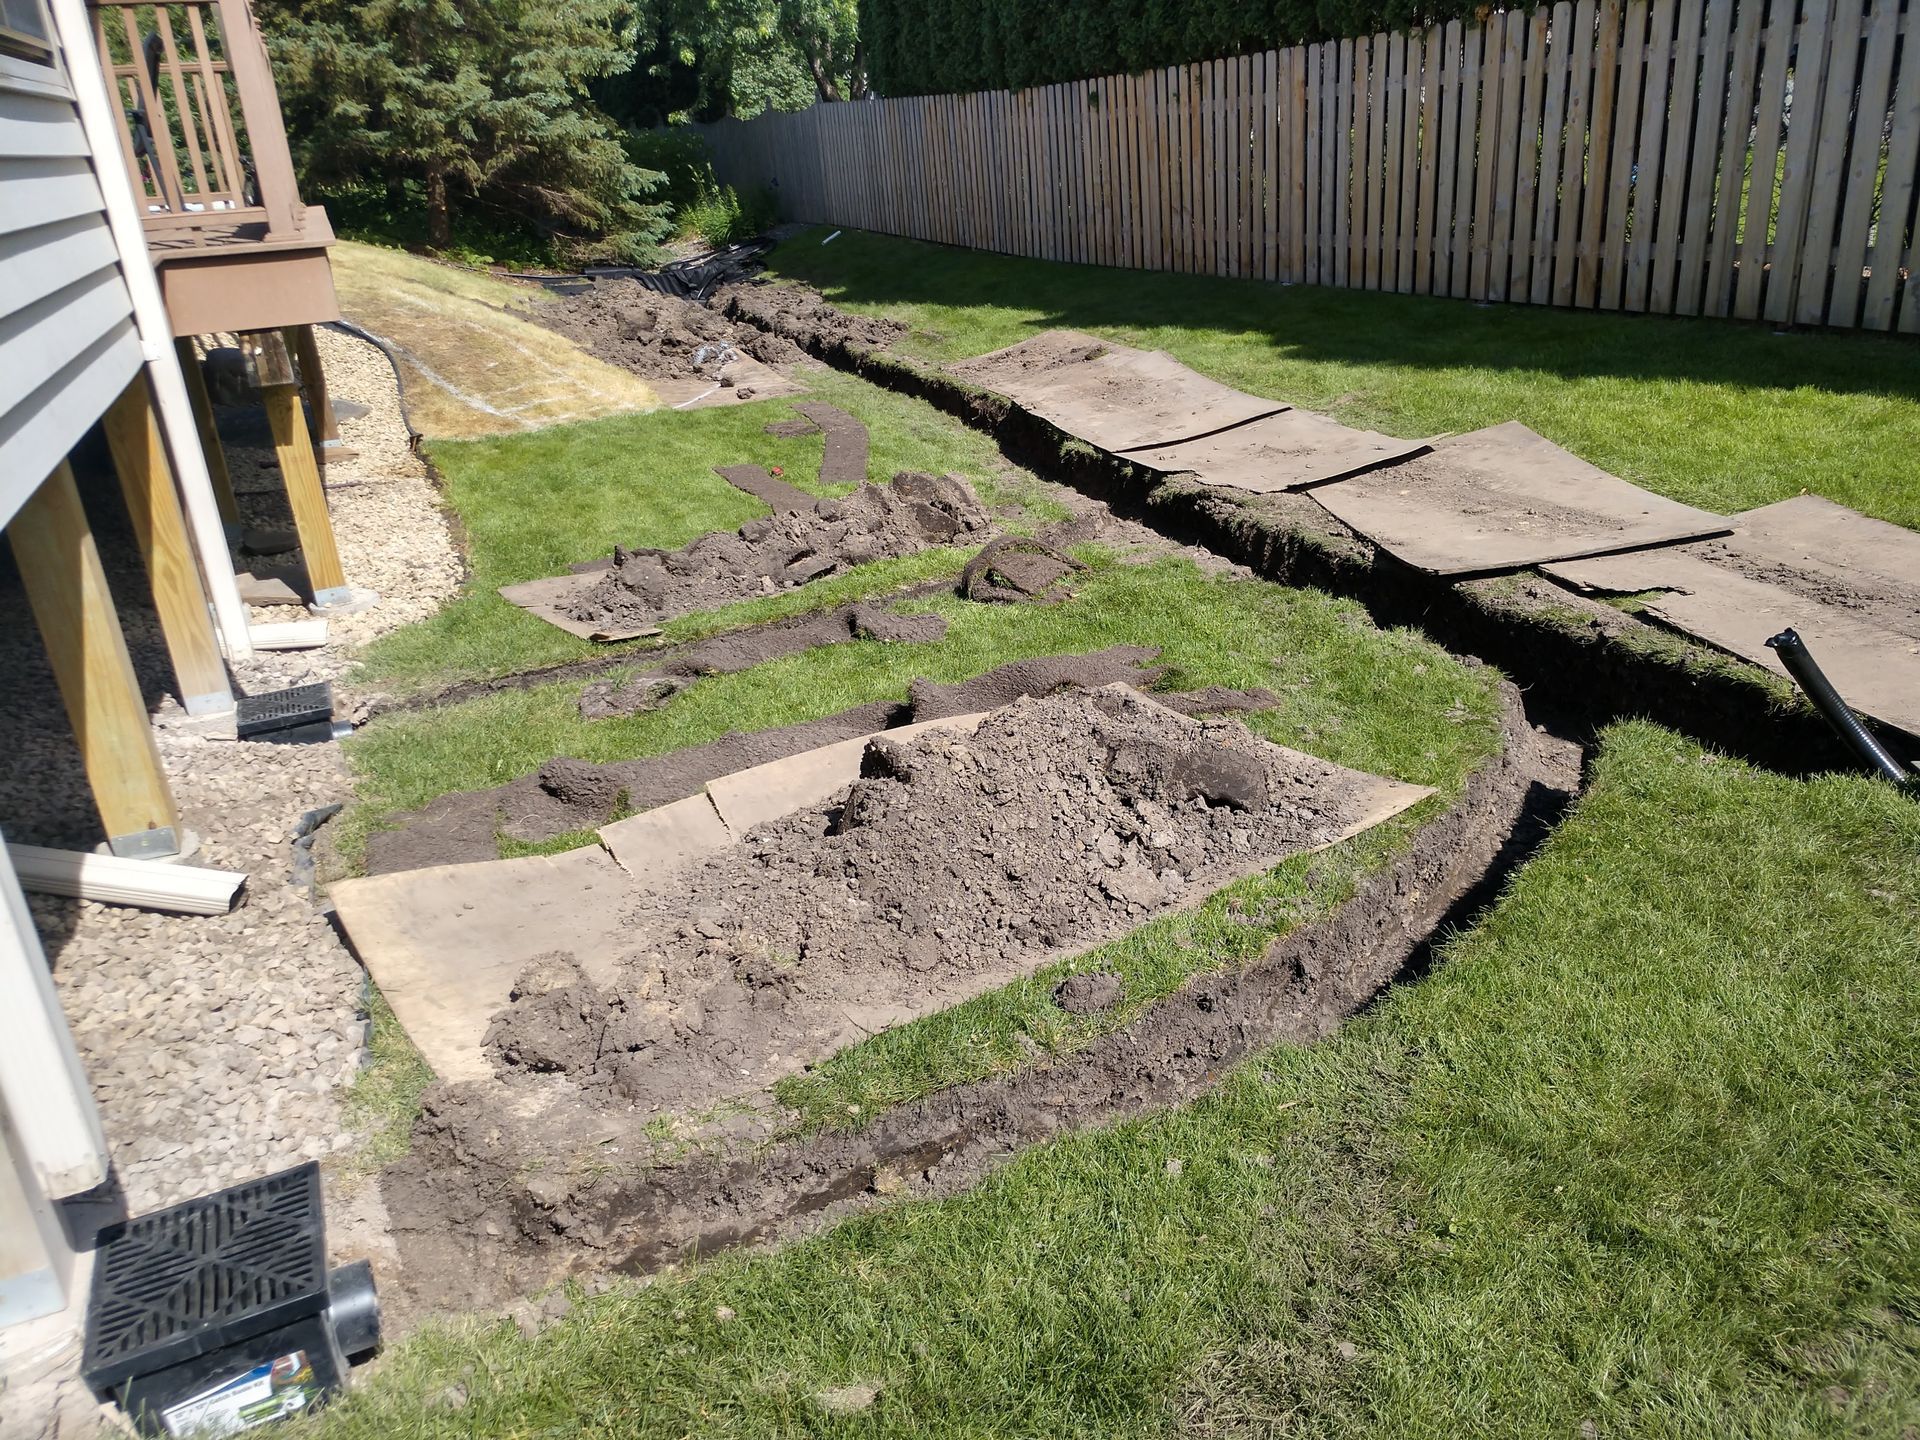
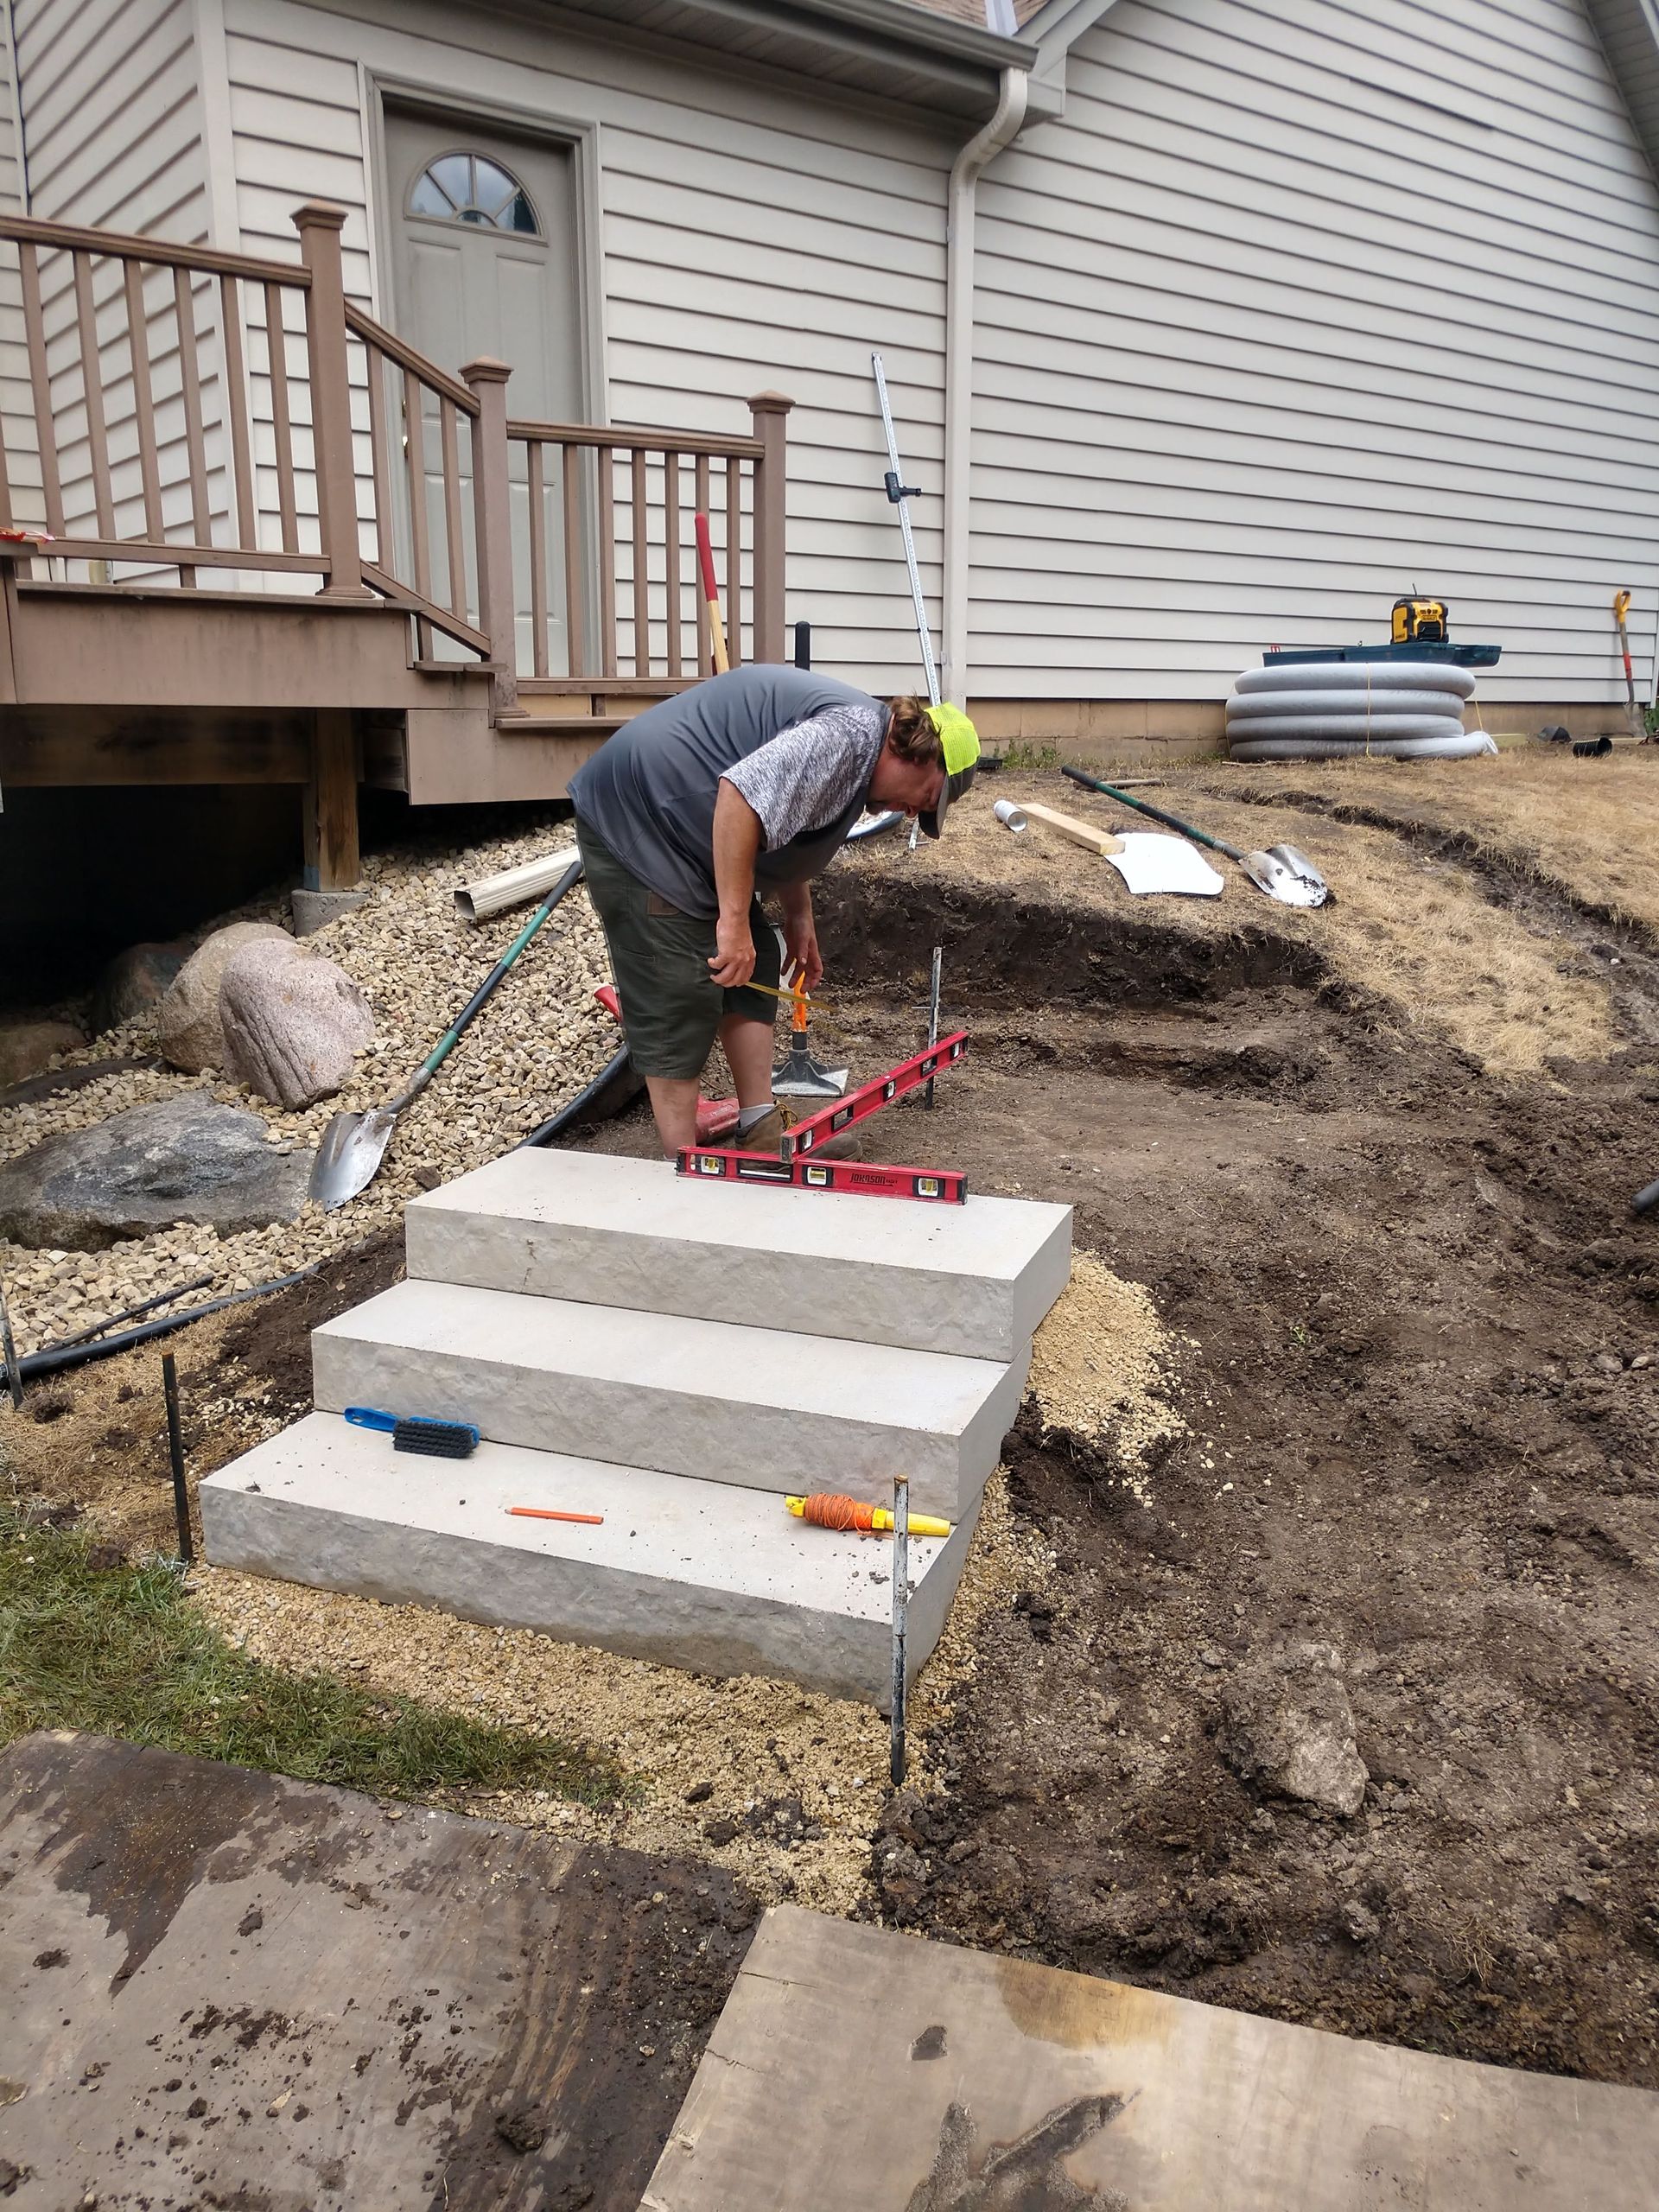
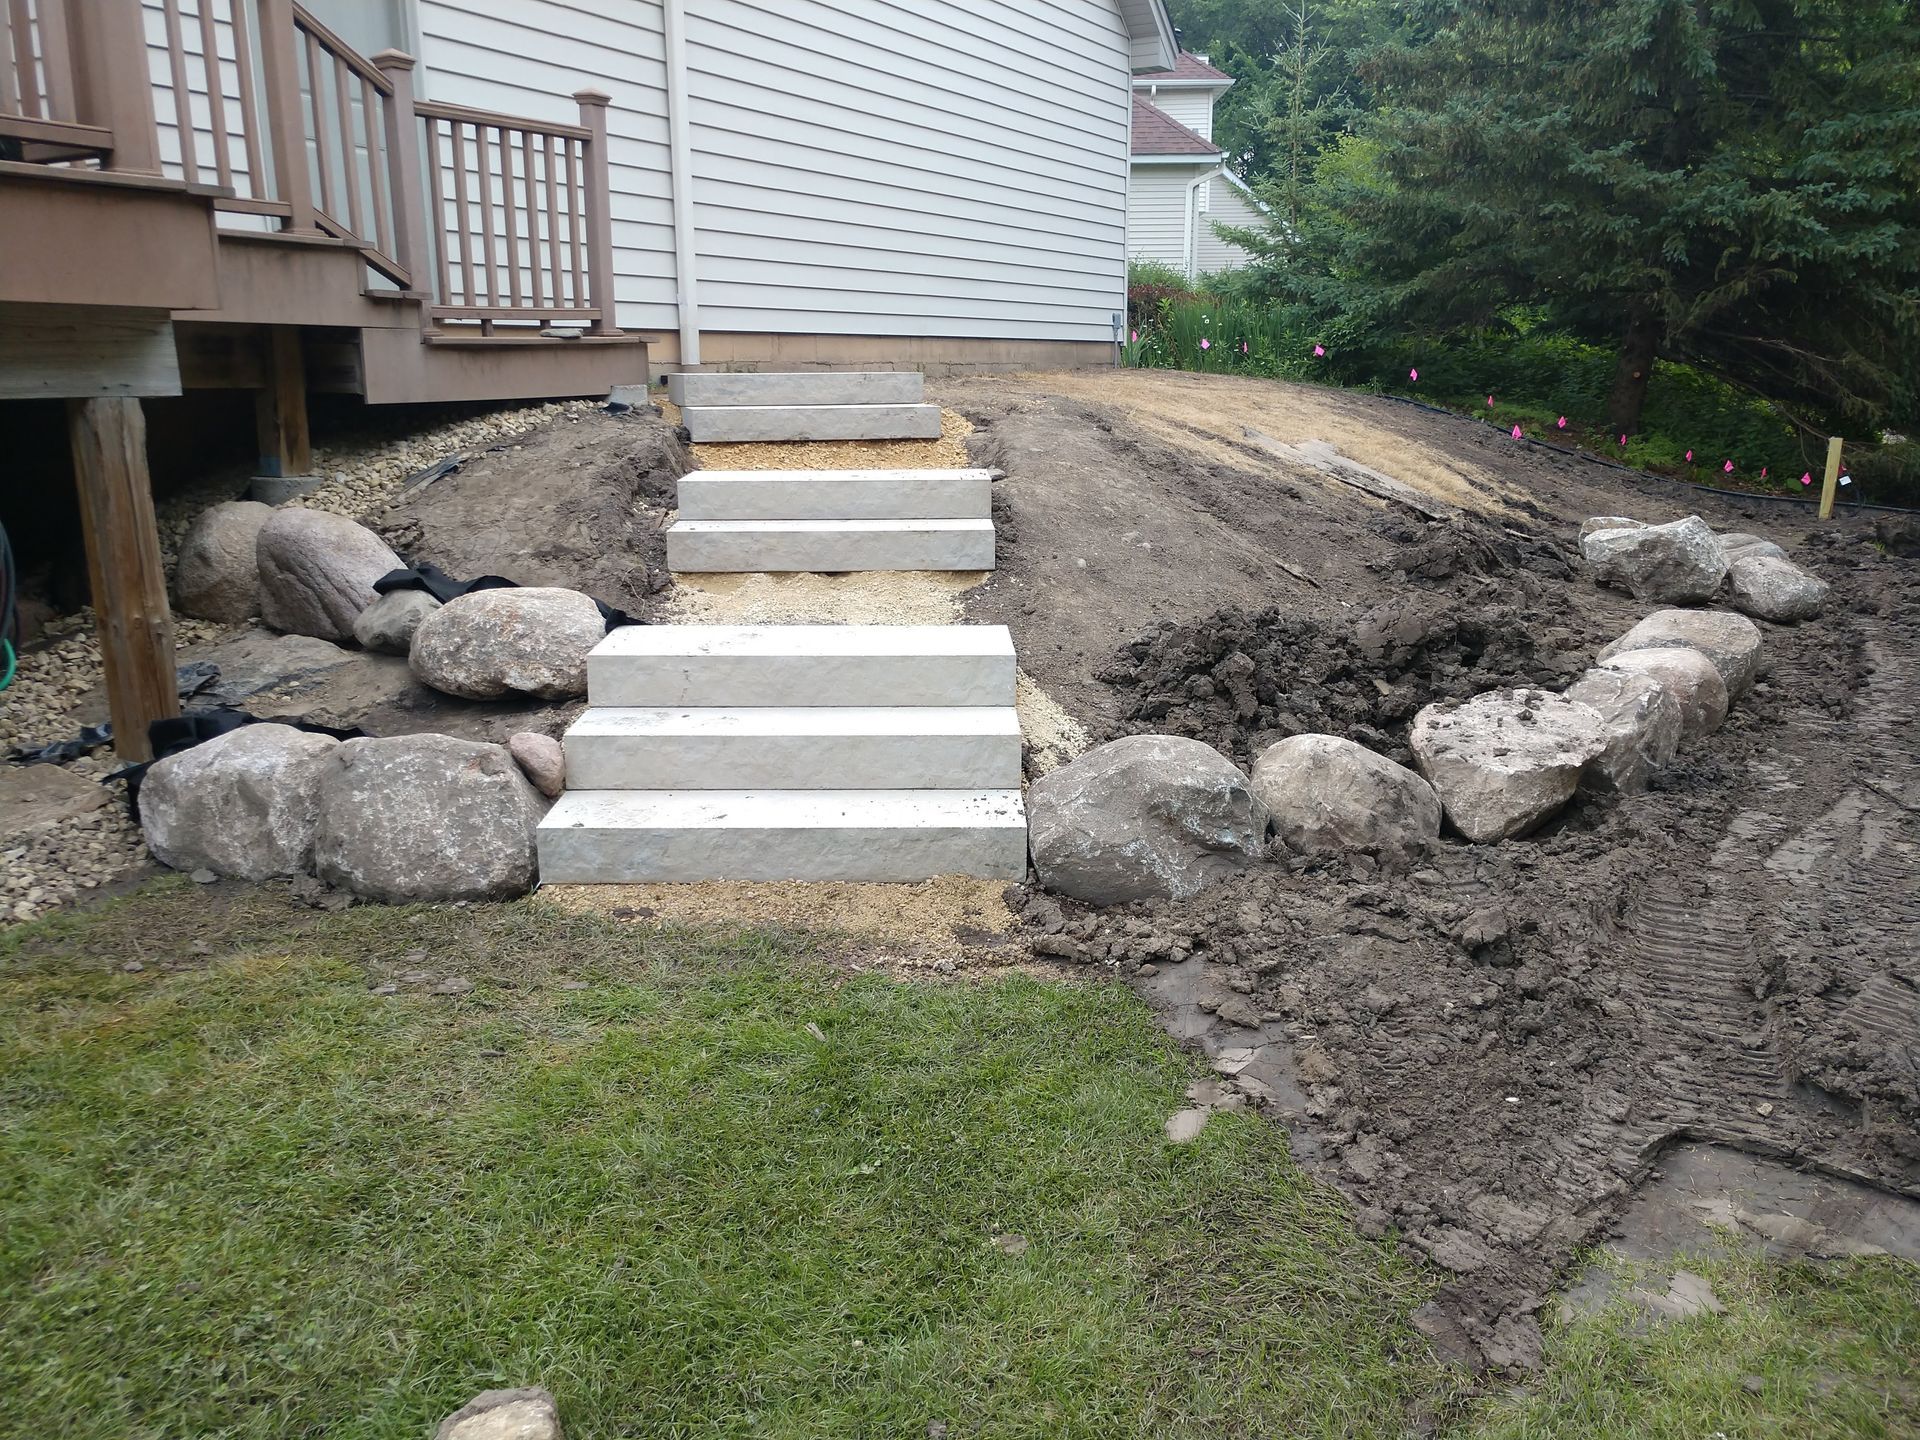
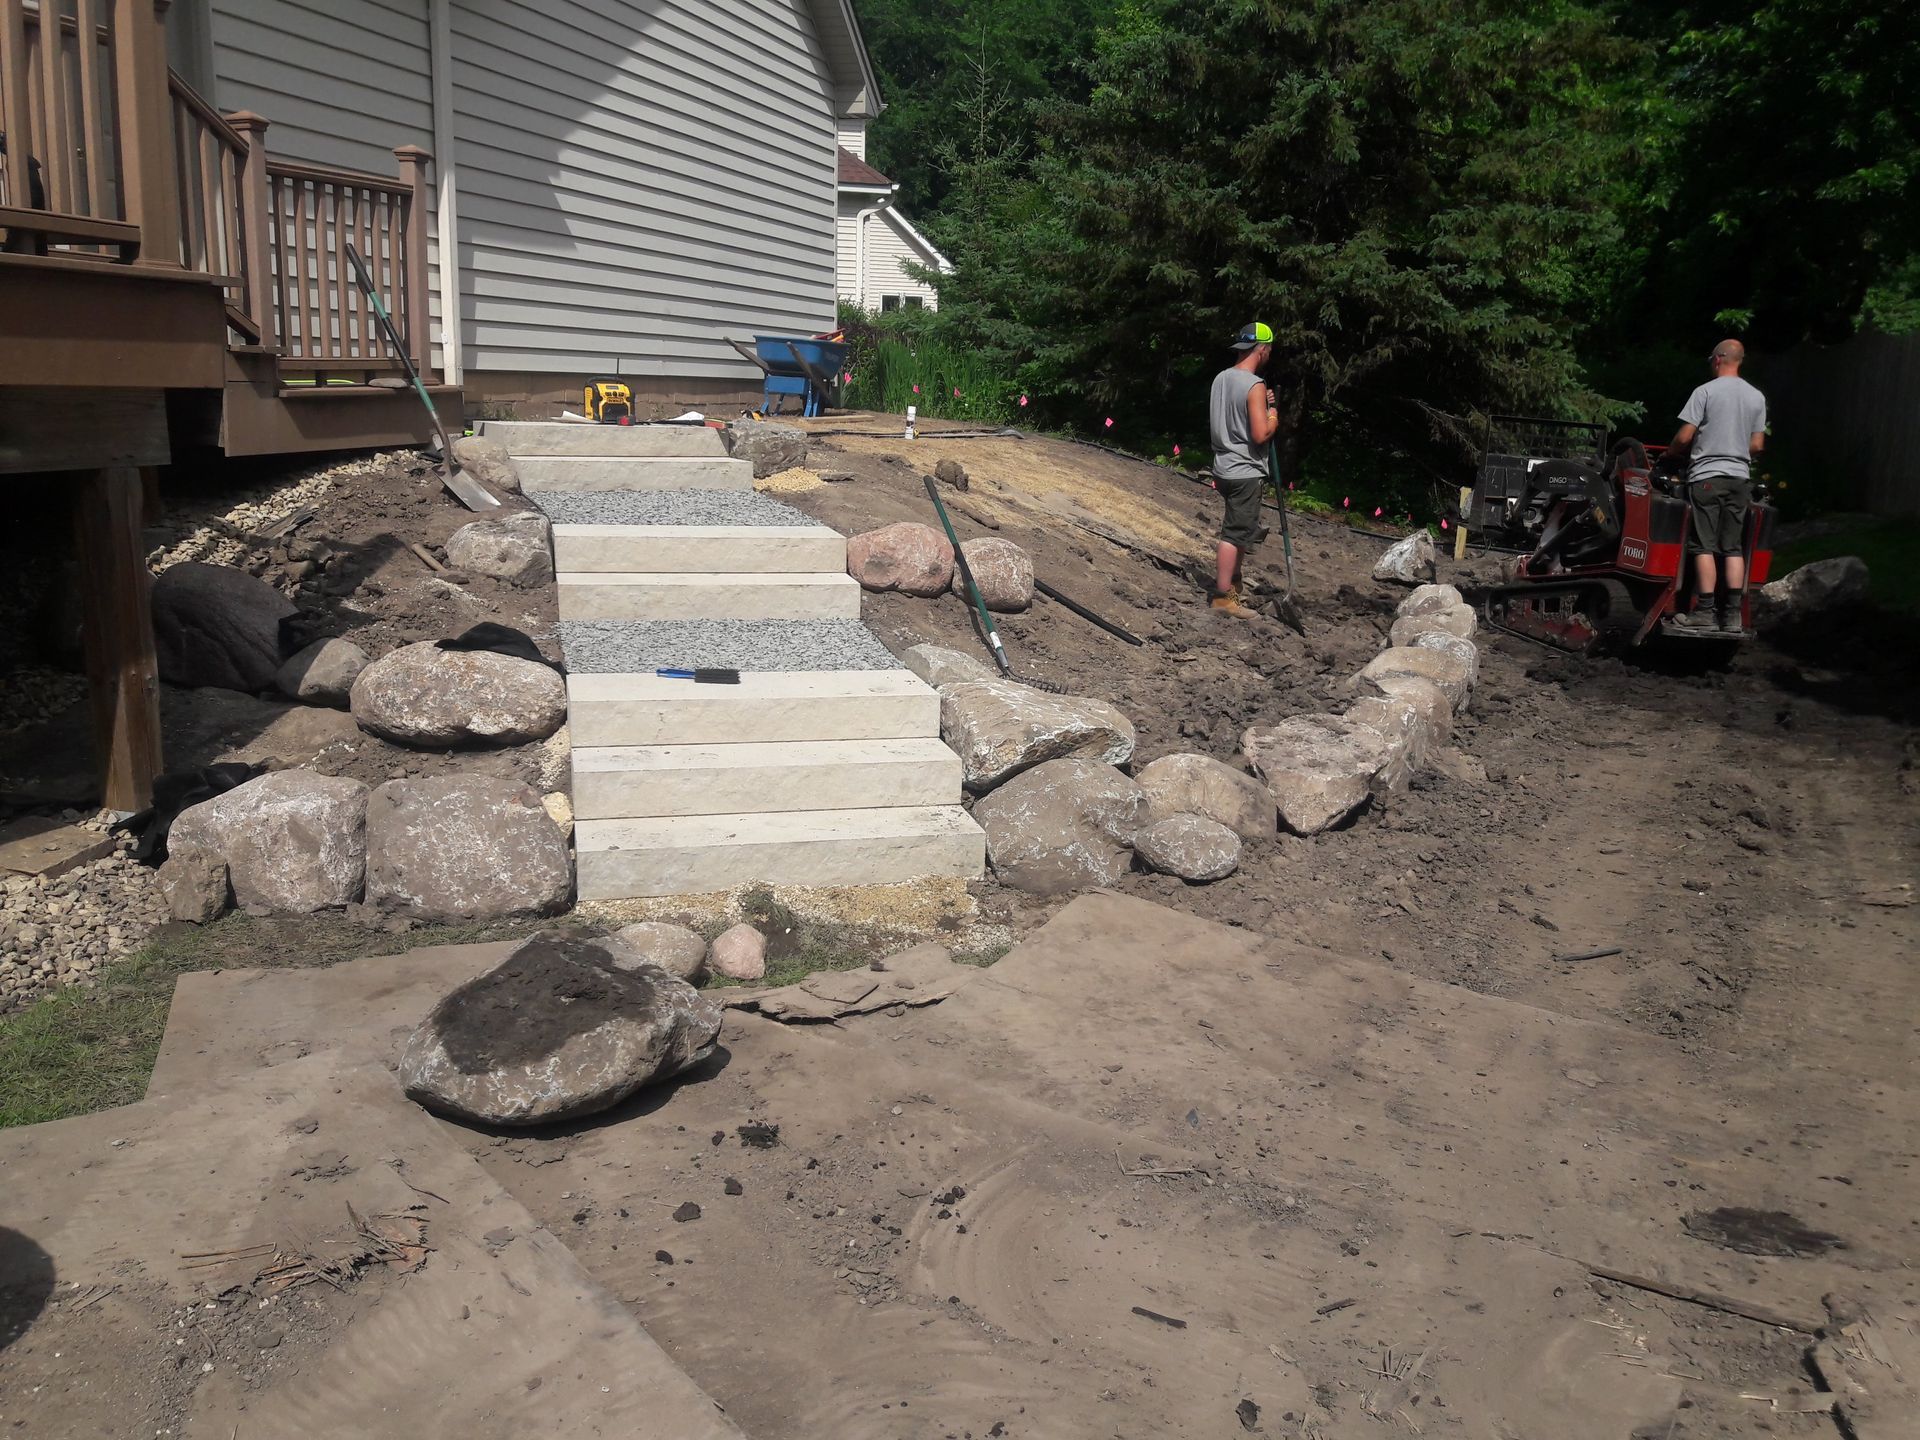
To prepare the site, we removed the sod on the hillside and used protective boards to safeguard the existing lawn while equipment accessed the backyard. A boulder wall was installed at the bottom of the slope to stabilize the grade. From there, step installation began at the lowest point of the hill and progressed upward. Each step location was excavated to allow for 4–6 inches of Class 5 base material, which was leveled and heavily compacted before setting the step. This process ensured long-term stability and consistent elevations as the steps followed the natural grade of the hillside.
Once the steps were in place, steel edging was installed between sets of treads with landscape liner underneath. These areas were then filled with approximately 4 inches of crushed stone, creating a clean, cost-effective walkway between step sections.
Drainage System Installation
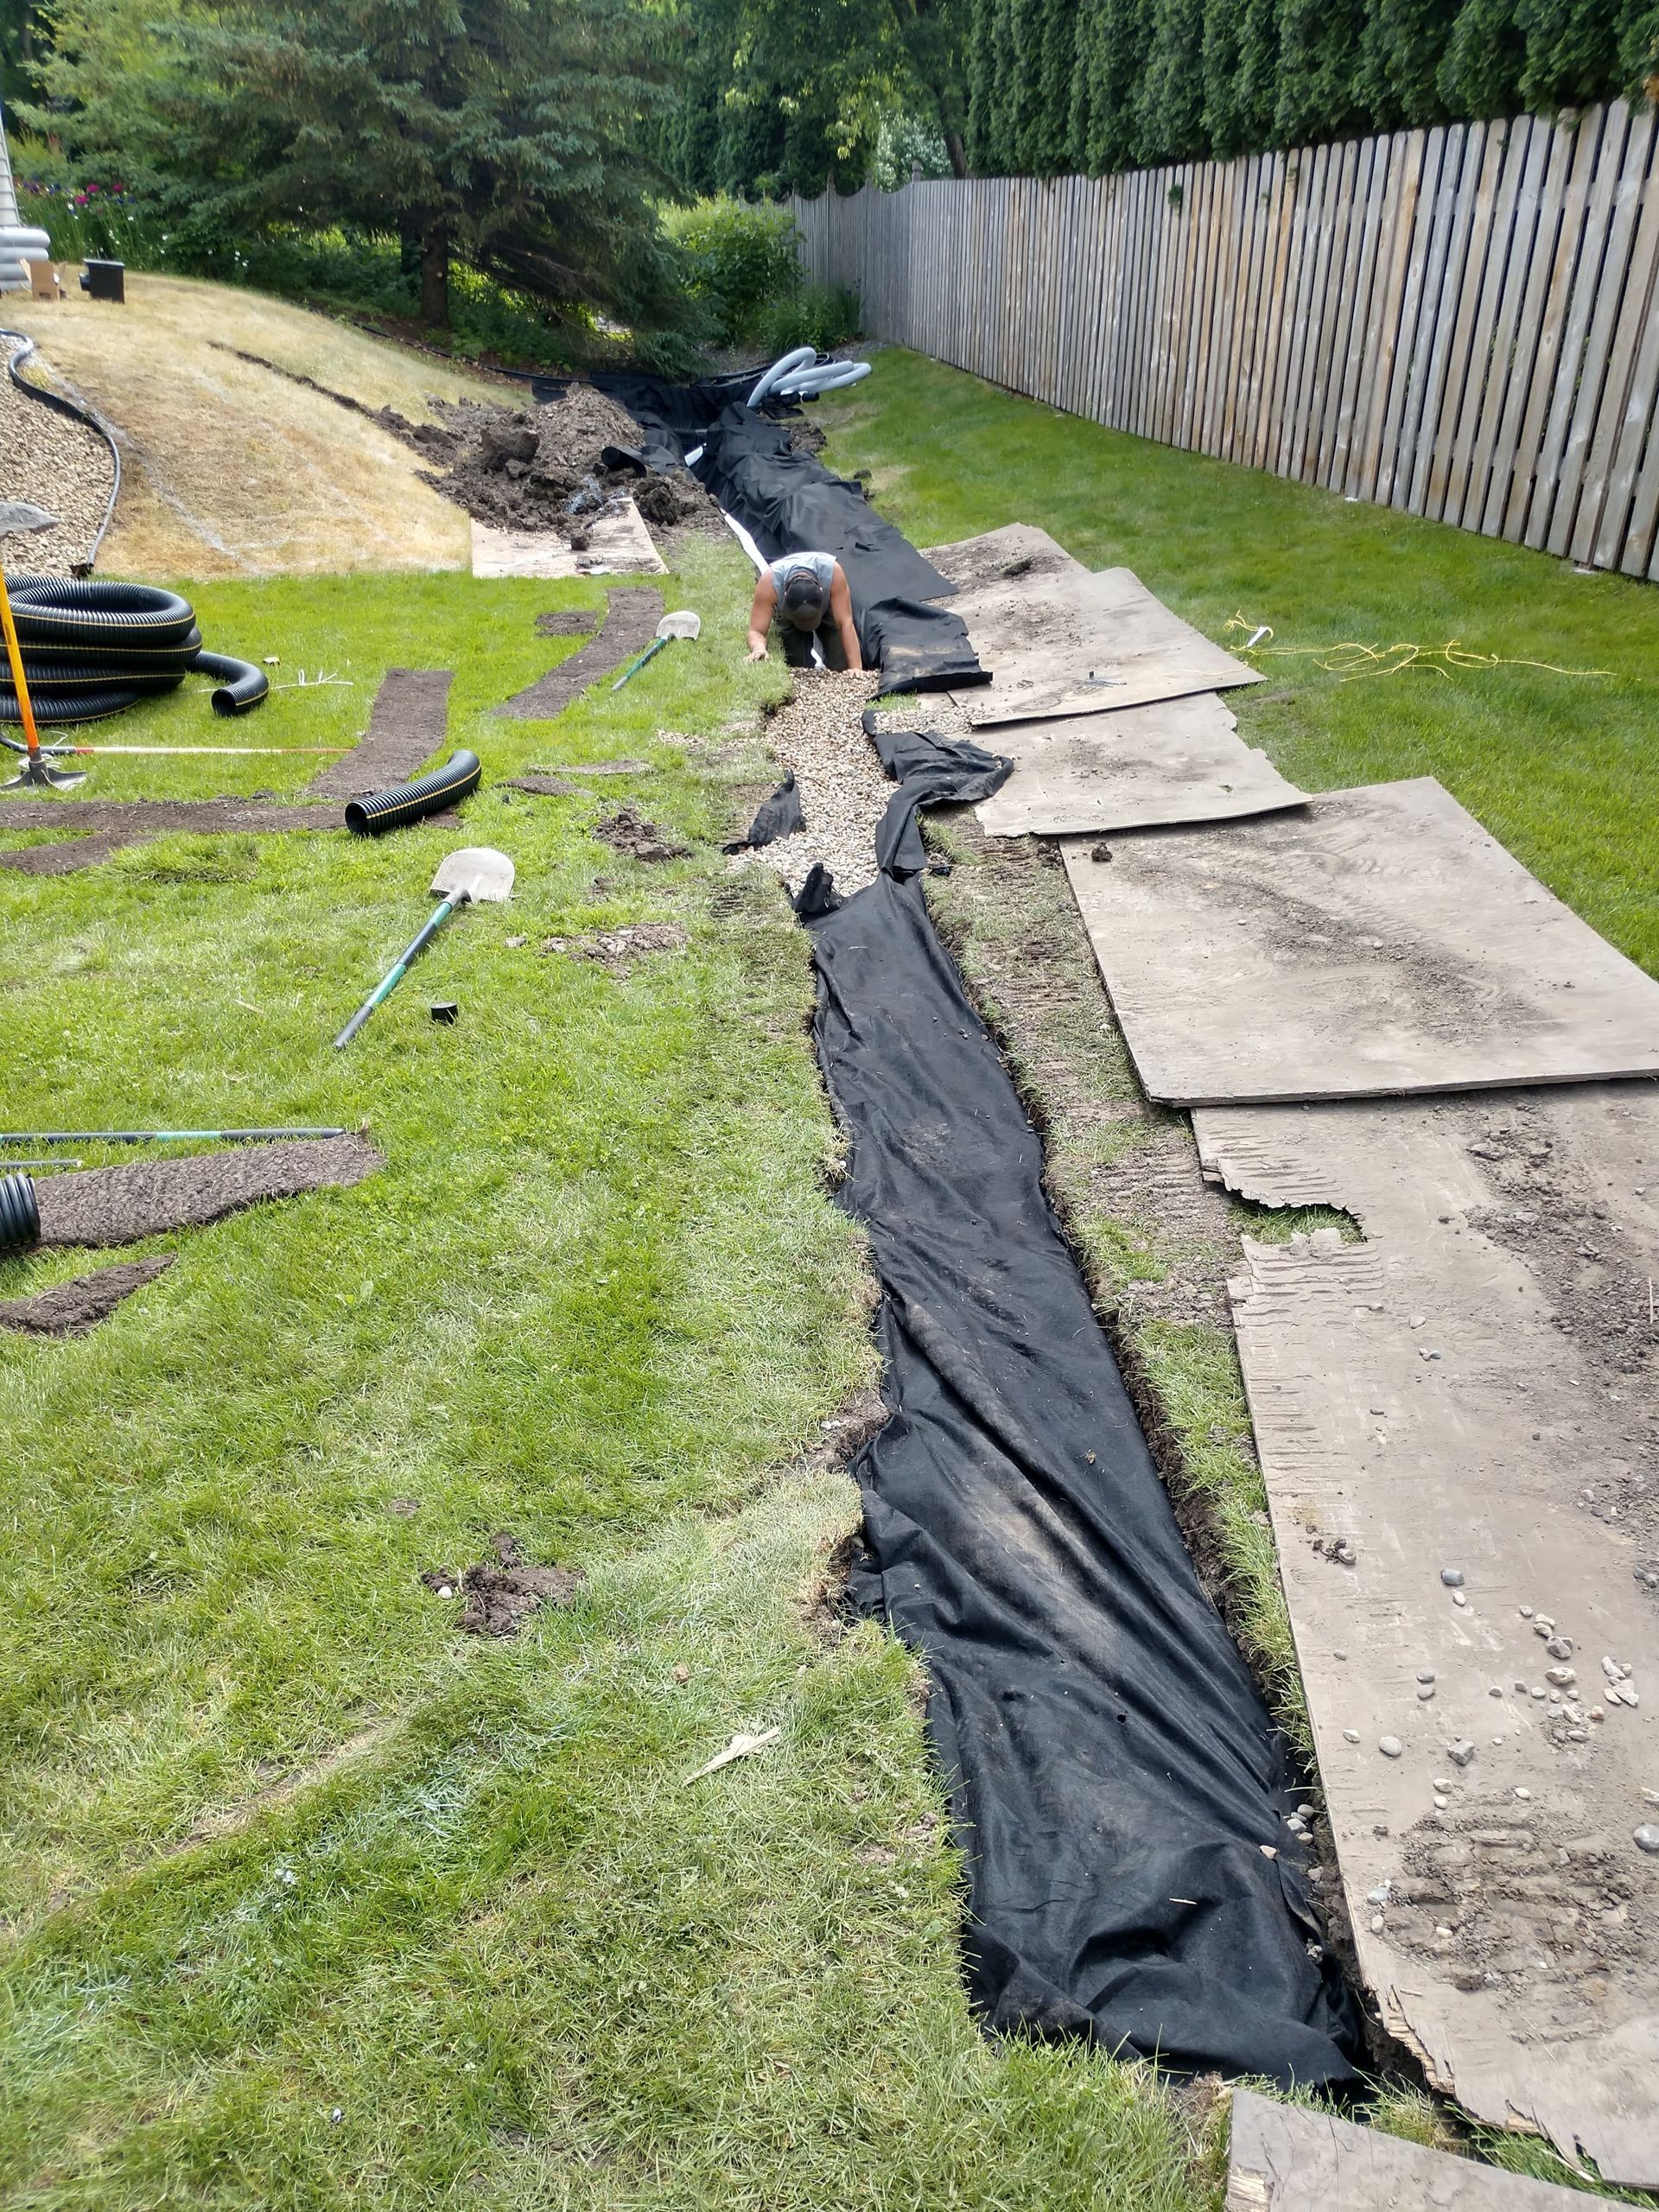
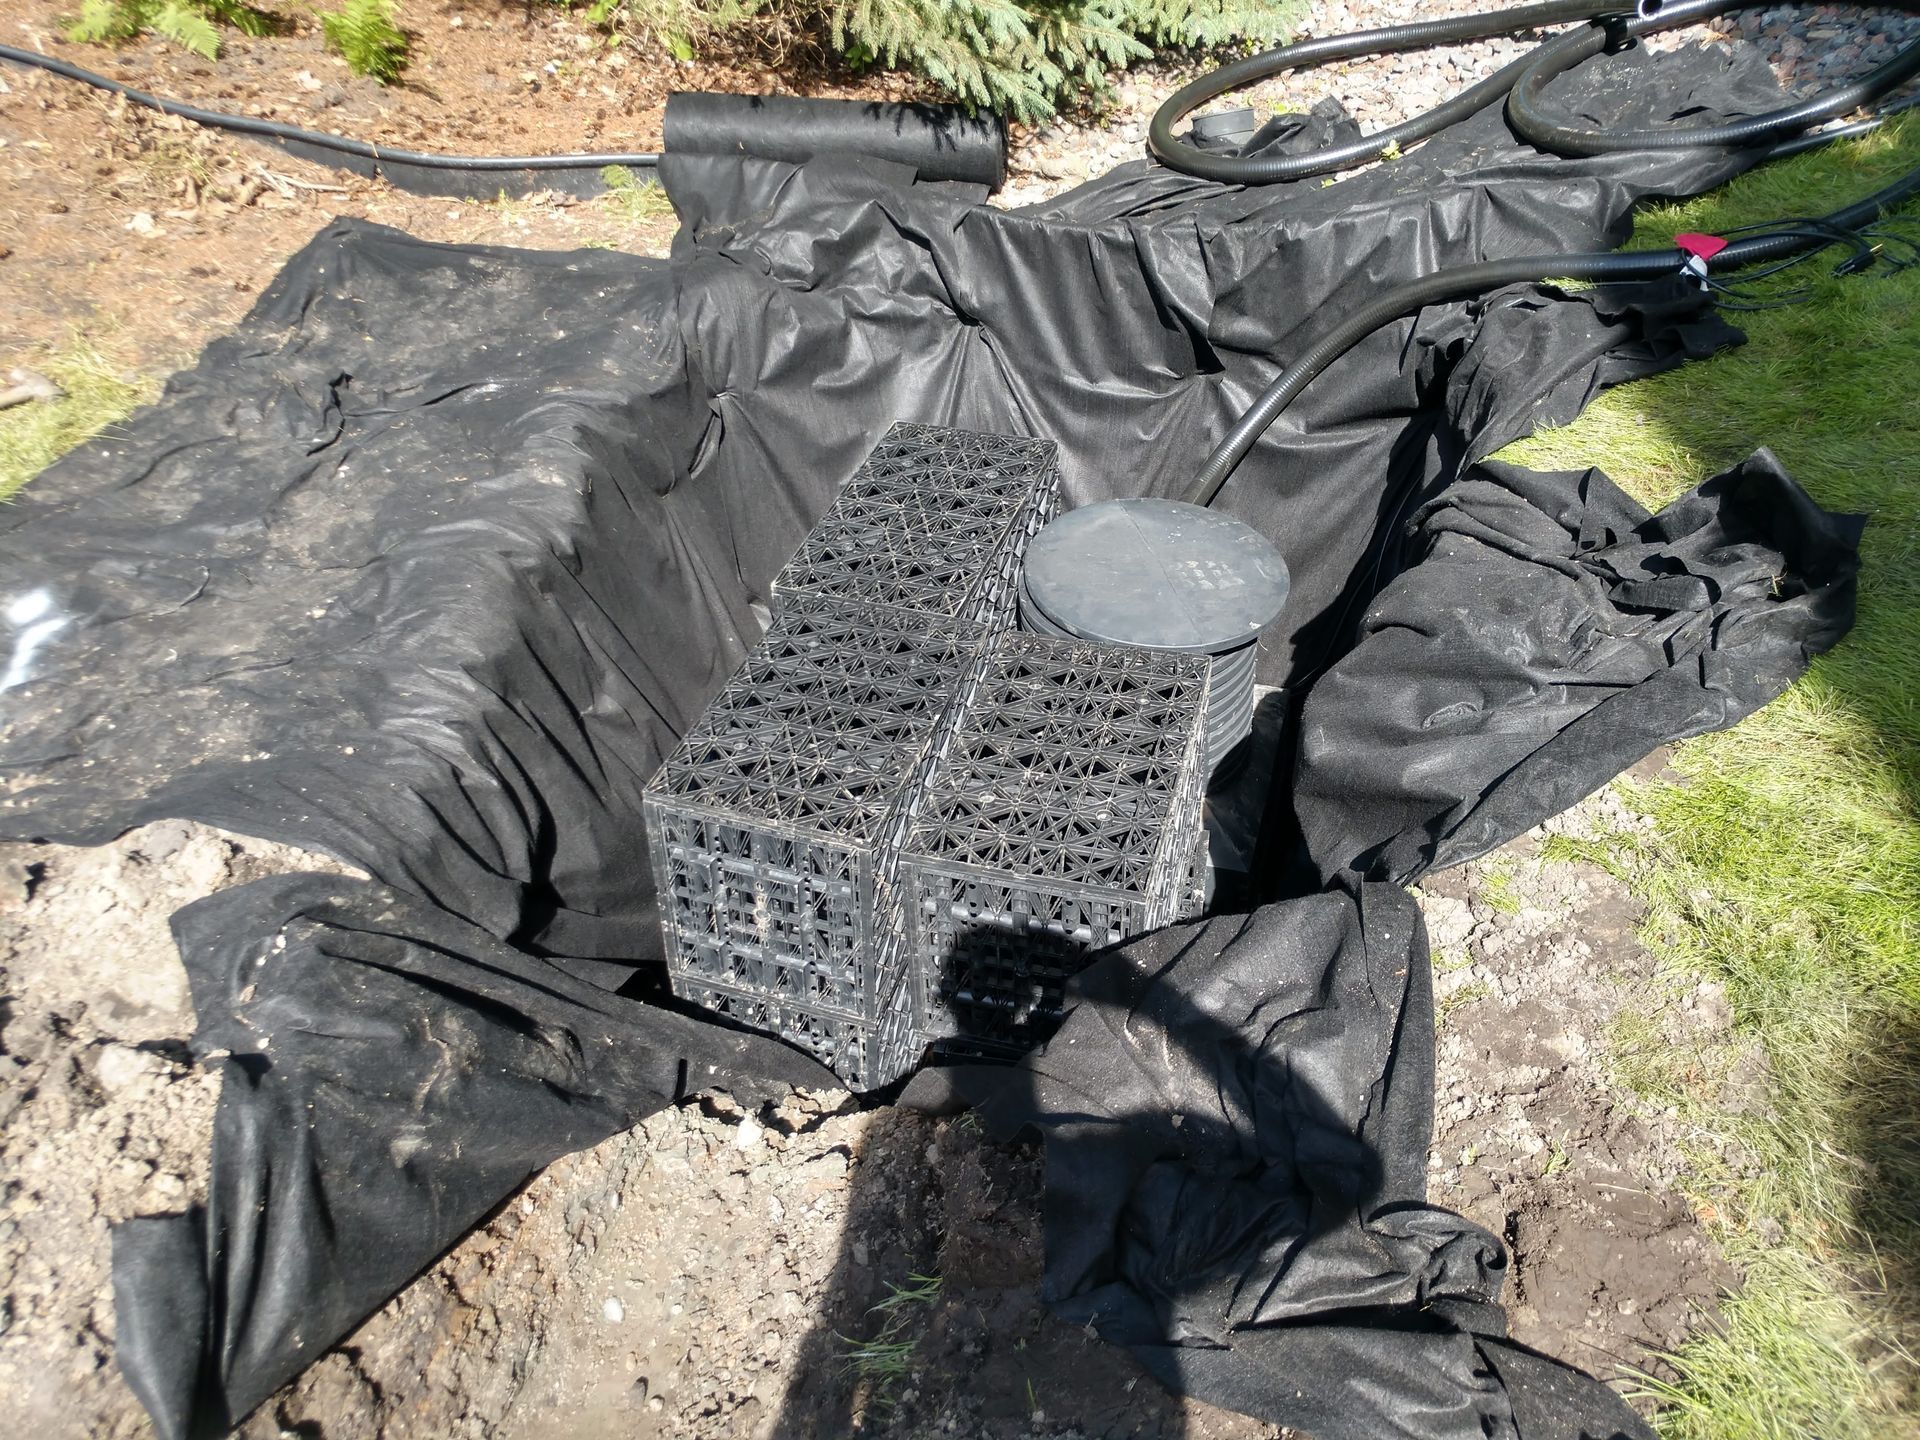
The primary drainage system consisted of a French drain running down the swale. It began at a depth of approximately 12 inches, sloped at a quarter inch per foot to follow the existing swale, and reached a depth of about 24 inches before terminating at a dry well basin. This basin was constructed to include an exterior sump pump for overflow management.
Downspouts were tied into this system using catch basins installed directly below each downspout. Underground drain pipe conveyed water from these basins into the main French drain, ultimately discharging into the dry well at the end of the swale. The sump pump allows excess water to be pumped to the front yard, where it connects directly to the city storm sewer. This solution prevented water from discharging into the neighboring property, which would have occurred without a properly engineered drainage system.
Grading, Planting, and Finishing Work
After all drainage components were installed, KG Landscape re-smoothed the existing swale and performed final grading along its length. A flat, level area was then created at the top of the hillside, providing a functional walkway between the garage’s back utility door and the deck steps. Previously, this area was steep and difficult to navigate; once completed, it became a safe and comfortable path for everyday use.
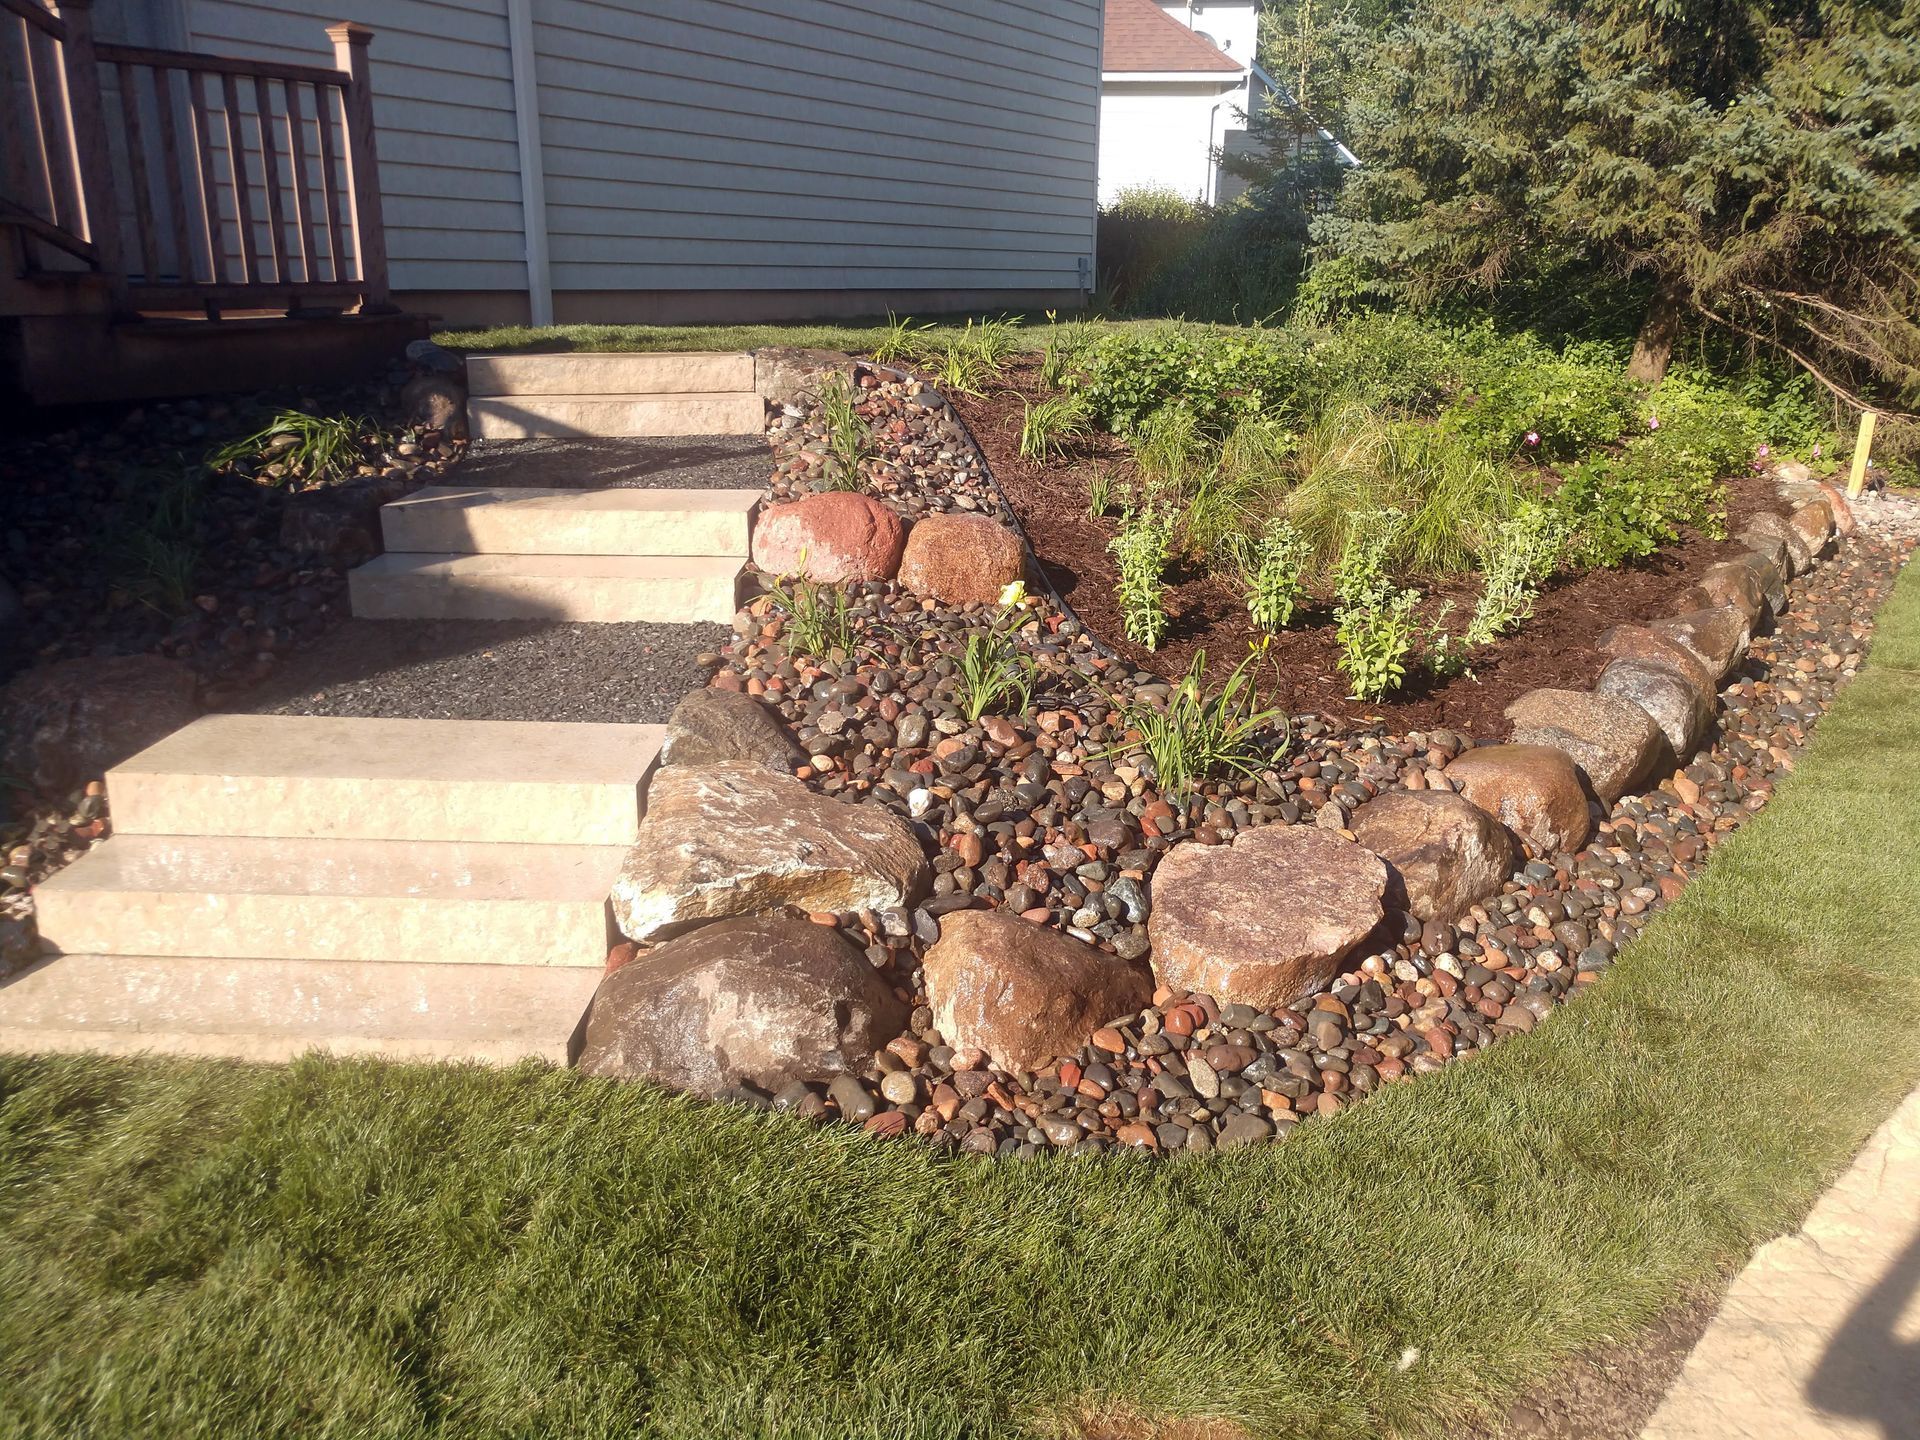
The hillside was finished with a thoughtfully designed planting plan that included sumac, ornamental grasses, flowering ground covers, and perennial plants. These selections were chosen to fill in naturally over time and remain virtually maintenance-free as they mature—ideal for a steep slope where frequent gardening is impractical.
Rock with landscape liner was installed along the steps and in key transition areas to reduce erosion and protect the gravel base used beneath the steps. This attention to detail helps ensure the long-term durability and stability of the installation.
Lawn Restoration
Once the core project was complete, all disturbed lawn areas were repaired. This included top-dressing with soil, installing grass seed, and securing seed blankets to protect against washout during rainfall. The customer was instructed to remove the seed blankets after 1–2 weeks, once germination had begun. Early removal prevents the netting from becoming embedded in the turf, which can otherwise take years to decompose or fully cover.
Step # 4: Project Completion
All of the work outlined in the proposal was completed and thoroughly tested by running water through every component of the drainage system. This allowed us to verify proper flow, confirm all connections were functioning as designed, and ensure the system was operating at full capacity. By the end of testing, both our team and the homeowner were fully confident that the drainage issues had been resolved in a high-quality, reliable, and long-lasting manner.
Following completion, the results were immediately noticeable. Even after large rain events, the lawn remained dry and firm—often showing no standing water as soon as the next day. Areas that previously held water and became muddy now drain efficiently, allowing the turf to stay healthy and usable. The improved soil stability also eliminated the erosion issues that had been affecting the hillside and surrounding landscape.
We have remained in contact with the customer since the project was completed in early 2018, and the system has continued to perform exactly as intended. They report no recurring puddling, significantly firmer grass throughout the backyard, and no ongoing erosion concerns. The consistent performance over multiple seasons and heavy rain events highlights the effectiveness of the design and reinforces the long-term value of installing a properly engineered drainage solution.

We’ve never seen an outdoor drainage issue we couldn’t fix. Do you have an exterior drainage problem? Call us today to schedule an outdoor drainage consultation at 763-568-7251. You can also submit a quote request to get in contact with us!