
How To Care For A Newly Planted Tree
Trees are an investment for any homeowner or property manager. With a few exceptions, they’re the most expensive single item in any planting or landscape design. That means taking care of a newly planted tree in the first year or two and beyond is incredibly important. Trees also grow slowly so any missteps are costly in the eventual growth. Keep these tips in mind about wrapping trees, mulch rings, and watering and you’ll be all set to have a beautiful tree now and for many years to come.
Watering
This is an incredibly crucial step that people often have misconceptions about. Here’s how easy it is, water the tree 10 gallons of water each week for every inch in diameter of the tree. So many new trees we plant are 2.5″ in diameter. That means each week, that tree should be watered about 25 gallons. There are a couple easy ways to water like this. You can use an empty 1 gallon jug of milk or a 5 gallon bucket from a hardware store. Drill some holes in the bottom of the jug or bucket and you have a super easy way to water for specific amounts. Many hardware stores also sell tree watering bags that wrap around the tree. The bags have tiny holes in them to water the tree slowly over time. These are more expensive than the bucket or milk jug route but work just as well!
Another thing to keep in mind for the watering is you want the water to penetrate deep into the roots. Don’t lightly water for 15 minutes at a time. Soak the ground so the roots grow deep. Rain water during the week counts for the watering so if it’s a particularly wet week, cut back on the watering a bit. If it’s super dry out, maybe water a little extra. This can seem like a lot of water but trees, especially new ones, are very thirsty things!
Mulch Rings
This connects with the watering schedule mentioned above. Adding a mulch ring around a newly planted tree keeps the soil around the tree most for longer periods of time. The biggest danger with a new tree is letting it dry out too much, thus starving it of it’s nutrients. Installing a mulch ring around the tree will safeguard the roots from drying out too much.
Depending on the type of tree, the mulch ring should be 2-3′ in diameter (bigger for evergreen type trees). We use a recycled hardwood mulch but any mulch will do. One tip we’ve seen people do incorrectly, don’t put fabric underneath the mulch. The mulch is supposed to deteriorate into the soil and allow water through so don’t put fabric down!
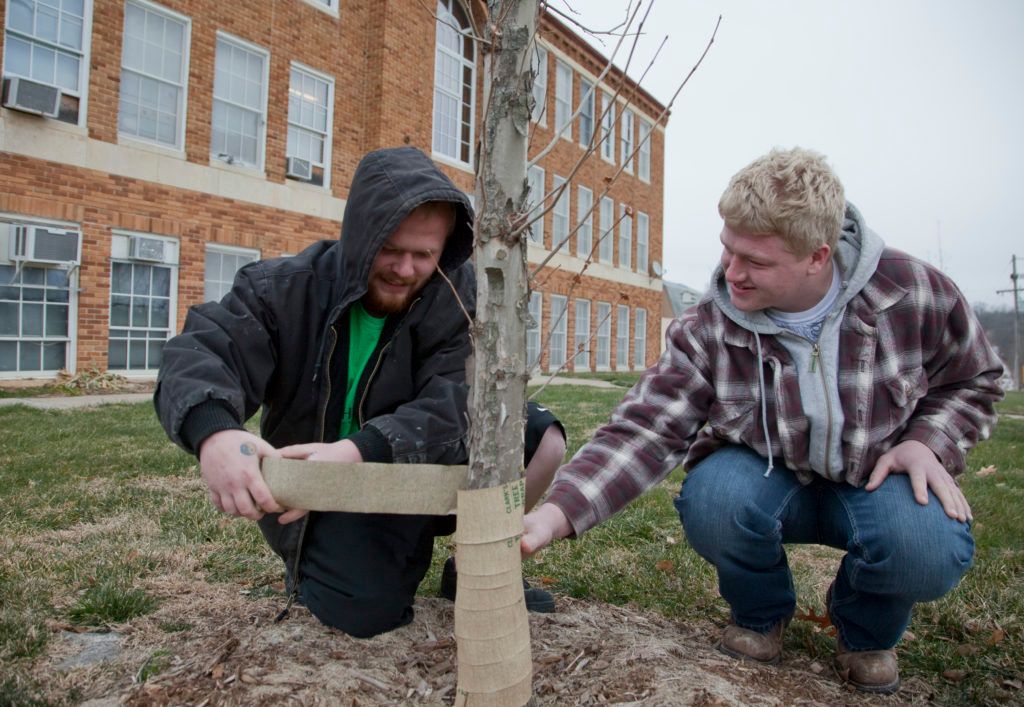
Wrapping Trees
For young trees in a cold environment, wrapping the trunk of the tree in the winter is an important step that many people skip. You want to start at the bottom of the tree and wrap up the trunk to the lowest branch. You can use fabric or plastic wrapping from a hardware store, just make sure it’s securely tied to the tree.
Wrapping the tree is important because of the warm and cool cycle that can happen in the winter. The cold winter sun can sometimes warm the trunk of the tree and cause the sap to loosen up. Then the sun will set and the sap will freeze. this freeze-thaw can cause structural damage to the trunk of the tree. Wrap your tree late in the fall just before or after the first freeze, then unwrap it after the last freeze in spring. It’s a small thing to do that will greatly increase the appearance and health of your young tree. Do this the first 2-5 winters of the tree.
If you’re looking for help with tree installations, we strongly suggest you consult with a trusted, experienced landscape designer
who can help you get the most value for your money now and in the future.
The post How To Care For A Newly Planted Tree
appeared first on KG Landscape Management.
Ready to Start on Your Next Project?
Call us at (763) 568-7251 or visit our quote page.

The legendary architect Louis Sullivan coined a phrase that has driven architecture and design ever since: "form follows function." While aesthetics are critical to buildings and landscapes alike, that physical beauty must always remain secondary to the fundamentals of good design. In Shoreview, Minnesota, just outside St. Paul , we encountered a landscape where, unfortunately, function followed form. Here, the realities and principles of effective drainage were downstream of their original builder's aesthetic choices. That meant water from snowmelt and rainfall was streaming into parts of the lawn where it wasn't meant to be. The standing water that had been allowed to collect in the back and side yards was putting a considerable amount of the property out of play. In order to reclaim usable space and rethink the way the land handled water, this Shoreview homeowner entrusted KG Landscape with identifying key issues, presenting potential solutions, and doing the necessary work the client decided upon to restore their lawn.

On the shores of Lake Minnetonka, perhaps the most famous of Minnesota's 10,000 lakes, an Orono, Minnesota homeowner was struggling with a back yard that was becoming more marsh than yard. The yard was a scenic one. The back porch opened up to the top of a small hill, which rolled down toward the lakefront and the boathouse. This flat space between the hill and the water would be ideal for backyard barbecues, some low-stakes games of bocce and badminton, or simply a spot to lay down a towel and get some summer reading done. Instead, this area was too waterlogged to enjoy. The runoff from the hilltop combined with unfavorable soil composition were limiting the use of the yard, closing off space while even diminishing the quality of the turf. How would this homeowner be able to reclaim this unusable land without disrupting the Lake Minnetonka shoreline that made the property so attractive? To find a solution, they turned to KG Landscape.

Can you use compost as lawn fertilizer in Minnesota? Learn how compost feeds turf, how to apply it, and where it fits. Get a free quote.

Organic weed control for Minnesota lawns: what works, what doesn't, and how to manage weeds without harsh chemicals. Get a quote.

Keep your lawn and your pets safe. Pet-safe lawn care tips for Minnesota yards, from products to timing. Get a free quote.

Looking for the best organic lawn fertilizer in Minnesota? See top options, how they feed your turf, and what KG uses. Get a quote.

Is compost a fertilizer? Learn what compost does for your Minnesota lawn, how it differs from fertilizer, and when to use it. Get a quote.

Compost feeds the soil, fertilizer feeds the grass. Learn which your Minnesota lawn needs, when to use each, and how to apply both. Get a quote.

Eco-friendly lawn care tips for Twin Cities yards: cut chemicals, save water, and build healthy soil naturally. Get a free quote.

Simple, proven lawn care tips for Minnesota yards: mowing, watering, feeding, and building healthy soil that lasts. Get a free quote.