
How We Designed & Built a Permanent Sump Pump Drainage Solution Using a Dry Well for a Home in Minneapolis
Intro
This case study documents the drainage solution we designed and built for a Minneapolis residential property with ongoing sump pump discharge issues.
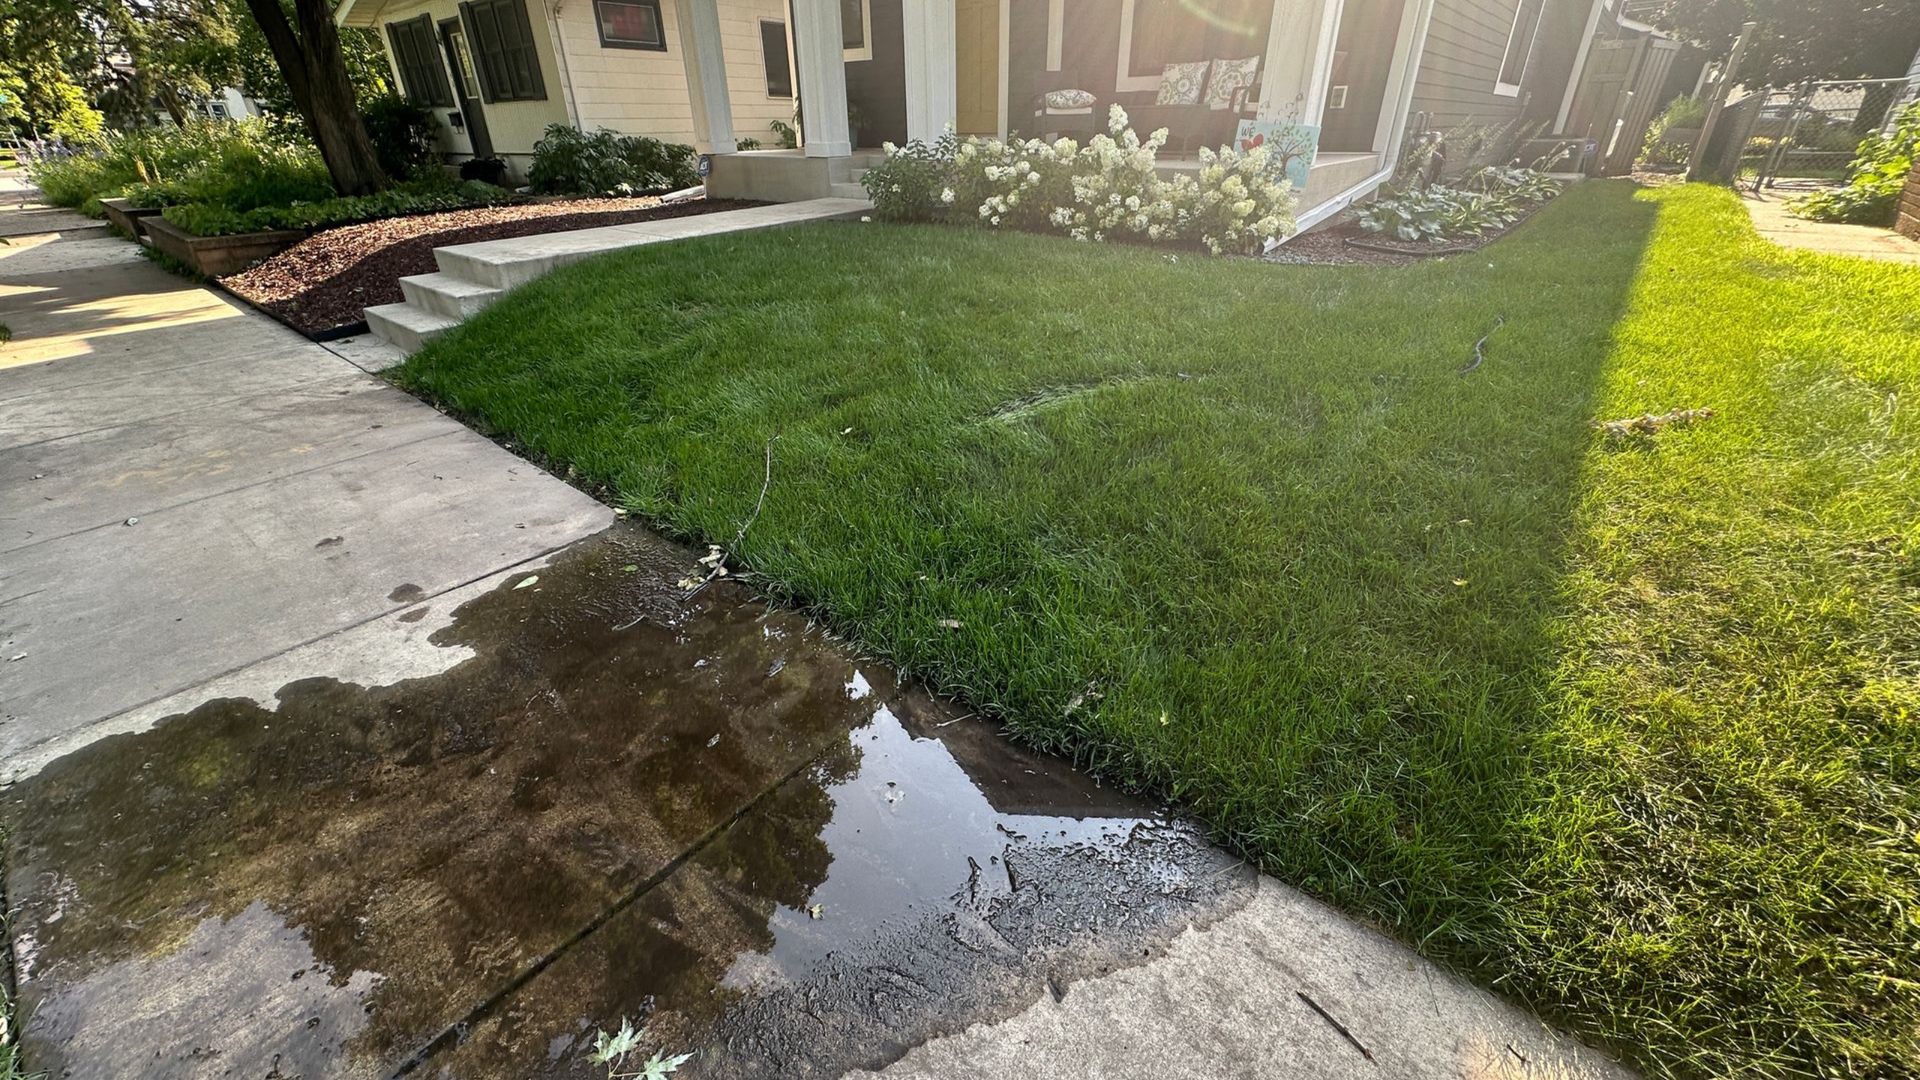
With no natural low point on the property where sump discharge water could be drainage to, the sump pump water regularly caused pooling, muddy conditions, and ongoing frustration for the homeowner. Most problematic, were the temporary sump line hoses stretched across the yard, and ice buildup near sidewalks during winter.
These problems were not caused by the sump pump itself, but by the lack of a reliable, year-round way to manage discharged water on a tight city lot.
This page focuses on the
solution and execution. The site evaluation, constraints, and reasons common fixes failed are documented separately in part #1 of this case study, which we provide a link to further down.
About the Author
I’m Kent Gliadon, founder of KG Landscape and a graduate of the University of Minnesota Landscape Design program. For over 20 years, I’ve focused on integrating well-planned landscape design and installation work with properly engineered outdoor drainage solutions.
I believe discerning homeowners deserve landscaping & drainage renovations that are carefully planned from the beginning—accounting for water movement, grading, soils, hardscaping, and future use—so problems are prevented before they occur. These case studies explain how and why specific solutions are implemented and what it takes to build landscapes that truly last a lifetime.
Project Snapshot
- Project Location: Minneapolis, MN
- Property Type: Residential
- Primary Issue: Sump pump discharge water pooling and freezing
- Solution Installed: Underground sump pump drainage system with dry well
🔍 Start Here: Understanding the Problem & Options We Considered First
Before reviewing the solution, it helps to understand the site conditions and problems that led to it. Part 1 of this case study explains the sump pump discharge issues in detail and the problems it was causing, including pooling, freezing, and why temporary fixes failed.
👉 Read Part #1 of this case study to see the full problem & site evaluation
The Chosen Drainage Solution Strategy
We Selected a Dry Well as the Best Solution
Because the drainage problems happening in this yard were outlined in great detail in the part #1 case study, we're starting this part#2 case study with the how implemented the chosen solution.
Once the site evaluation was complete, the goal was clear: manage sump pump water in a way that worked year-round without relying on surface discharge for the sump pump water specifically, which was already causing pooling and ice build up on the sidewalk.
Because there was no existing safe surface outlet location due to discharge water creating safety and liability concerns, the solution needed to function underground.
The final drainage solution plan we came up with, combined grading improvements with a dedicated underground dry well drainage system sized for active sump pump flow volumes in Minneapolis.
How we Selected the Best Location in this Yard to Install the New Dry Well
When we first evaluated this site, it was clear the project would require a dry well to safely store and manage water discharged by an overactive sump pump. Proper placement was critical to ensure long-term performance and to prevent future moisture-related issues around the home.
Key Criteria for Dry Well Placement
1. Distance from the House Foundation
Our primary goal was to locate the dry well as far from the home’s foundation as possible. We wanted to avoid introducing additional moisture into the soil near the foundation, since excess groundwater in this area was already contributing to the sump pump’s overactivity.
2. Avoiding Nearby Structures
We also ruled out locations near the garage. Adding moisture near the garage foundation could lead to freeze–thaw damage over time, potentially affecting both the foundation walls and the concrete floor slab.
3. Elevation and Overflow Management
Another critical consideration was what would happen if the dry well ever reached capacity. For safety and reliability, the dry well must be:
- Lower in elevation than the water source, allowing gravity to move water downhill through the underground pipe.
- Positioned so overflow water can safely exit the system and drain away from the house, garage, and hardscape if extreme conditions occur.
Placing the dry well at a lower elevation also improves system efficiency. Only the portion of the dry well below the incoming water level contributes to drainage. If a dry well is level with—or higher than—the discharge point, it would require significantly deeper excavation to function properly.
Front Yard vs. Backyard Evaluation
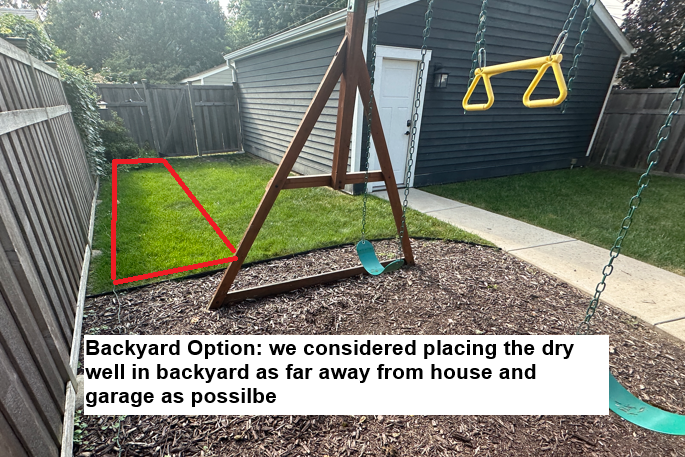
Backyard Option (Rejected)
We considered placing the dry well in the backyard, but this area was nearly level with the sump pump discharge elevation. As a result:
- The dry well would have needed to be excavated to approximately 6 feet deep.
- The bottom 4 feet would be filled with drainage stone.
- The discharge pipe would enter roughly 2 feet below grade, followed by 2 feet of soil cover above the dry well.
This approach required substantially more excavation and labor. Additionally, because the backyard sat level with the discharge point, there was no safe overflow path if the system ever became overfilled. While we design dry wells larger than necessary for long-term reliability, we always include extra protection by planning for controlled overflow whenever possible.
Front Yard Option (Preferred)
The front yard was a much better fit from an elevation standpoint. At the city sidewalk, the front yard sat approximately 24 inches lower than the sump pump discharge at the house. This allowed:
- Better gravity flow through the drain pipe
- Improved dry well performance
- A safer opportunity for overflow away from the structure
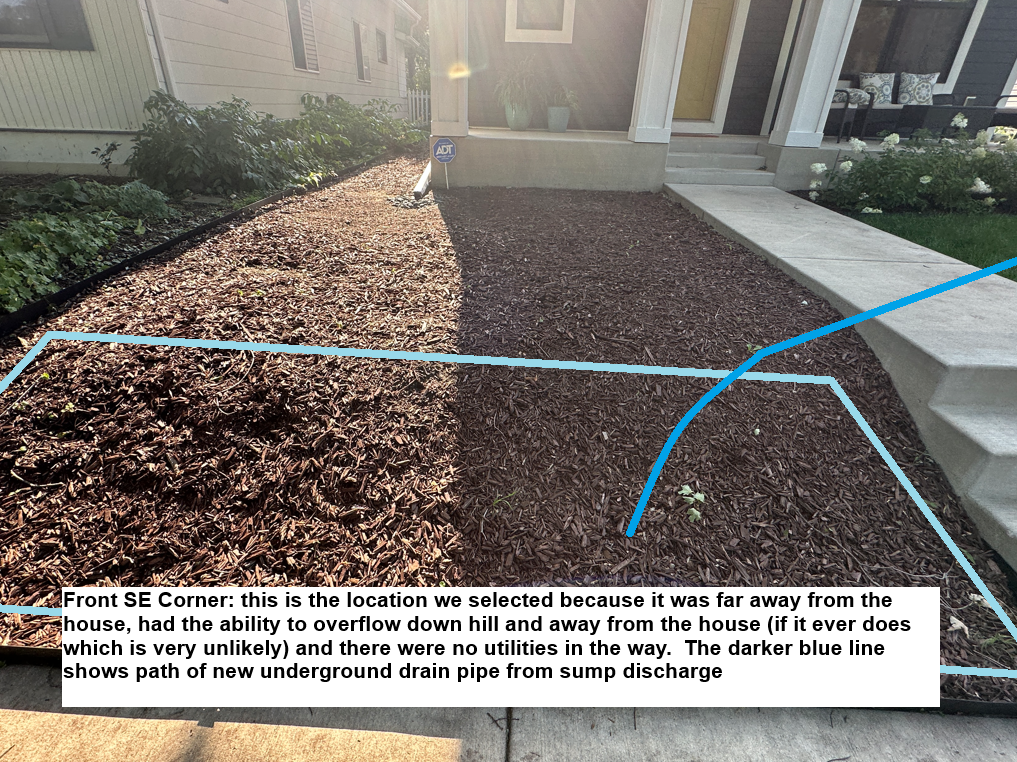
Below: See During Pictures of the Dry Well Locations We Considered
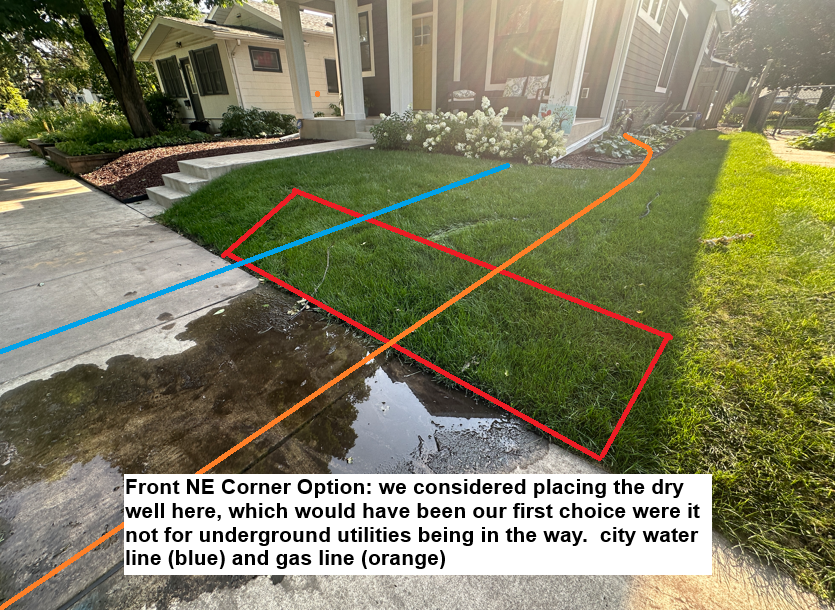
Final Dry Well Location Decision
The ideal location was initially the front northeast corner of the yard. However, this area contained both water and gas utility lines directly within the proposed excavation zone. Since the dry well would be approximately 4 feet deep, installing it there posed an unacceptable risk of utility damage during excavation with a mini excavator.
To avoid these hazards, we ultimately selected the front southeast corner of the yard. This location met all performance and safety criteria, though it required running the drain pipe beneath the sidewalk from the north side of the house to reach the final dry well location.
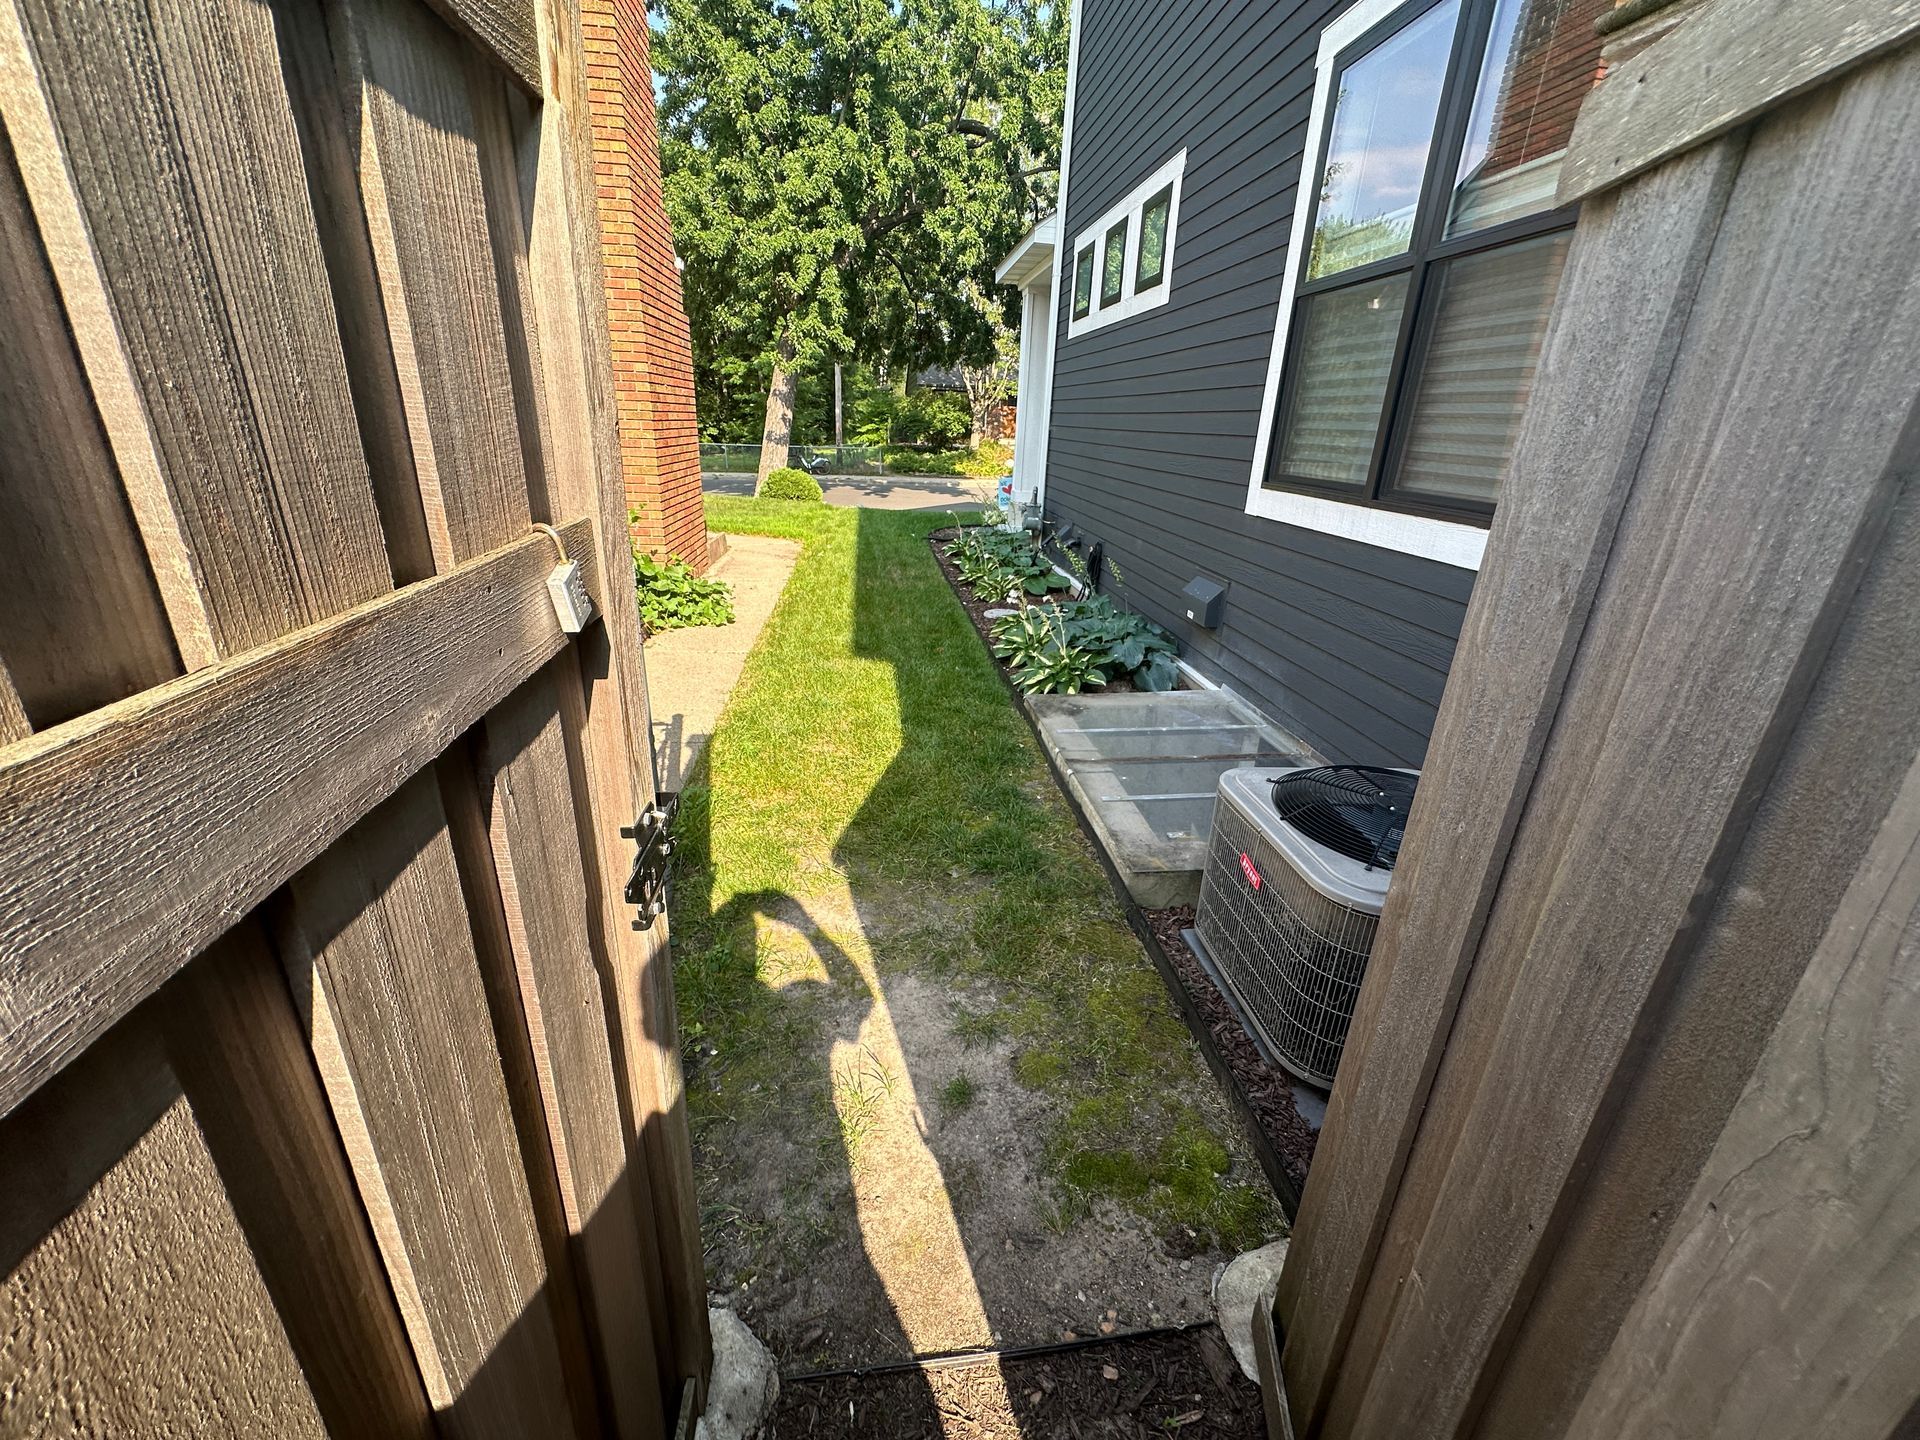
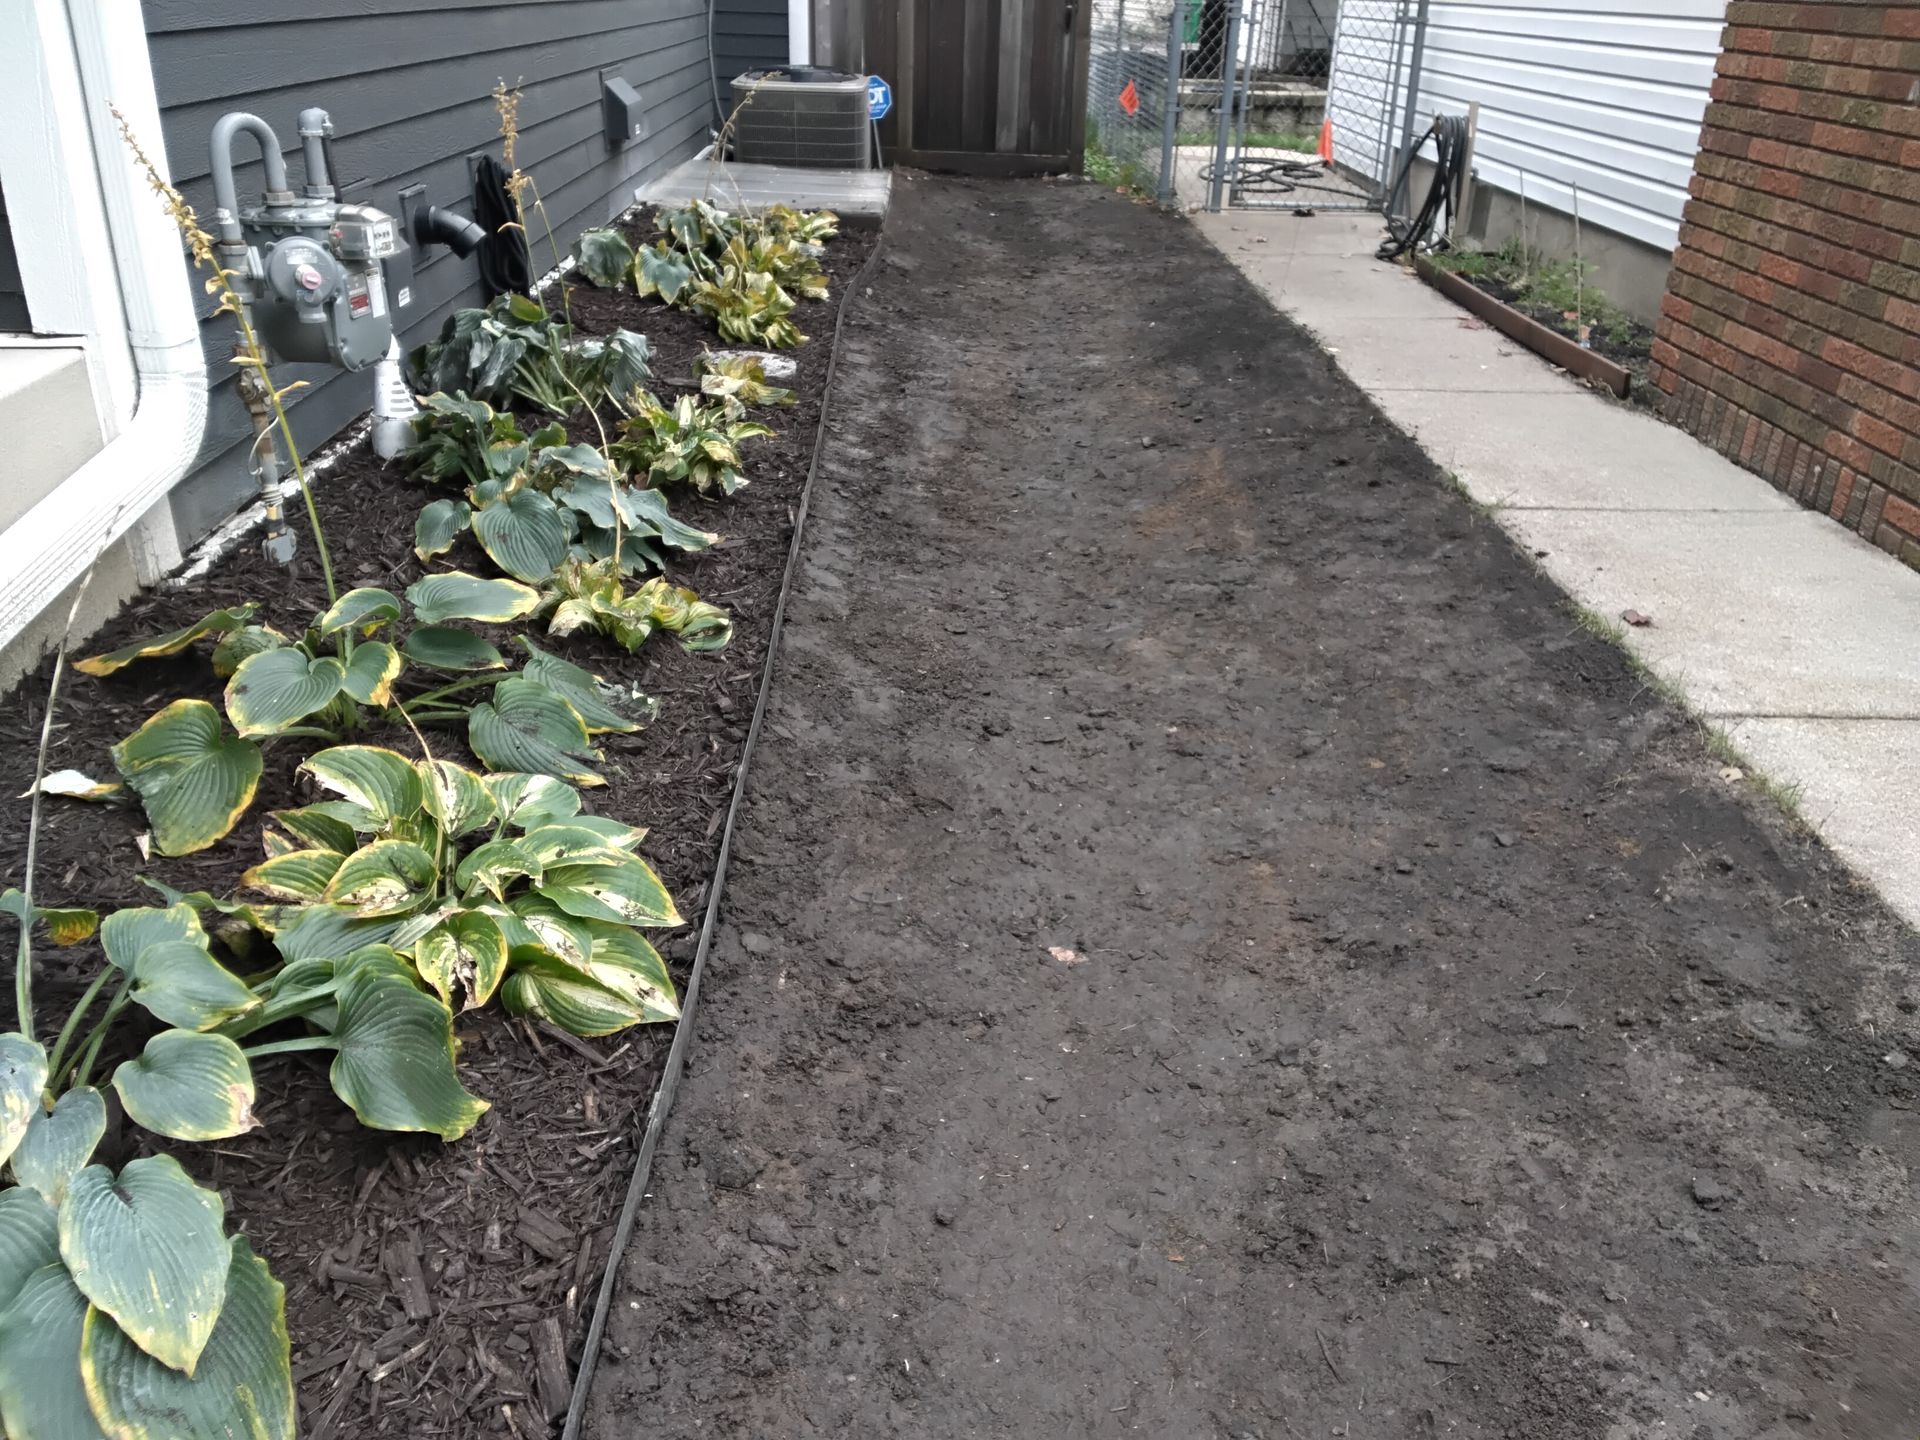
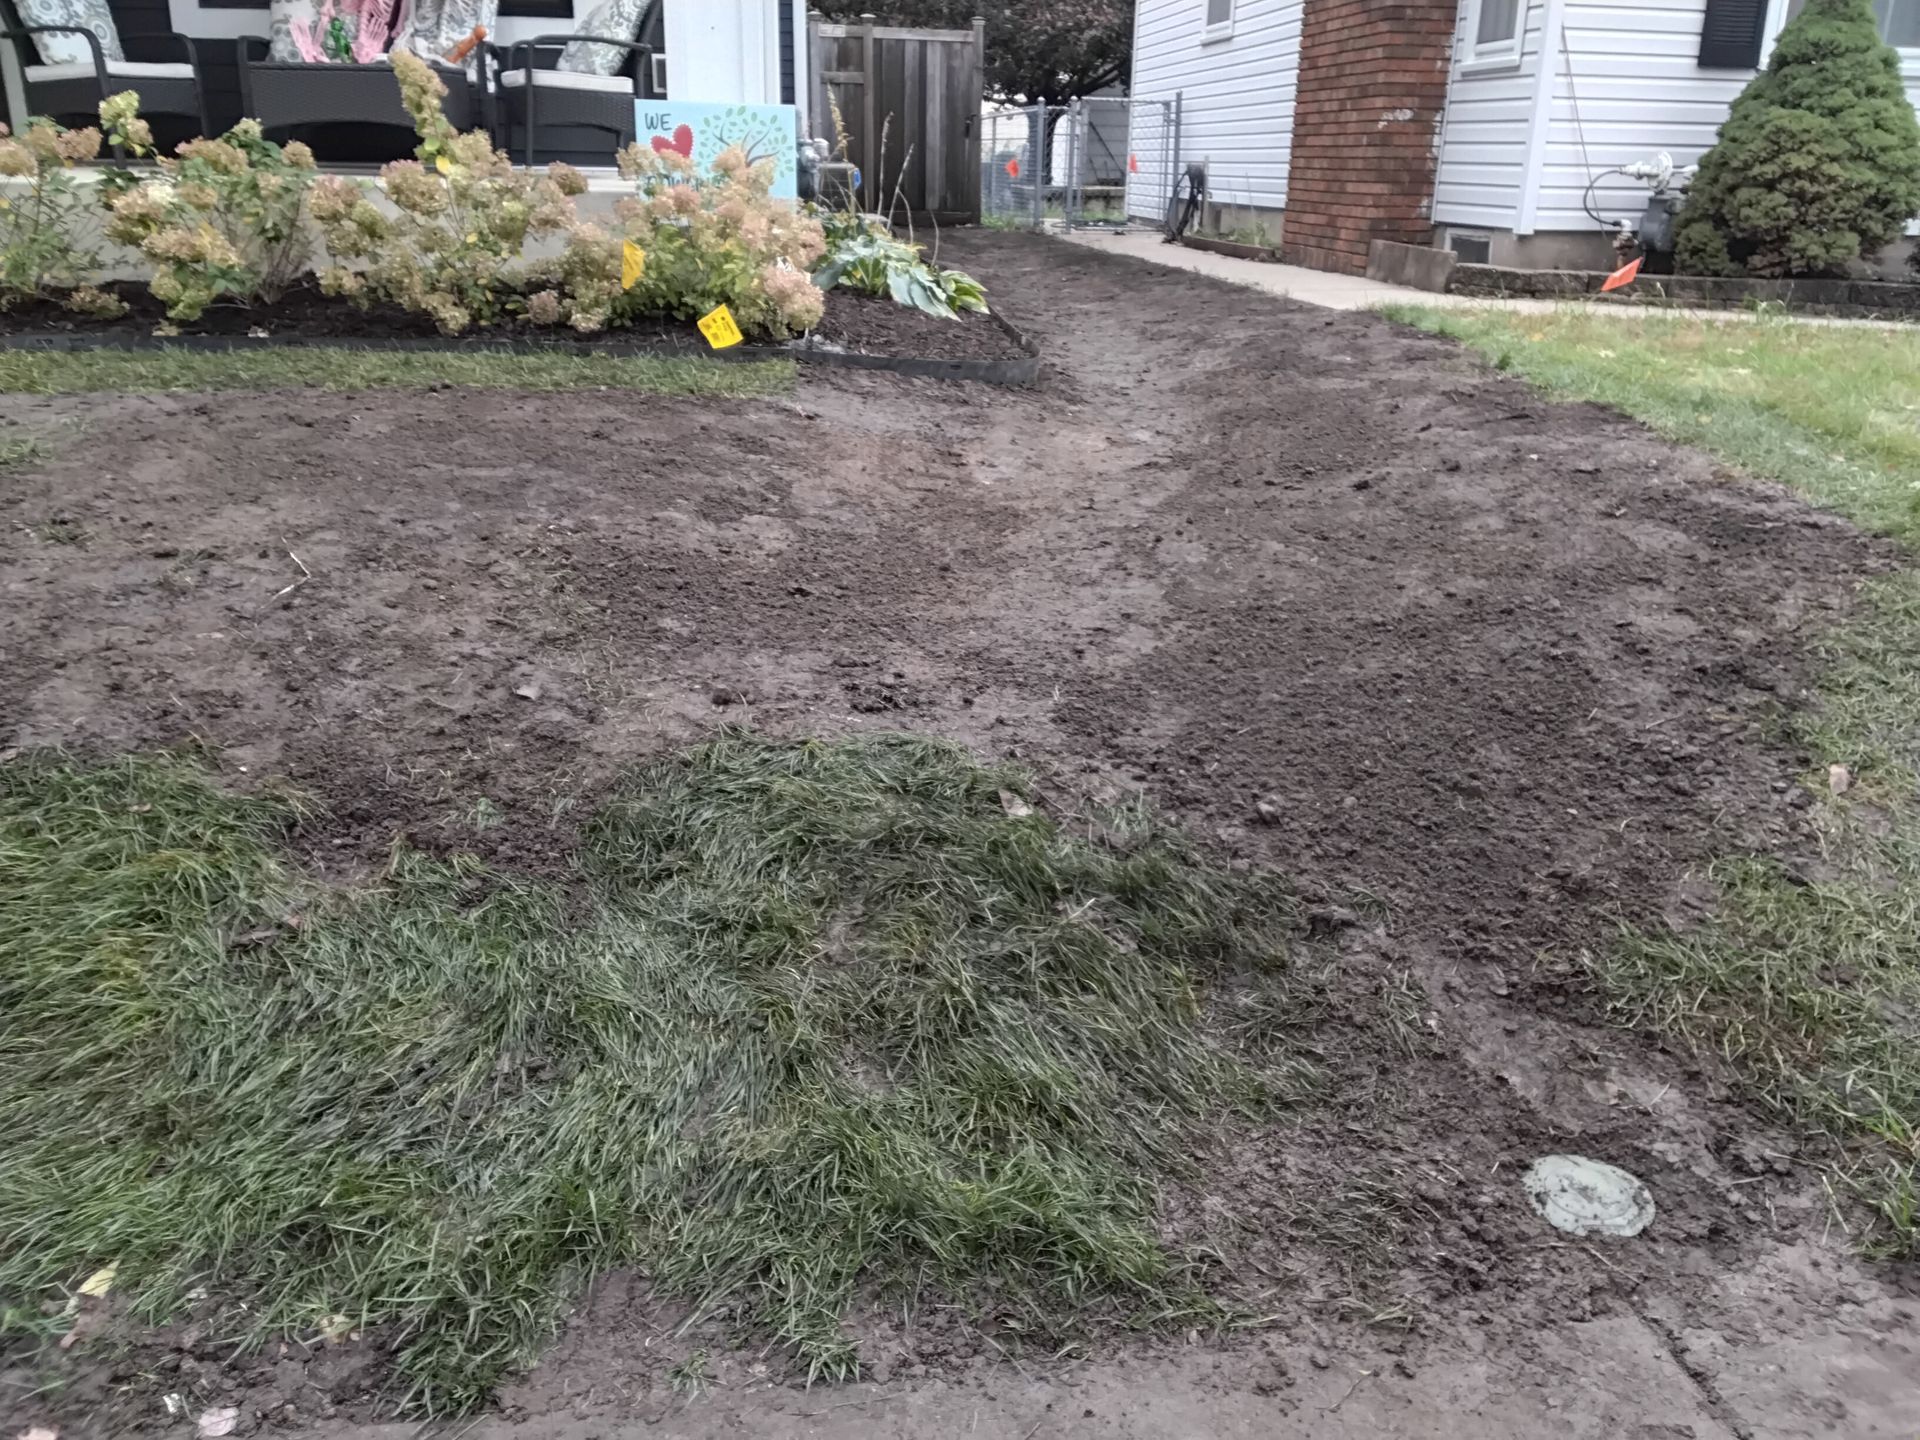
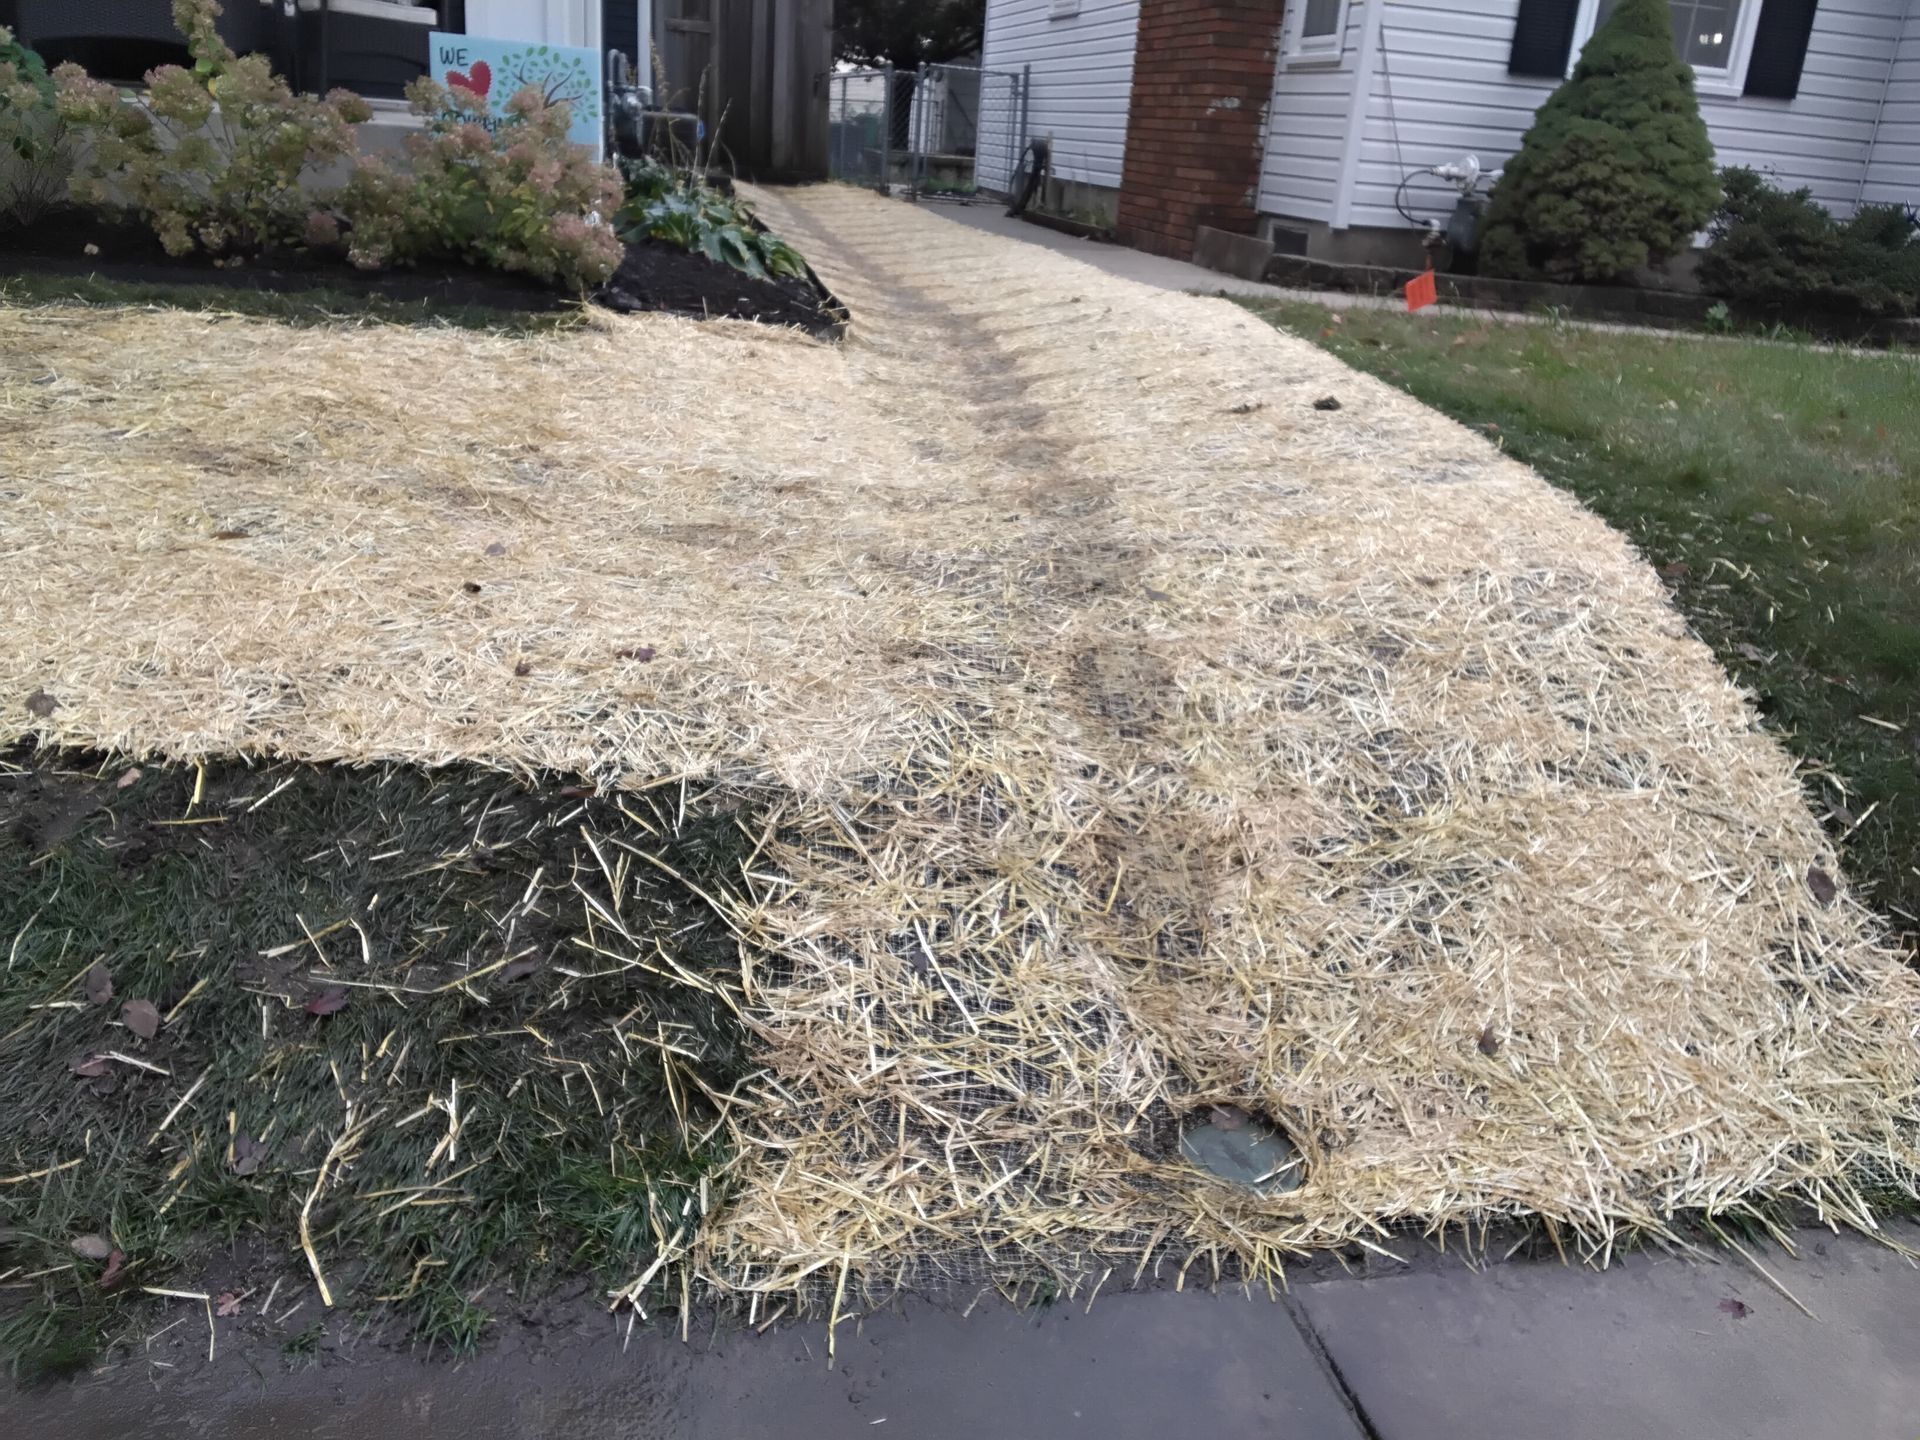
Step #1: Regrading the Flat & Narrow Side Yard
Creating a Contoured Swale to Send Water Out & Away
The first step in this project addressed surface water that was becoming trapped near the homes foundations within the narrow side yard. Because this area was nearly flat and confined, water had nowhere to go and consistently collected against the house. This flat sideyard issue was certainyl contrubuting to the over active sump pump.
First, we removed and carefulyl set aside the existing edging and plants. Then we built up the soil level along the foudnation to ensure a 6" slope away from the house within the first 10 feet. In this case the 6" of slope was instlaled within 4-5', due to the narrow side yard.
Nest, we regraded the side yard and introduced a subtle, contoured swale designed to move water both away from the foundation and out of the side yard altogether.
This gentle shaping directs surface runoff toward the front of the property, where it can exit the problem area and follow the neighborhood’s natural drainage pattern. Correcting the grade in this tight space was essential to eliminating standing water and setting up the rest of the drainage system for long-term success.
Below: See Before, During and After Picture of the Side Yard Drainage Swale Solution
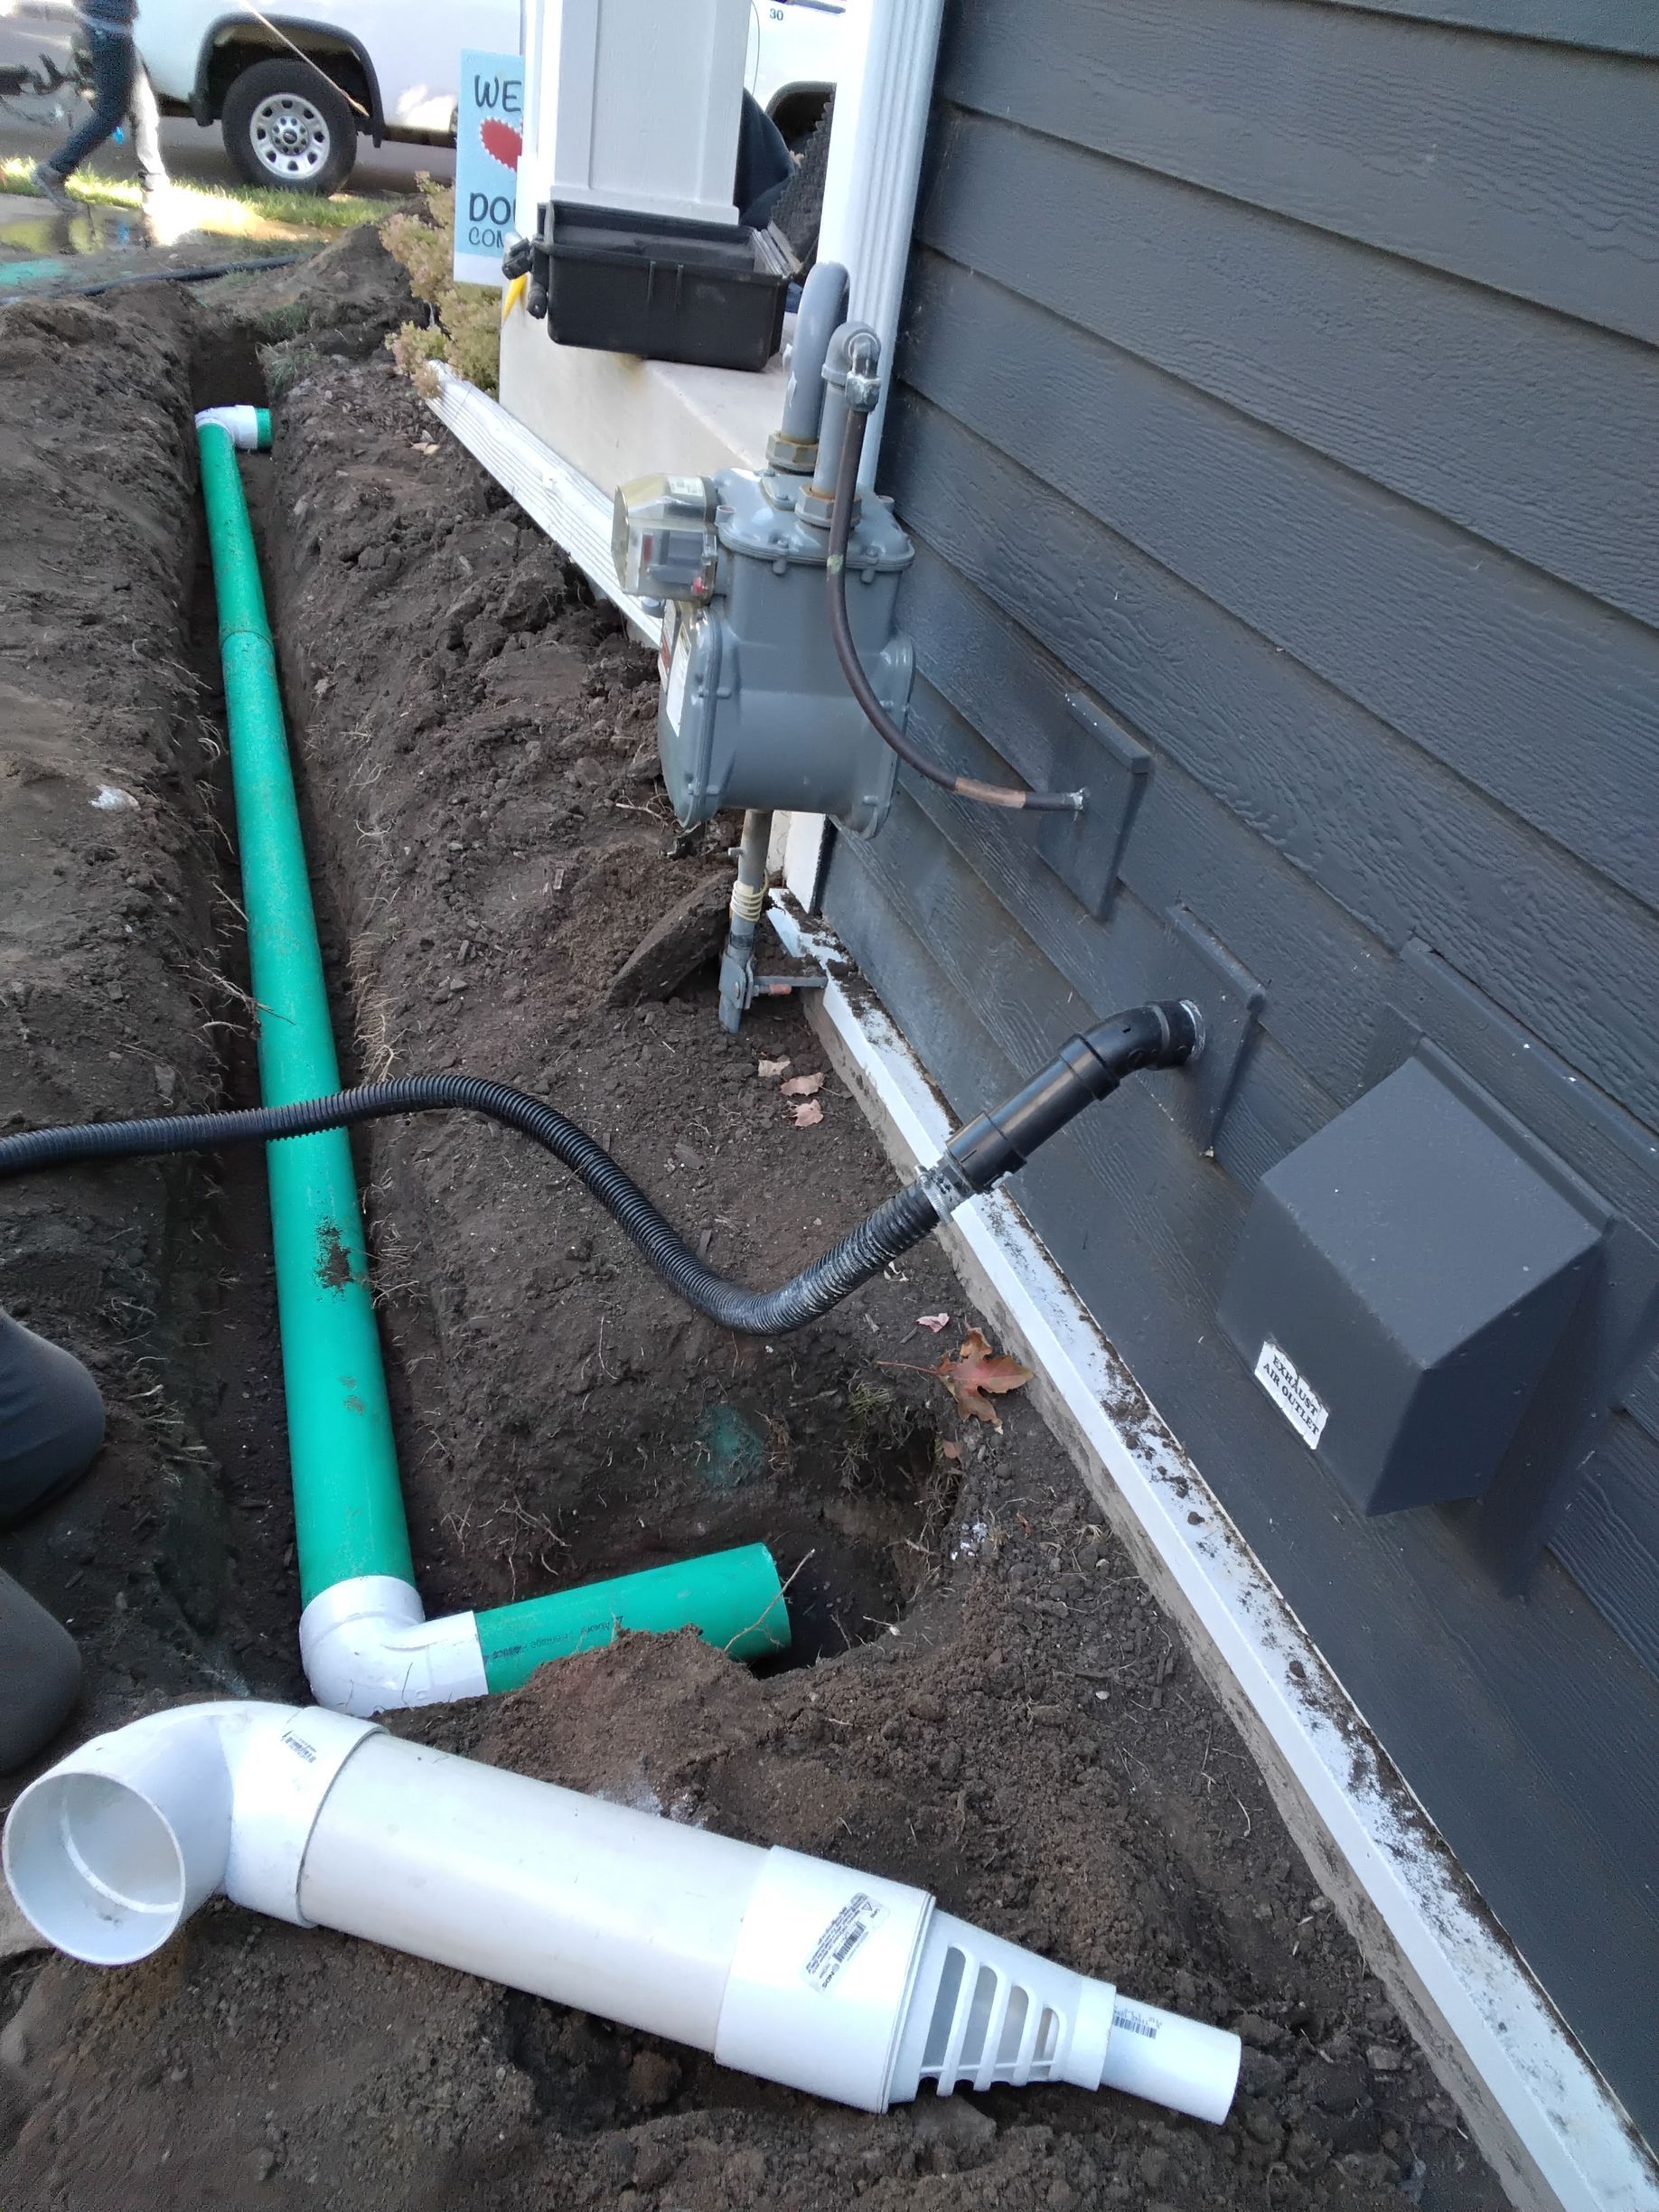
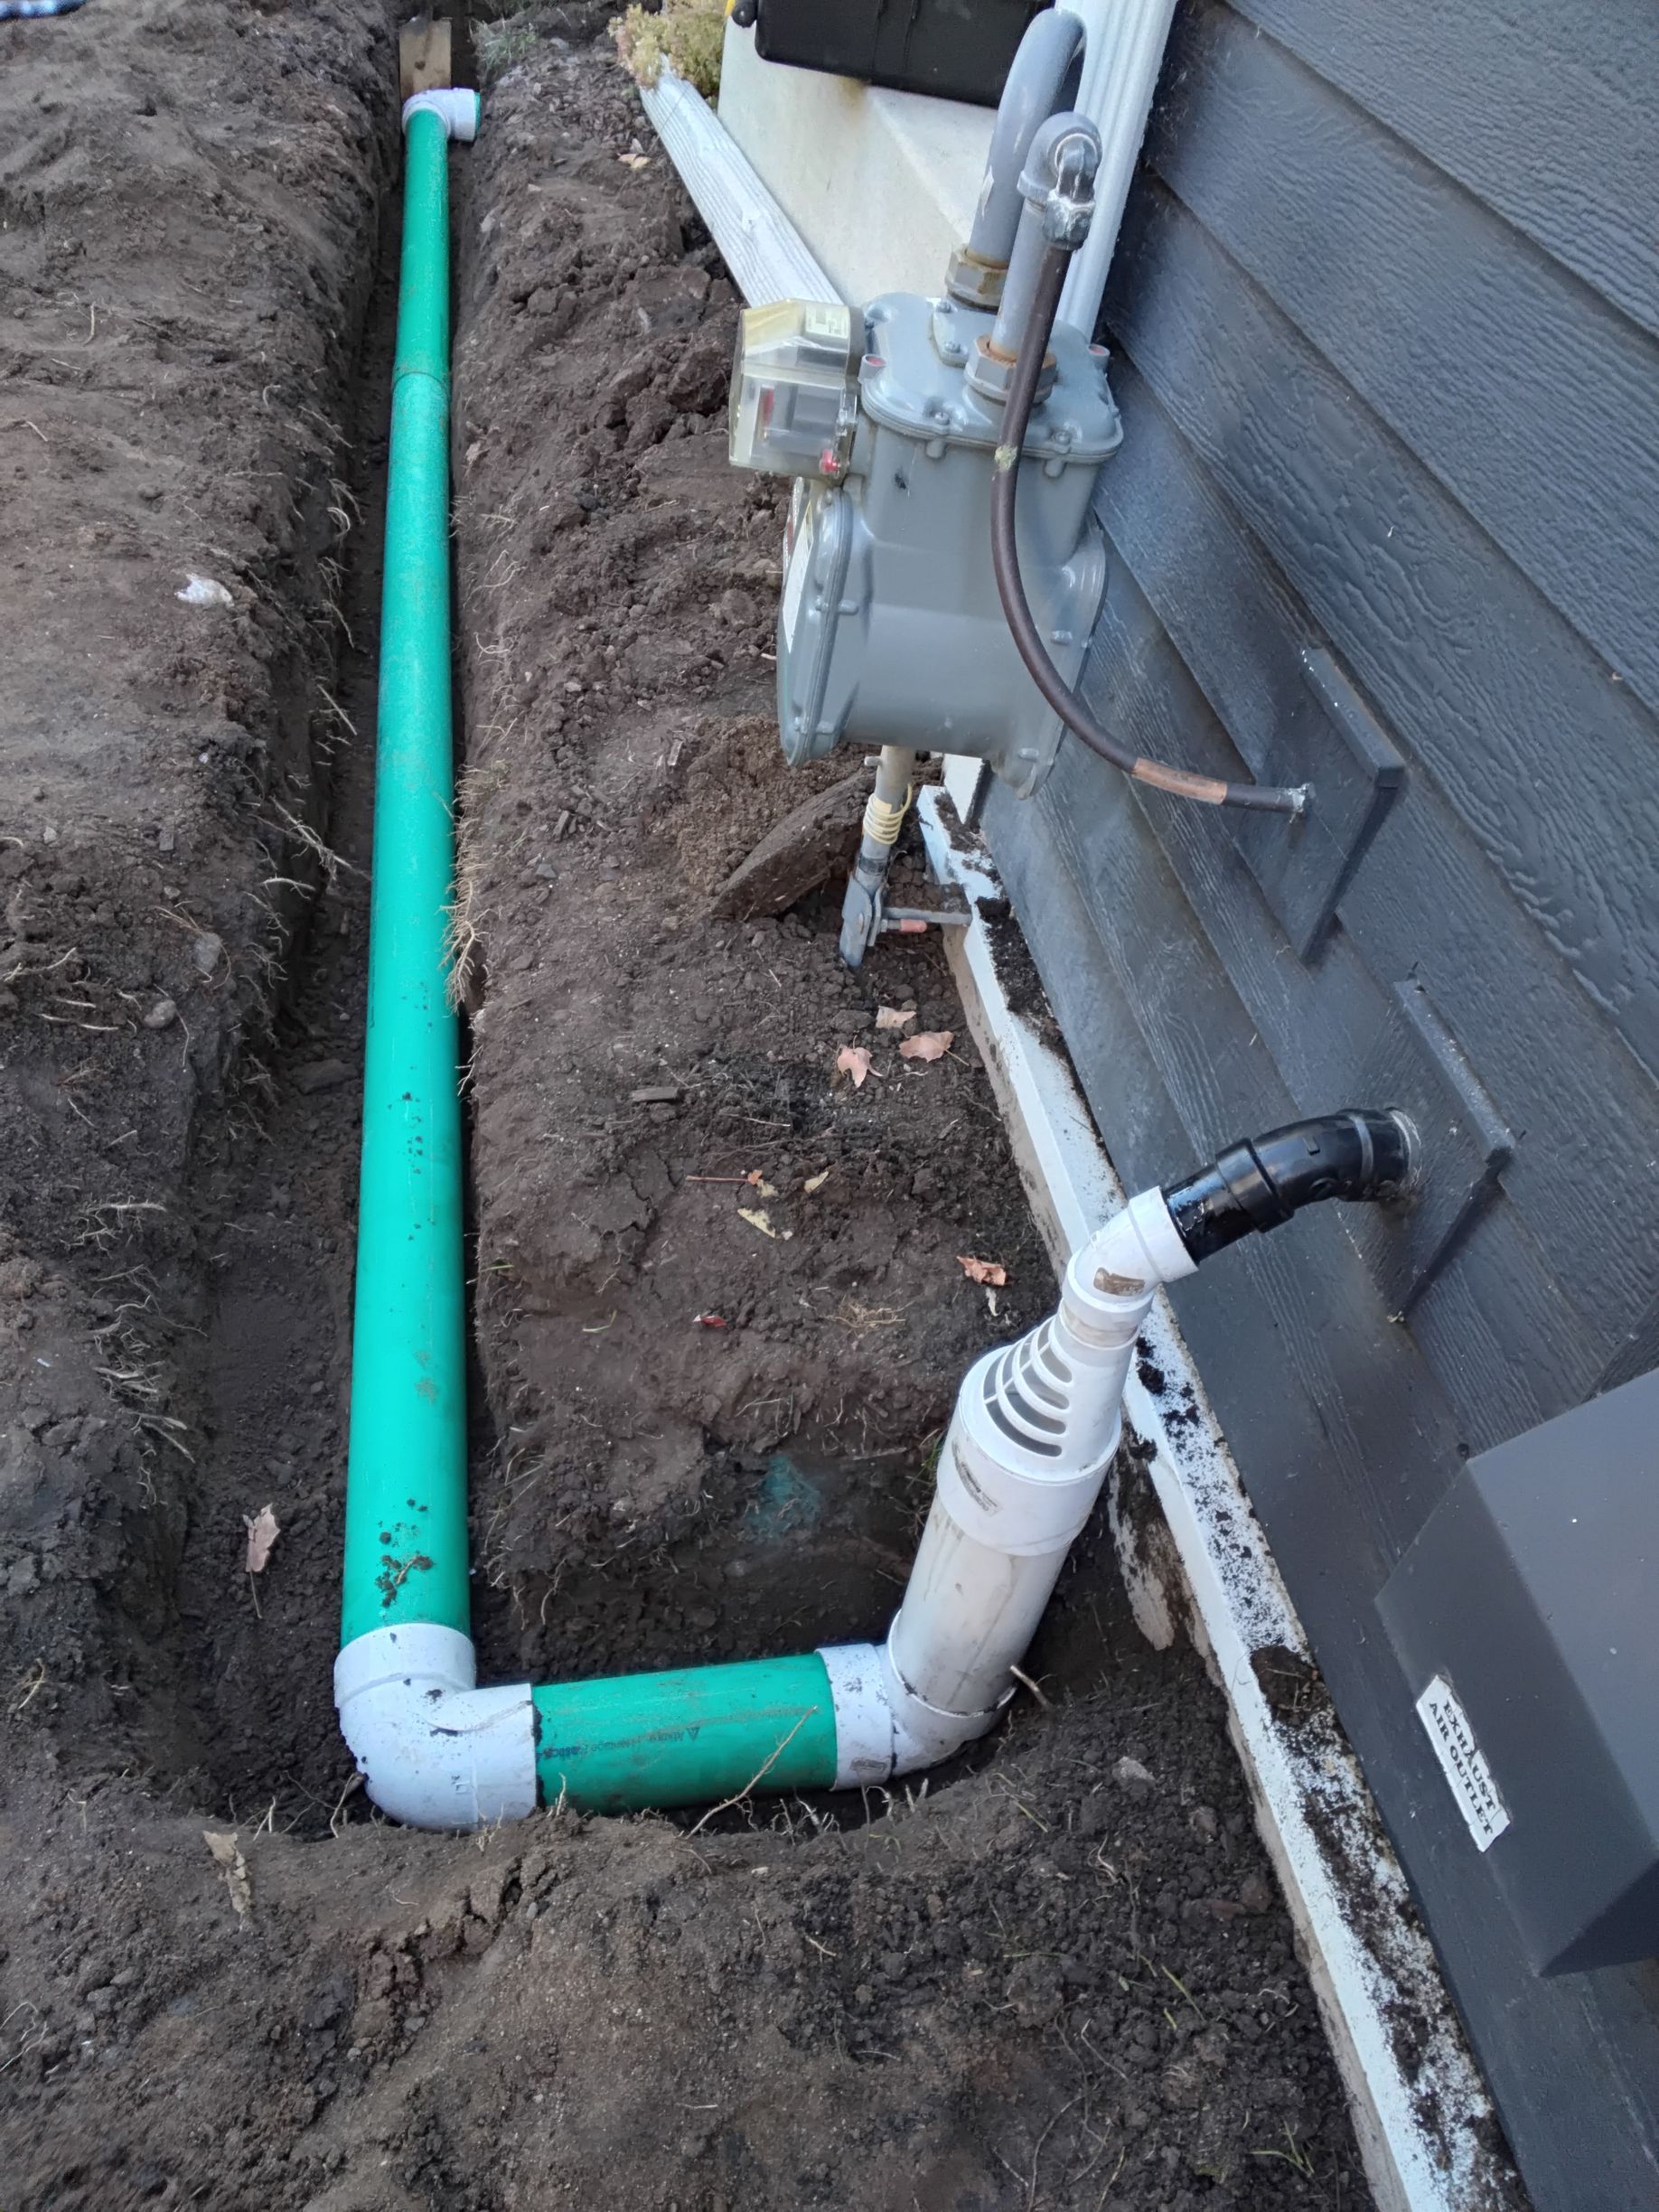
Step #2: Installed New Sump Pump Discharge Connection
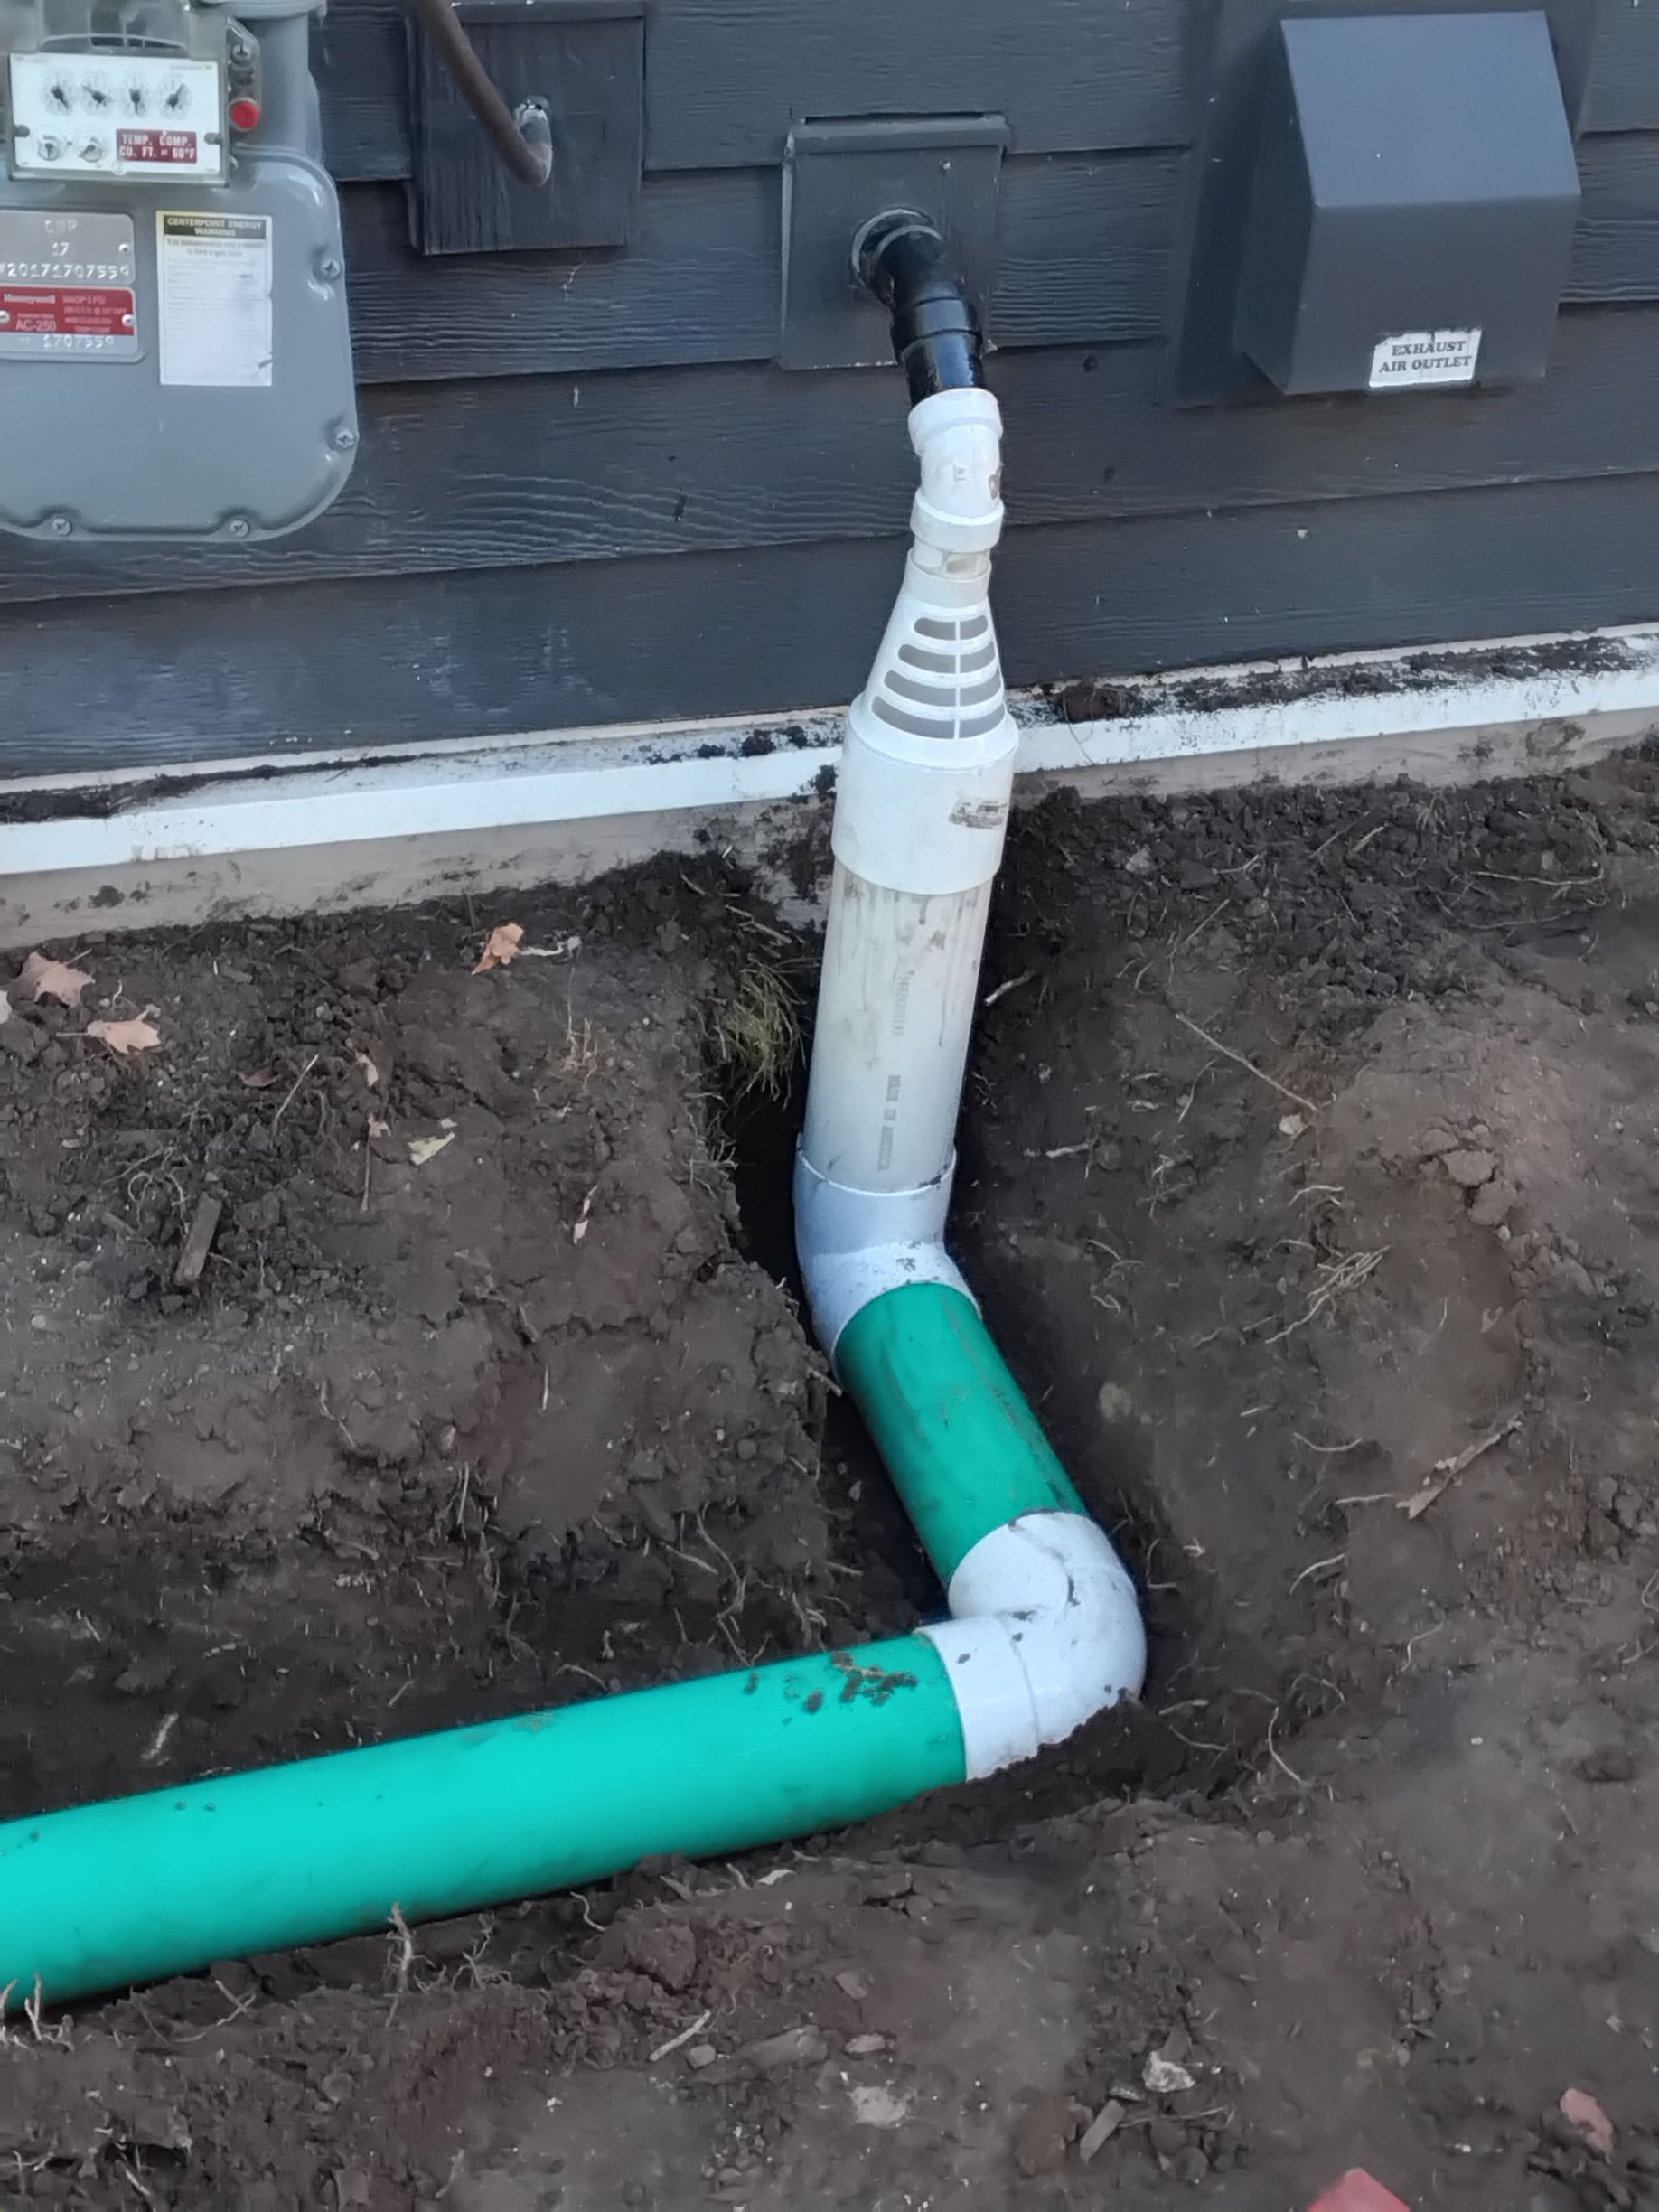
Next, we will install a new exterior sump pump discharge connection that incorporates an air gap and freeze guard between the existing outlet and the underground portion of the system. The existing 1½-inch sump pump discharge line will be transitioned to a 4-inch pipe for the underground section.
The 4-inch diameter is used to provide additional capacity, allowing water to flow freely even if partial freezing were to occur within the pipe. This added space ensures effective drainage and helps prevent water from backing up into the system.
Step by Step Overview:
- we removed the temporary above ground flex pipe extension house
- installed a new PVC frost guard system
- converted the 1.5" outlet line into a 4" line
- installed a vertical 4" PVC section down 12-18" below grade
- installed and 90 degree PVC elbow
- installed non perforated (no holes) PVC drain pipe to send water away from house underground
Below: See Before & After Pictures of the New Sump Pump Discharge Connection

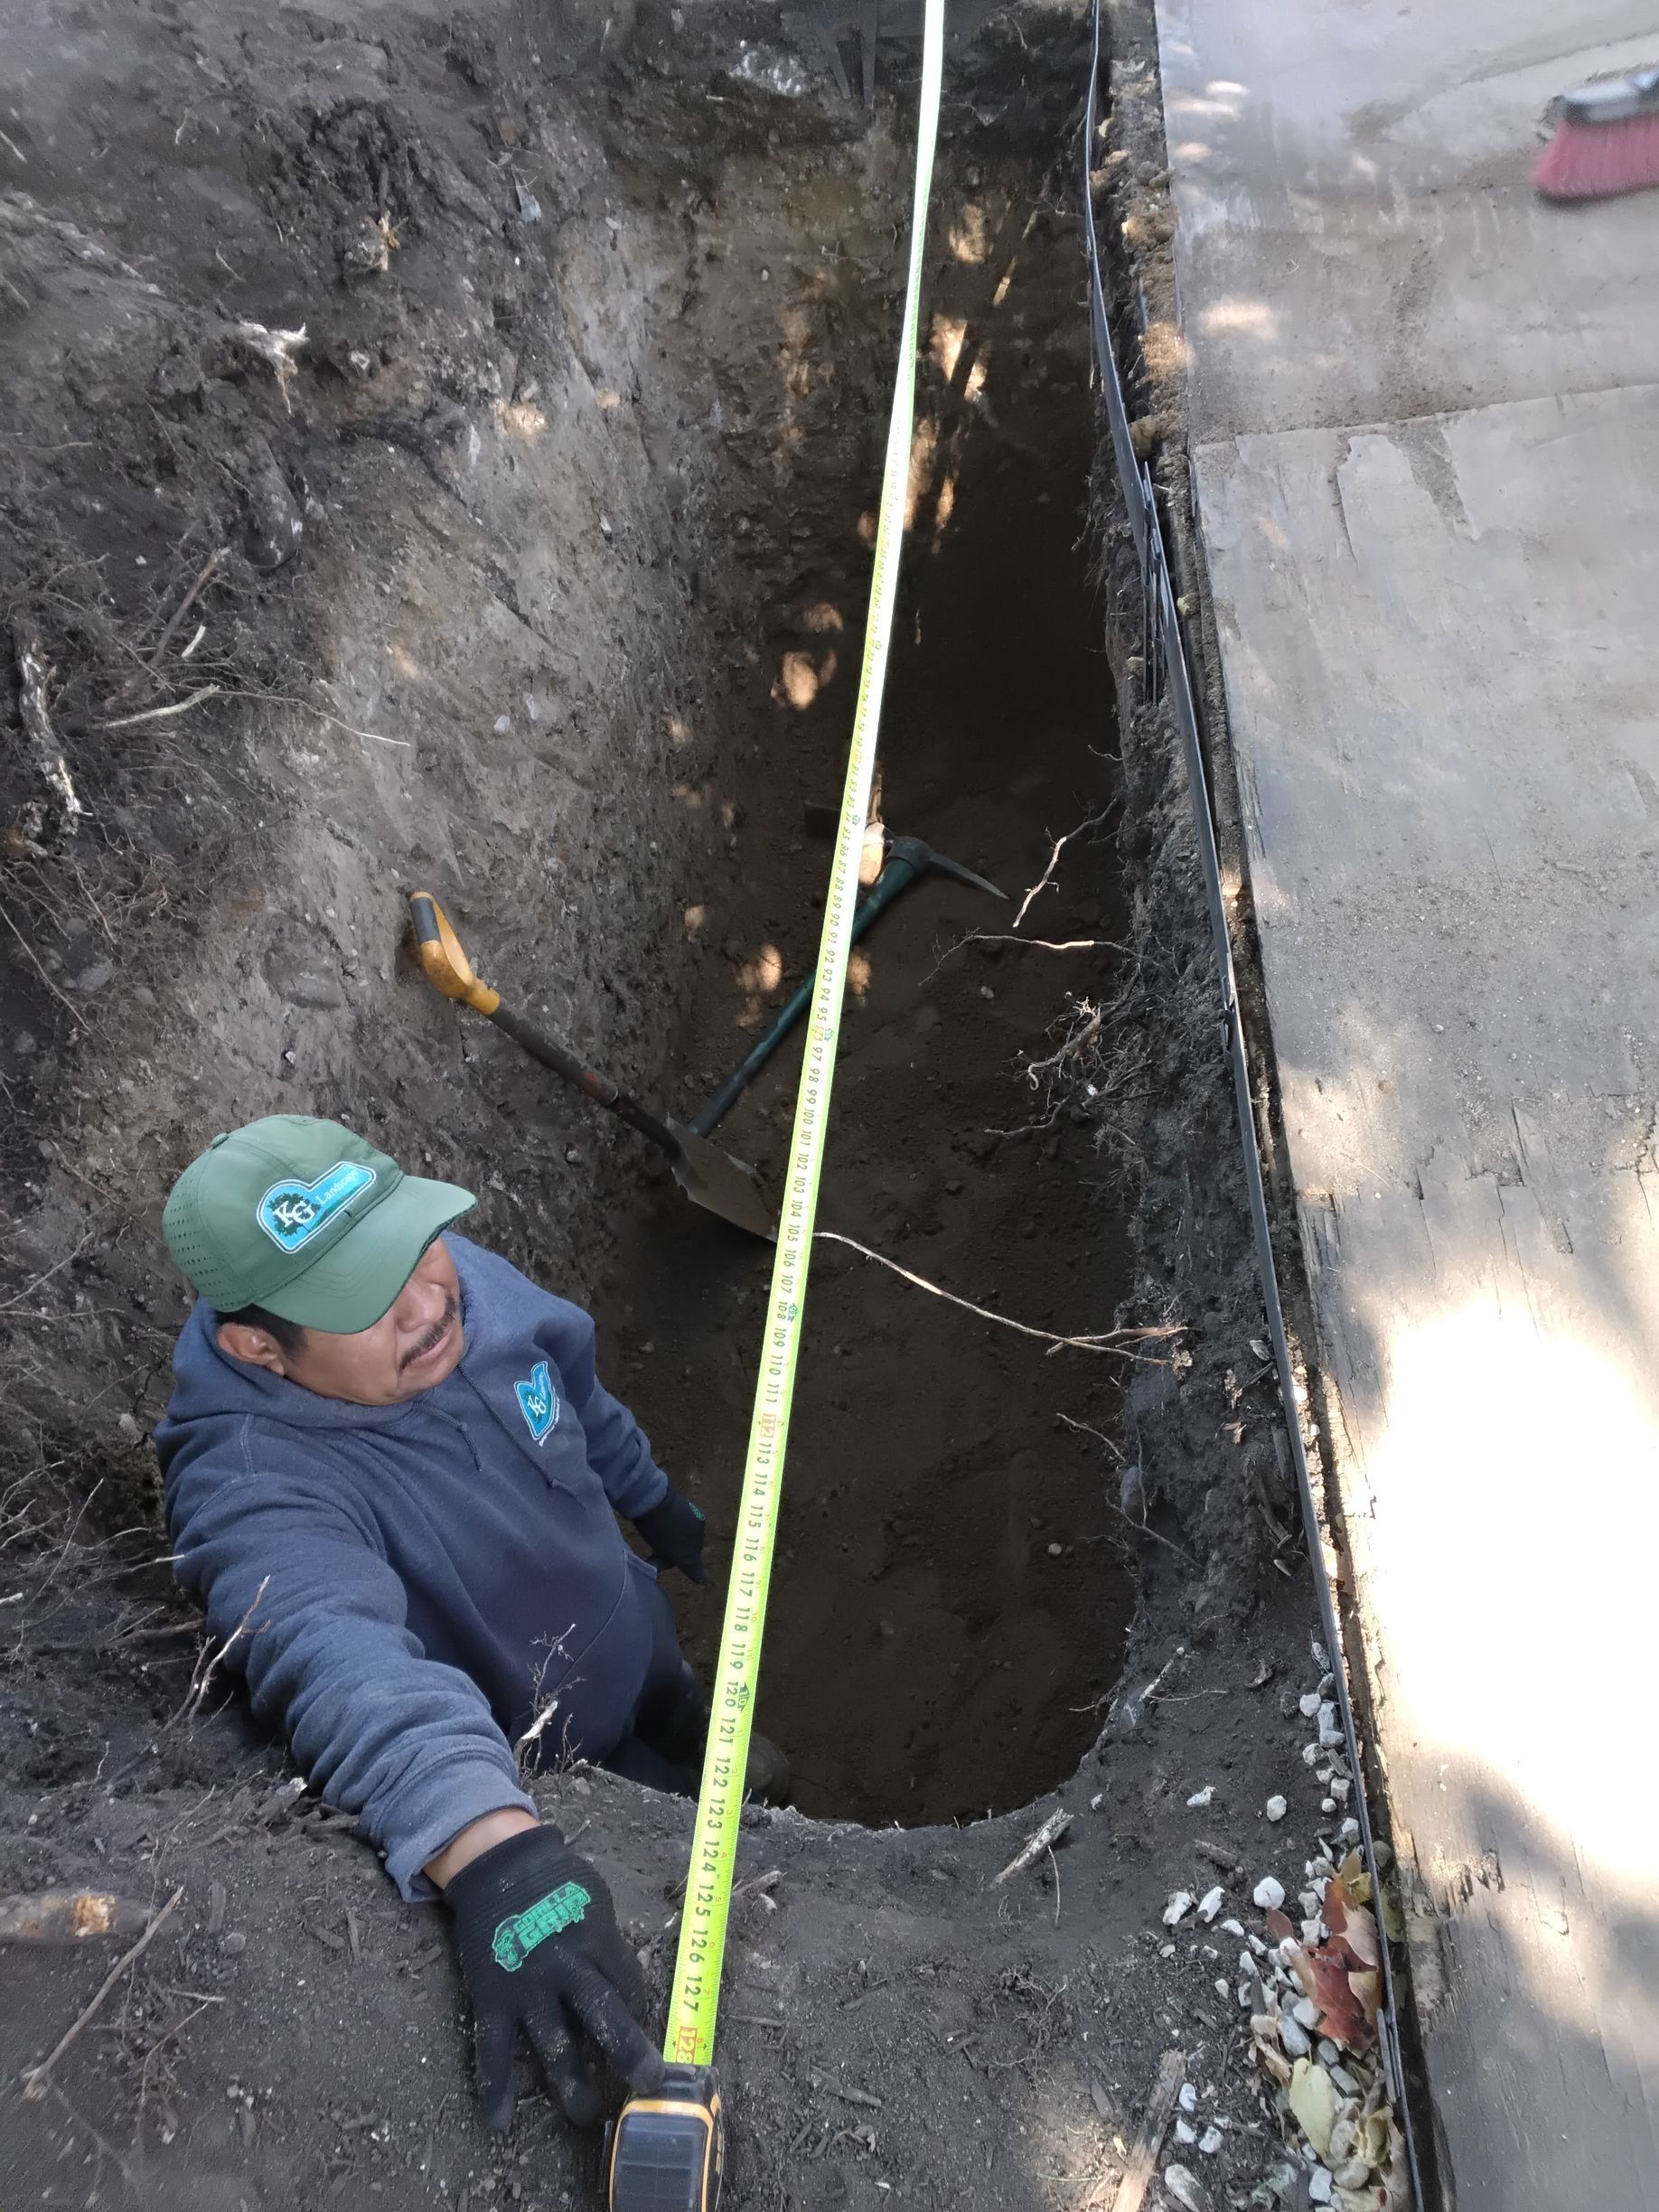
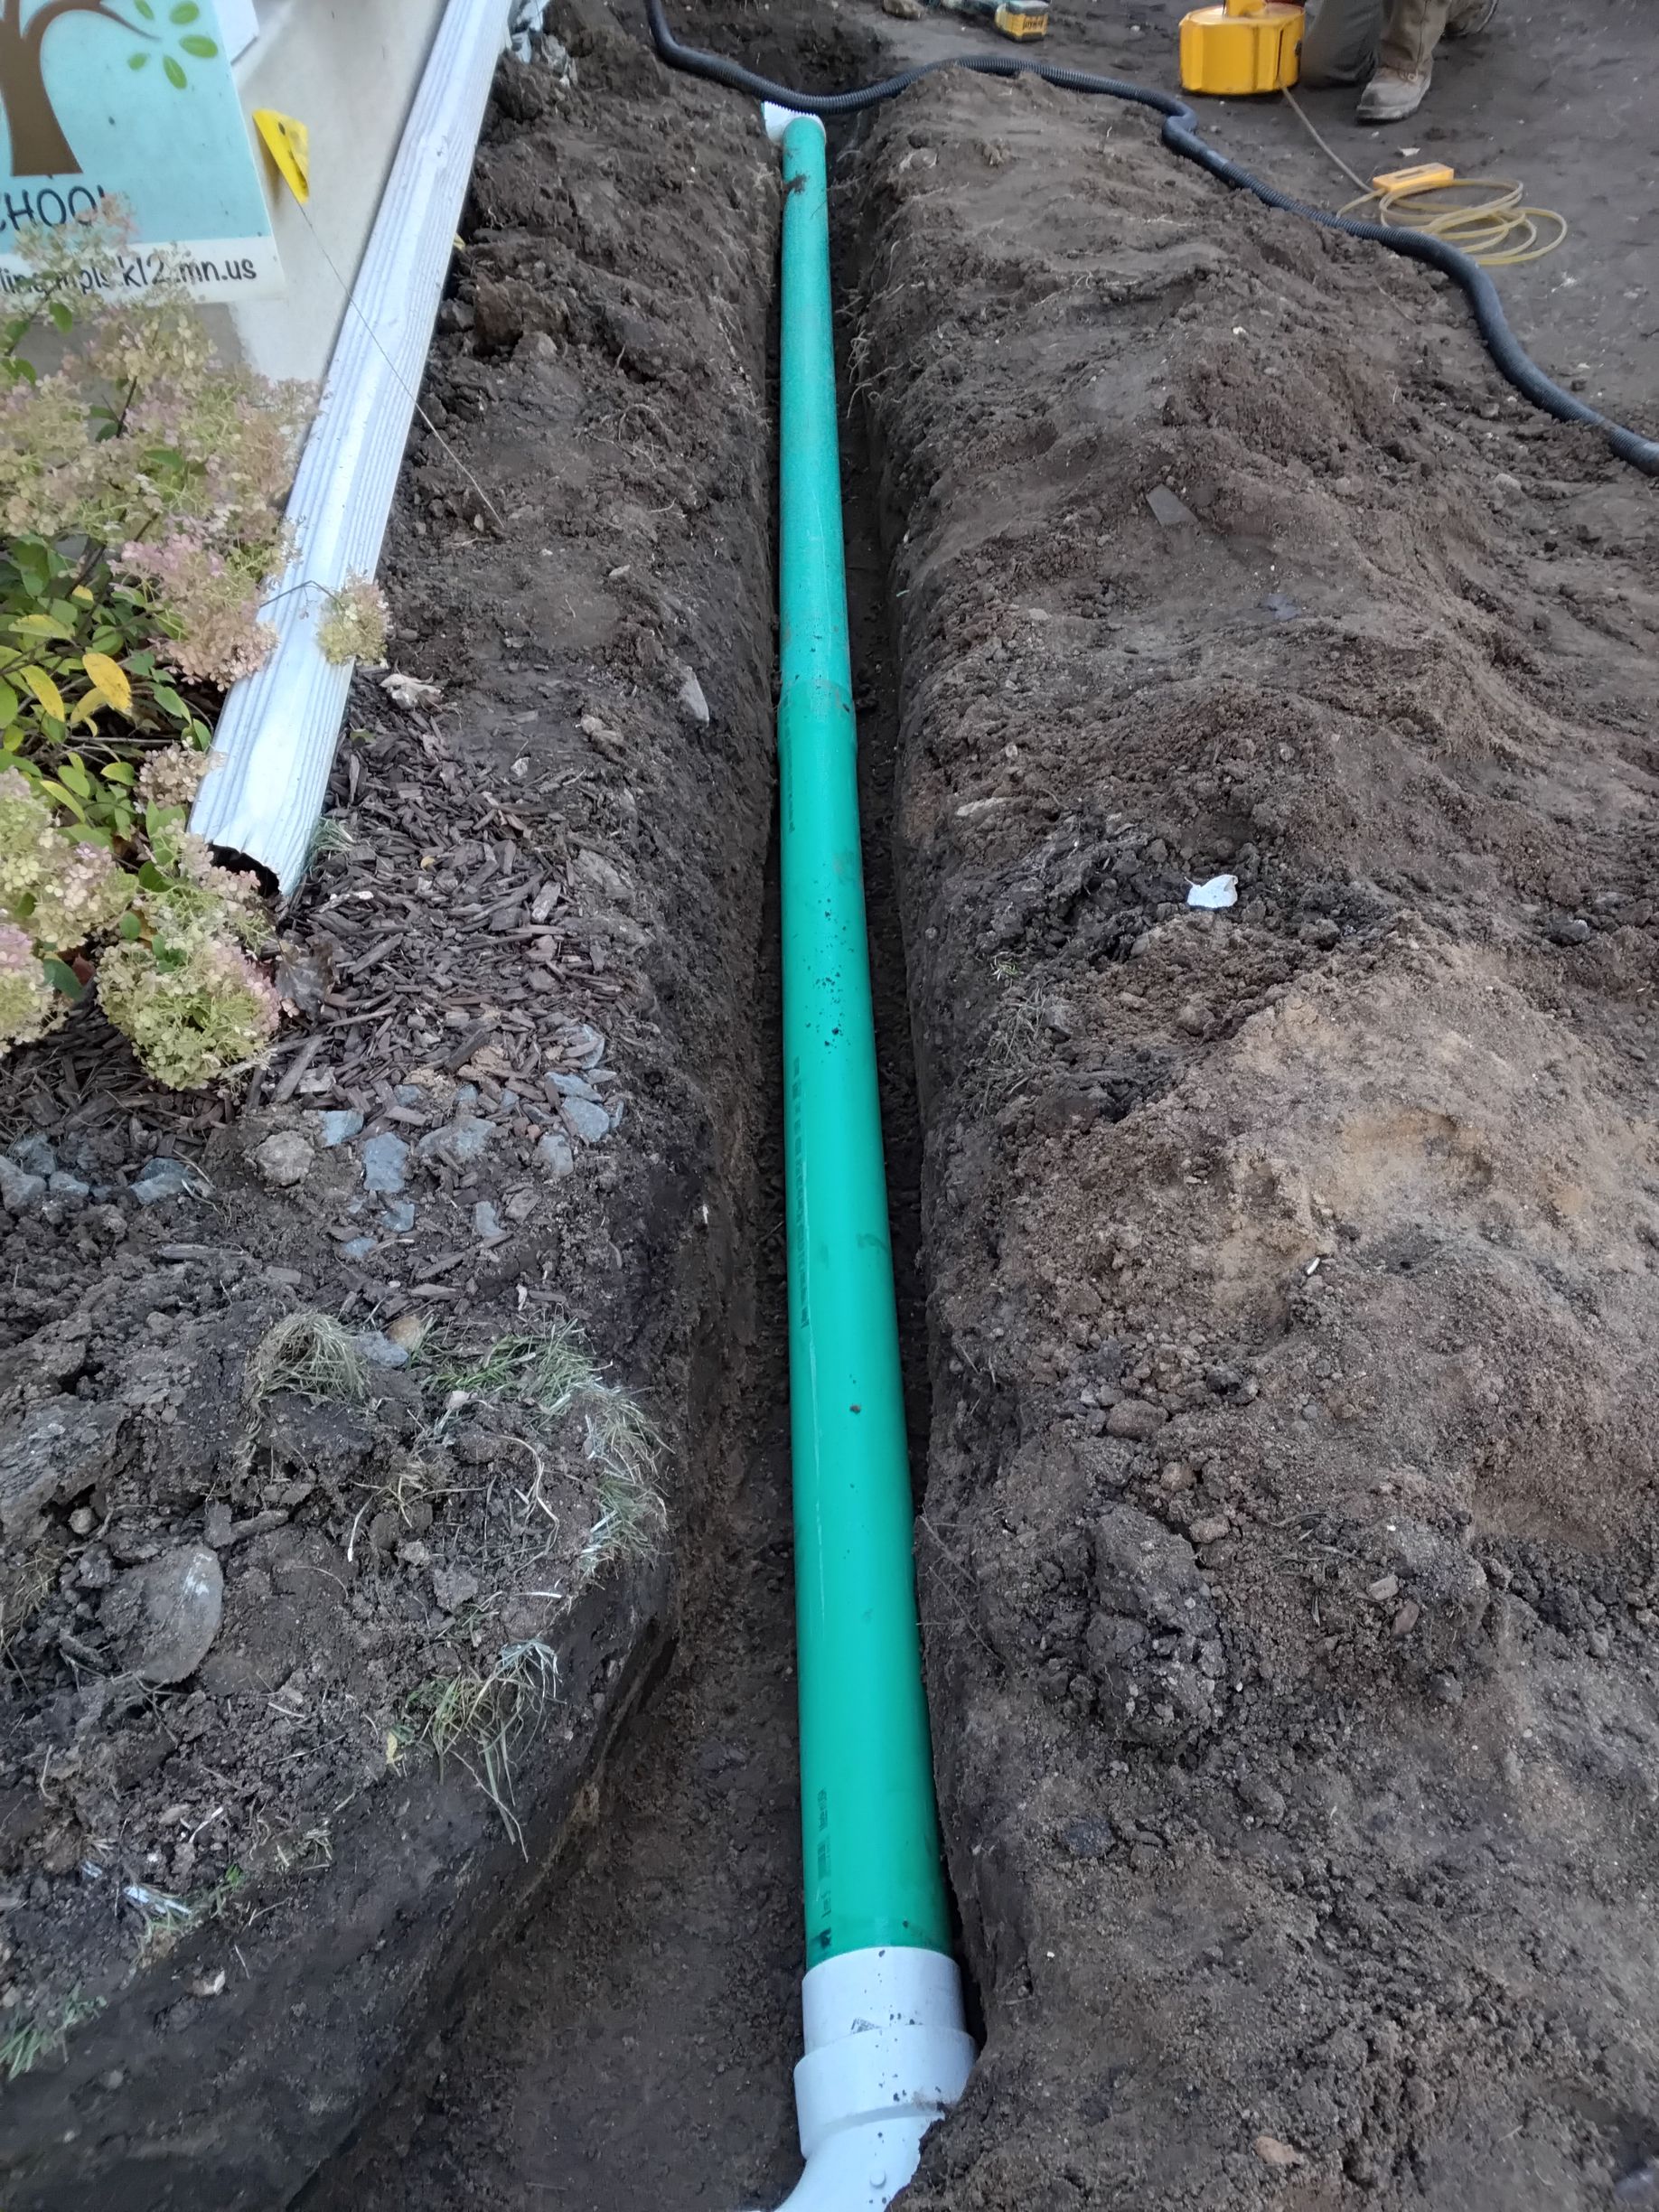
Step # 3 Trenching and Precision Installation of the Underground Drainage Pipe System
In step 3, we began installing the trenches that would house the underground drainage piping. This system was designed to carry water directly from the new sump pump discharge outlined in step #2 above, into a new underground drainage network that ends with a dry well, thereby providing a permanent solution for handling all water pumped from the basement’s interior drain tile system.
Below: See During Picture of How to Install Underground Drian Pipe the Right Way
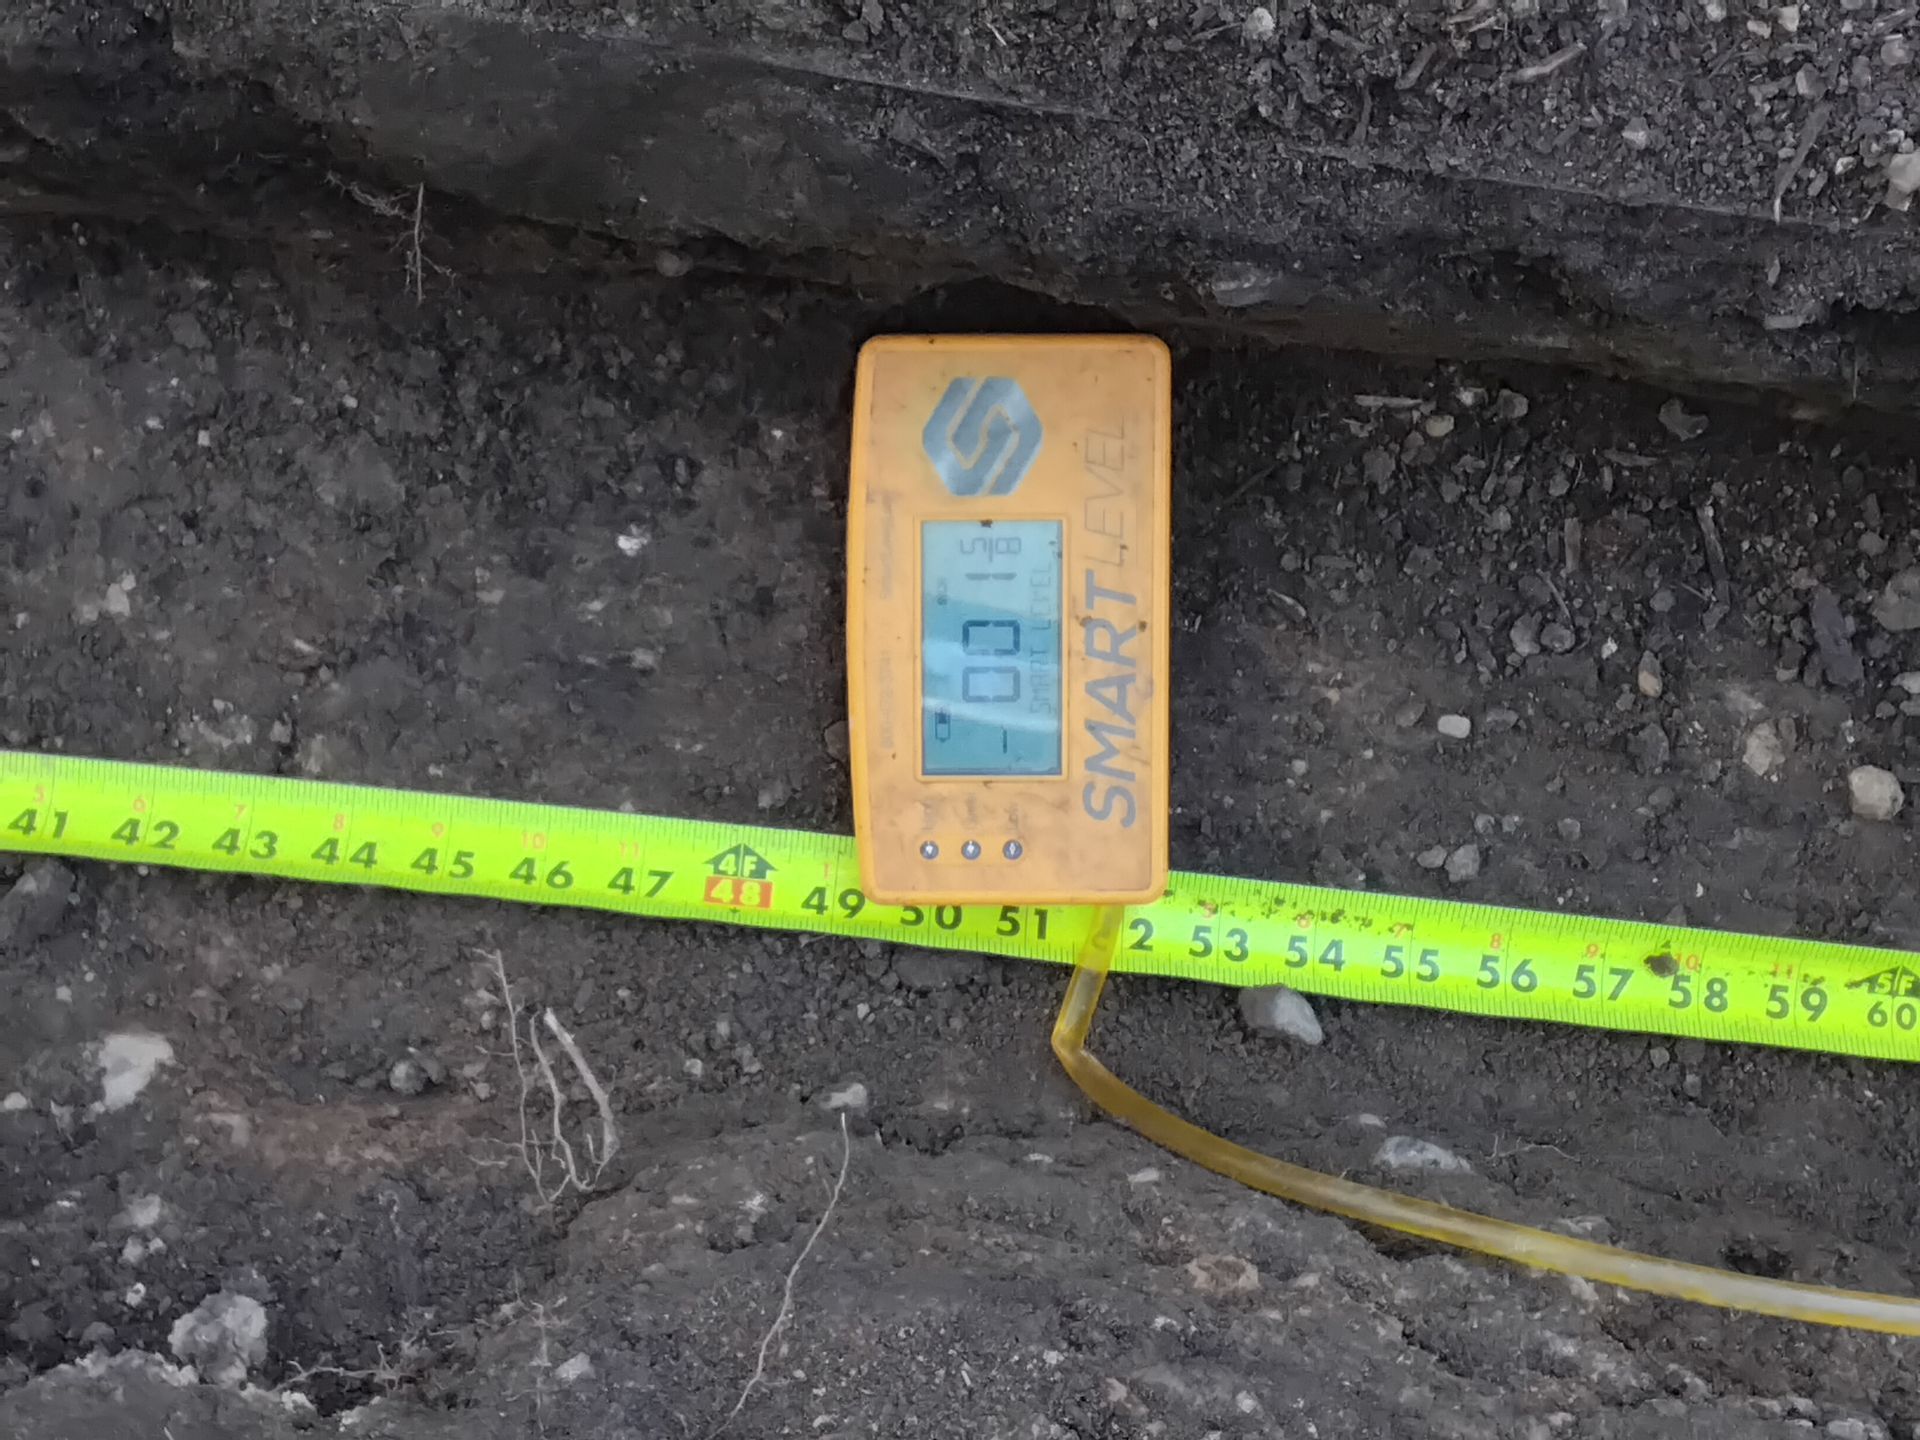
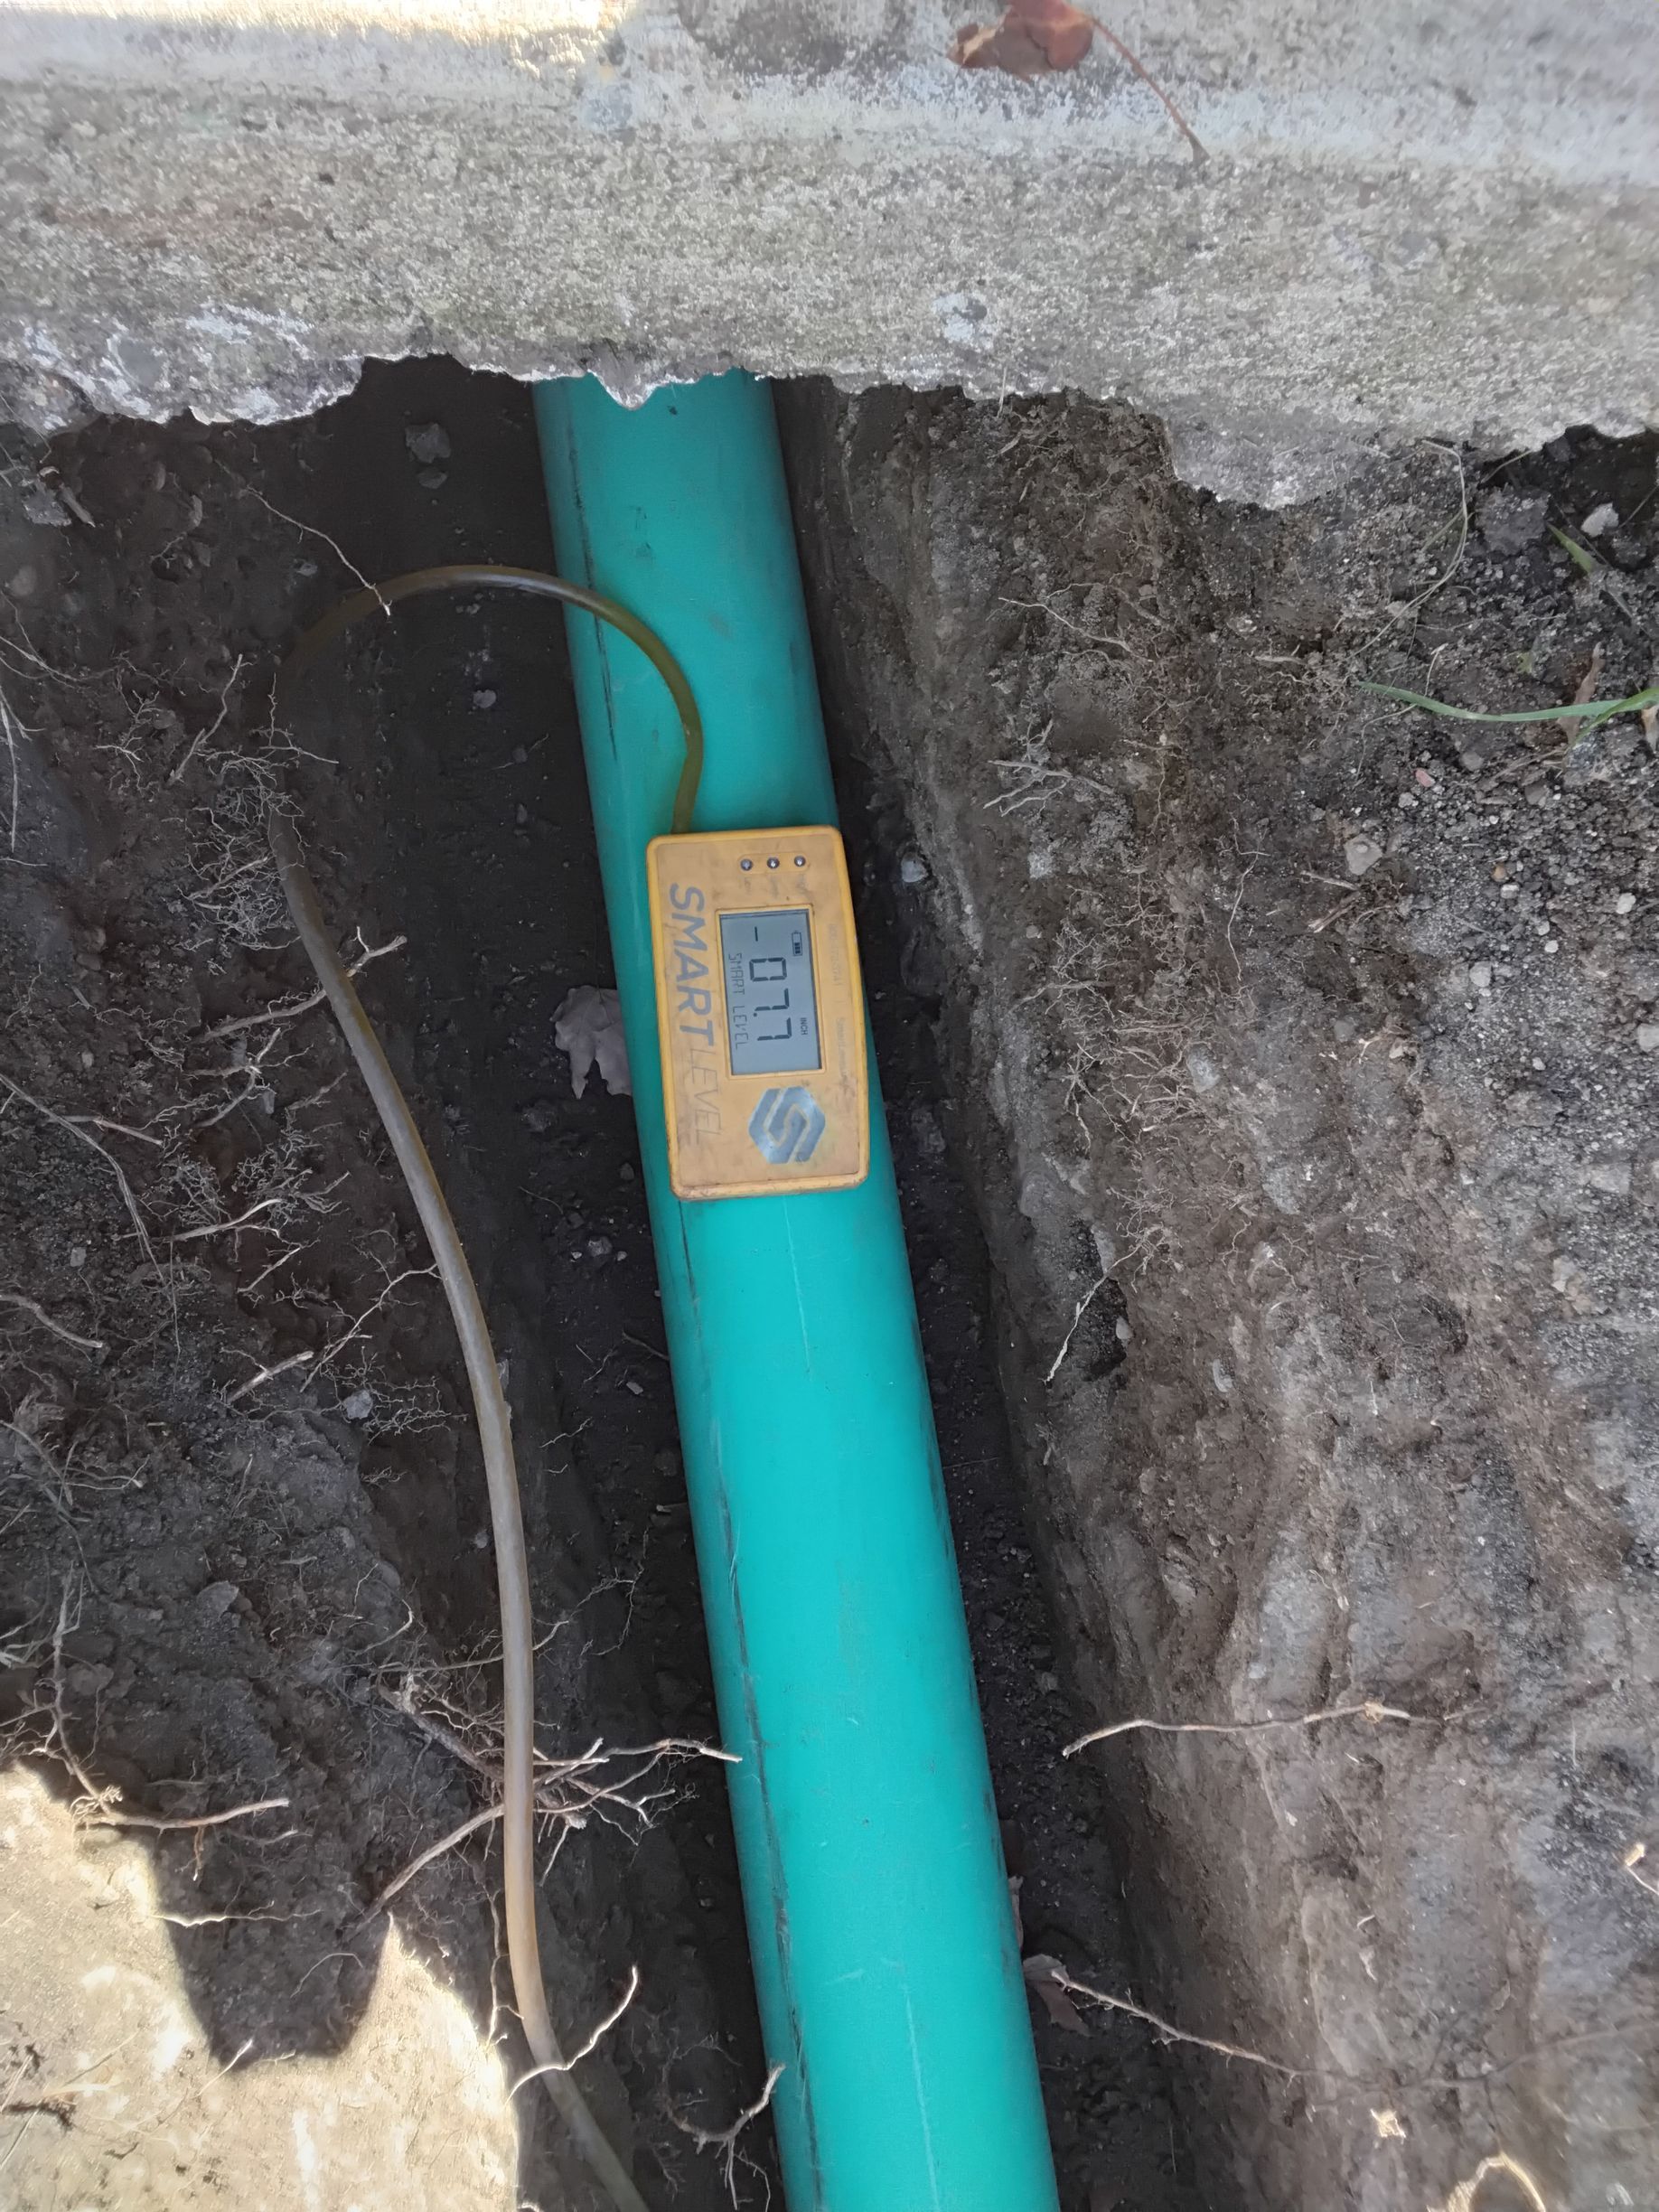
We Use Tools to Execute Precise Elevation Sloping of Every Underground Drainage Pipe
At KG Landscape, every underground drainage system is custom-designed by our team with precise elevations calculated in advance. These elevations are provided directly to the installation crew to ensure the system performs as intended.
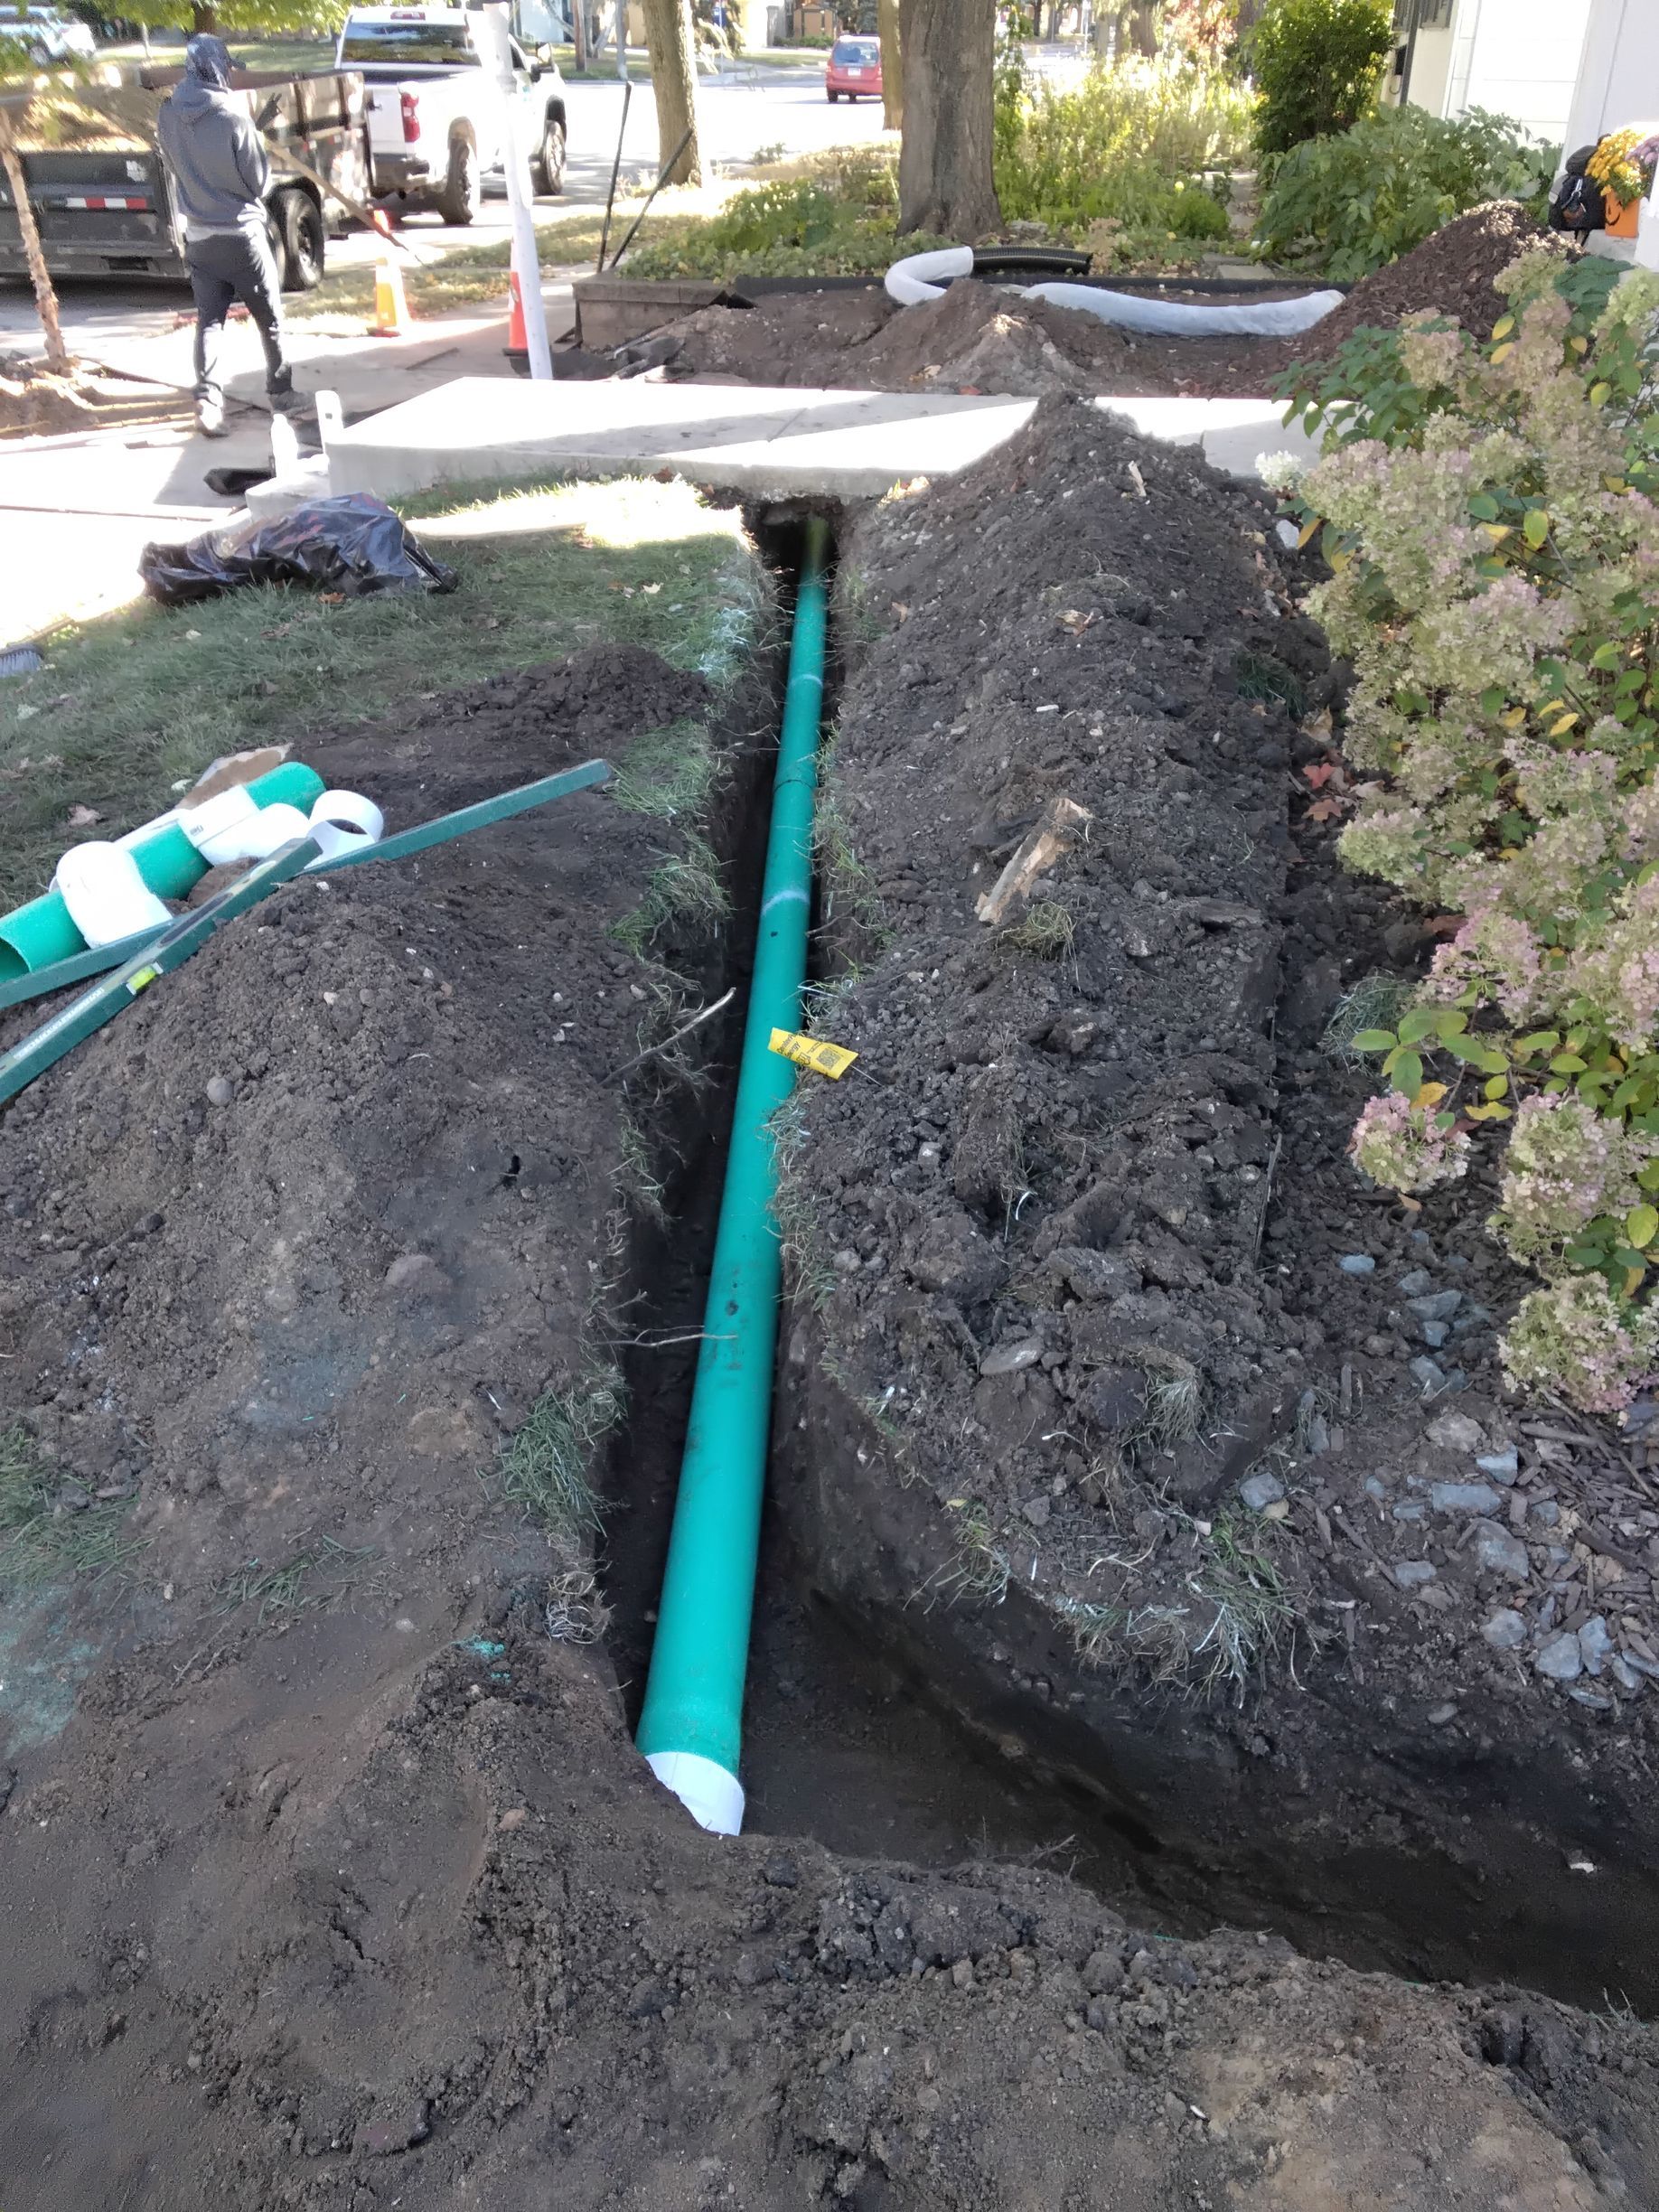
Part of this underground drainage pipe work involved installing pipe under the front sidewalk as showing in the pictures below. But why did we need to go under the sidewalk with our drain pipe? We'll explain that in step #4 section
Like every detailed and thoughtfully designed landscaping project we do, our drainage projects are meticulously designed and executed via our detailed processes to ensure top of the line quality and longevity.
Our long-tenured crews have the training, experience, and specialized tools required to install drainage piping accurately and consistently. As shown below, the crew carefully checks trench slope as it’s excavated, distributing the required fall evenly along the full length of the pipe to maximize flow and long-term reliability.
Step 4: Building the Dry Well — For All Season Water Infiltration
In this section, we’ll walk you through how this dry well was constructed, step by step.
This system was meticulously planned and built to hold significantly more water than the sump pump was discharging, allowing us to add other sources of water from a French drain we installed on the South side of the house and still making an overflow extremely unlikely. However, to add additional layers of safety and redundancy, we also incorporated overflow protection using a vent and a dedicated overflow discharge point.
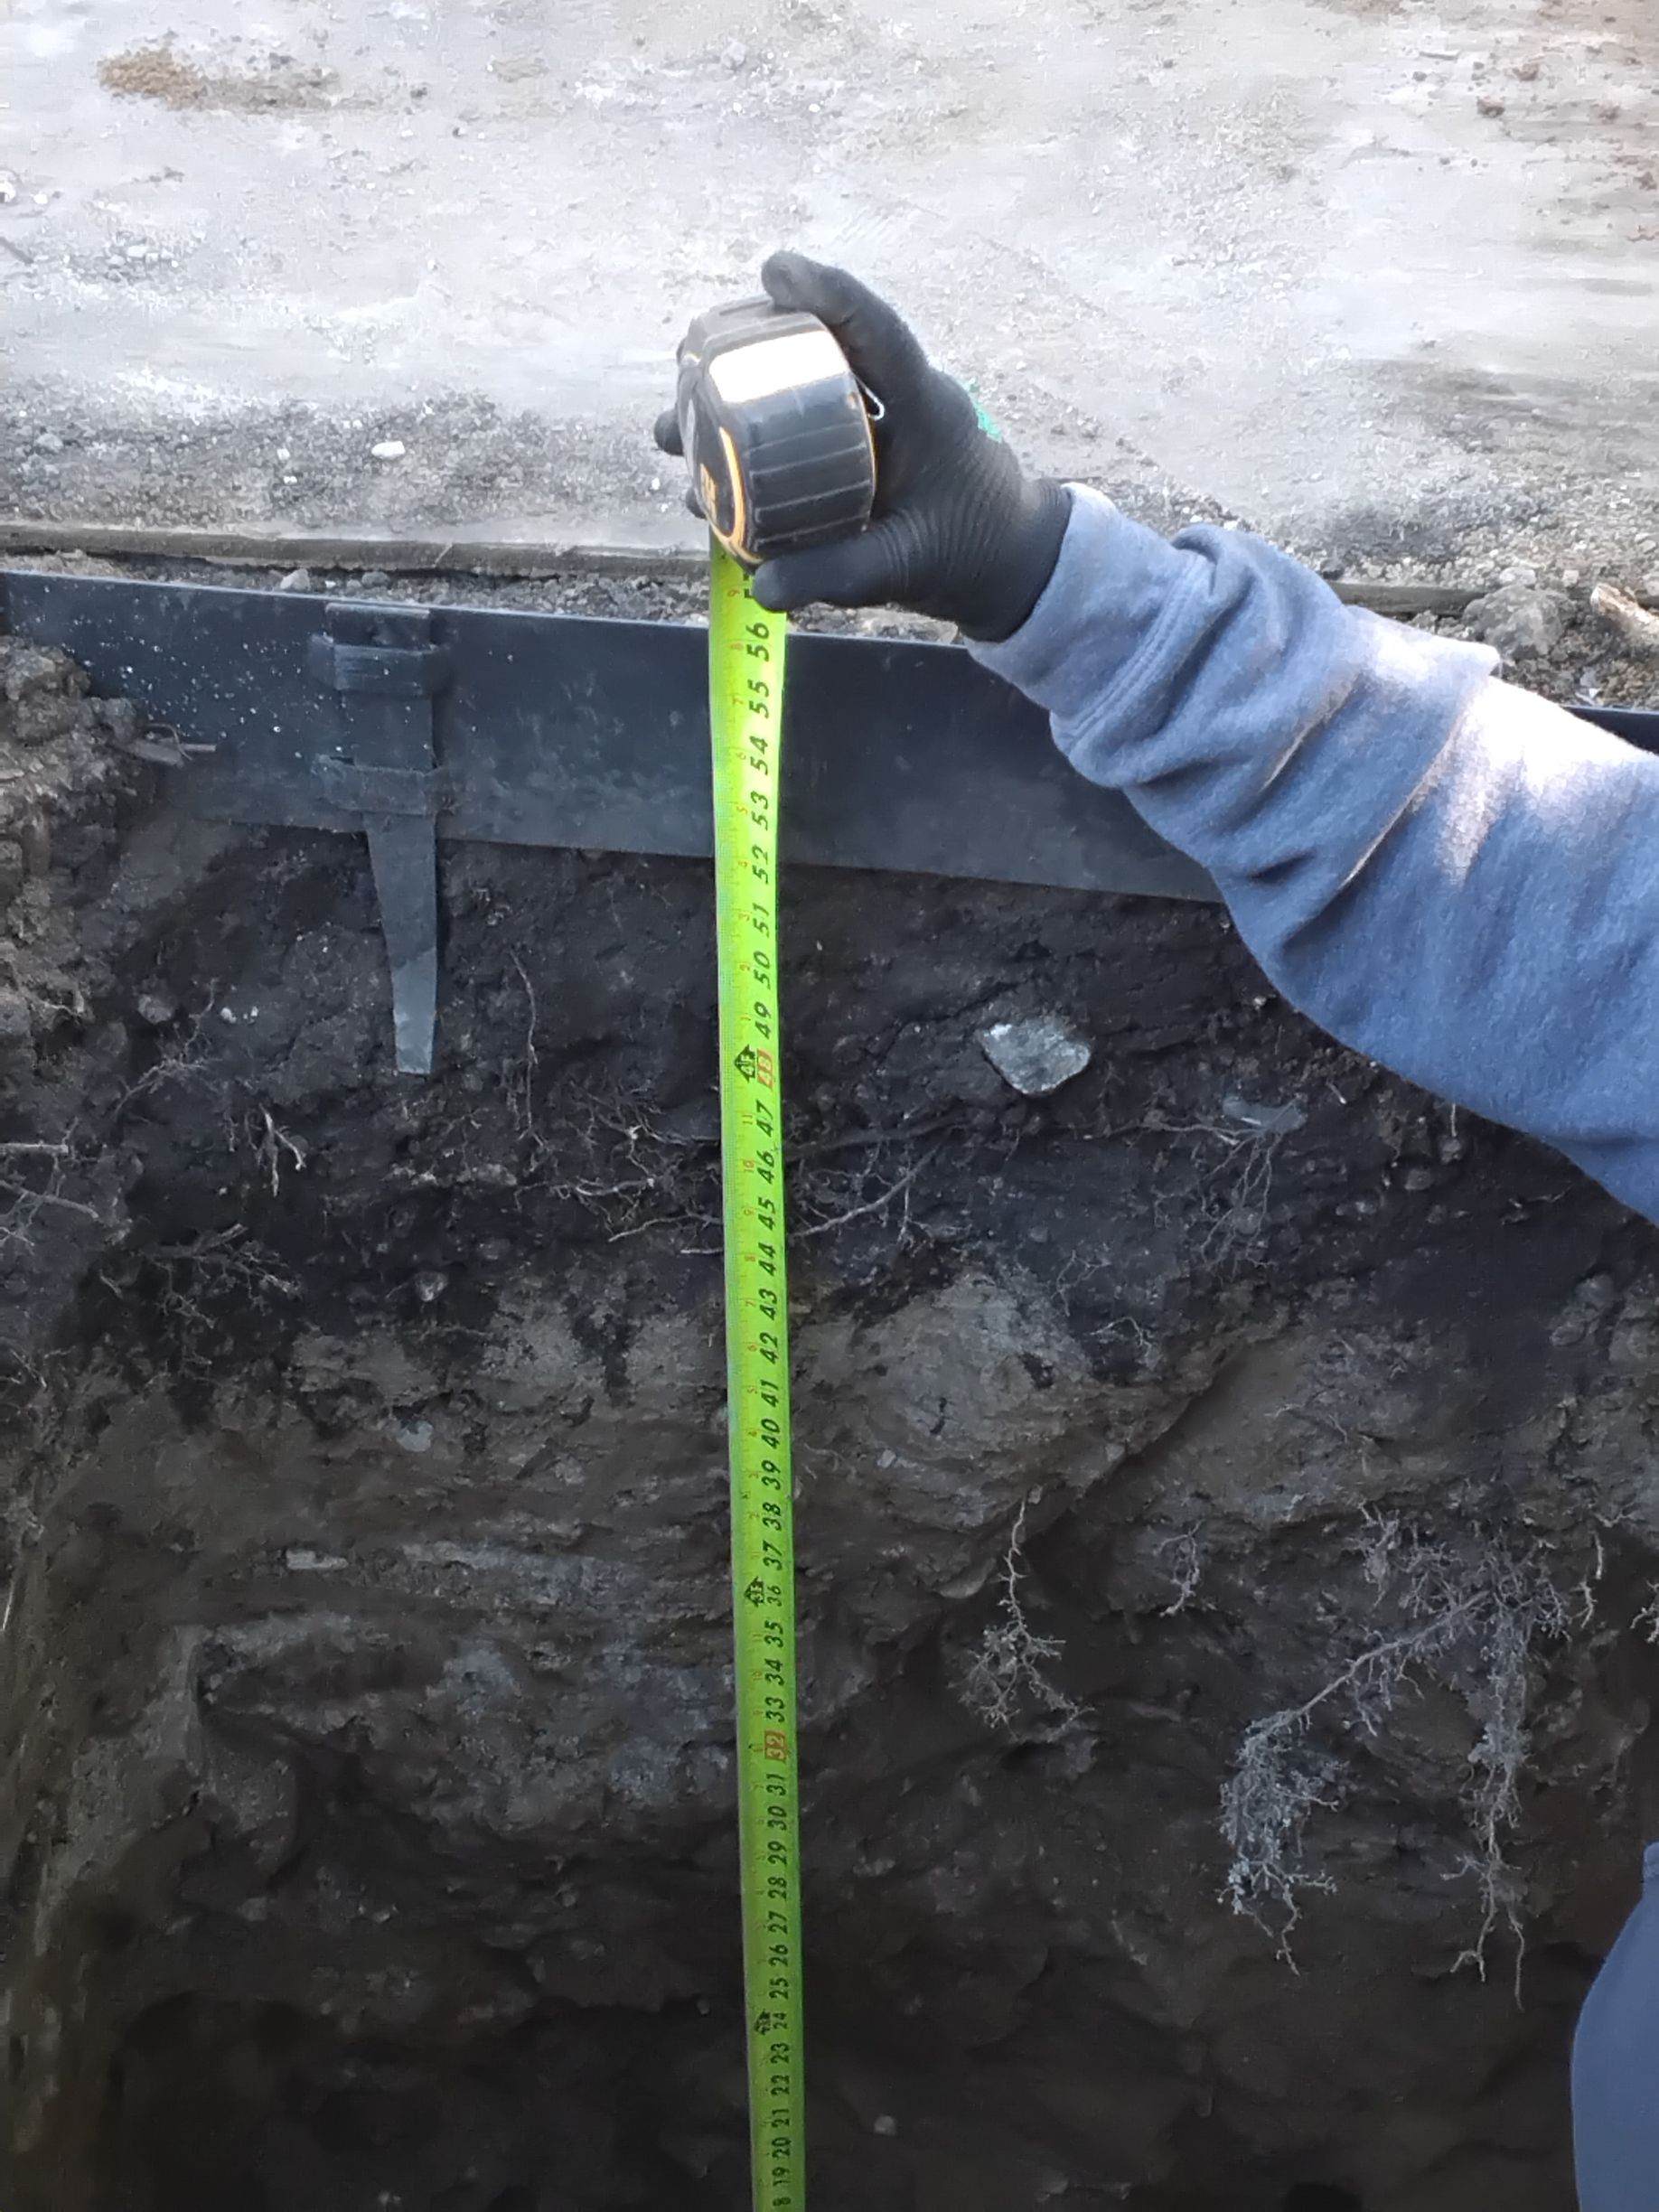
The dry well was excavated to a depth of 54 inches, intentionally extending below Minnesota’s 42-inch frost line. By placing the system beneath the frost zone, we ensured the dry well can continue absorbing sump pump discharge throughout the entire year, including during freeze–thaw cycles when shallow systems often fail.
Building dry wells at a larger capacity and greater depth greatly increases their long-term performance and reliability. Even the best-designed systems can allow small amounts of silt or debris to enter over time, so we took every precaution to minimize clogging, control sediment, and protect the system’s functionality.
As shown below, this dry well was intentionally overbuilt to ensure durability, efficiency, and peace of mind. Our goal is always to construct systems that are not only effective today, but designed to perform reliably for decades—if not a lifetime.
Step 4.1: Excavate the Dry Well Pit
A large pit was excavated to the precise dimensions required by the dry well design. In this case that was 4' wide x 12' long x 54" deep. Proper sizing and depth are critical to ensure the system has sufficient capacity to manage sump pump discharge during heavy or prolonged rain events.
Our crews always measure twice to ensure we build to the exact size we planned for and bid, ensuring no corners are ever cut. Once excavation is complete, the bottom of the pit is leveled and prepared to ensures even water distribution and long-term structural stability.
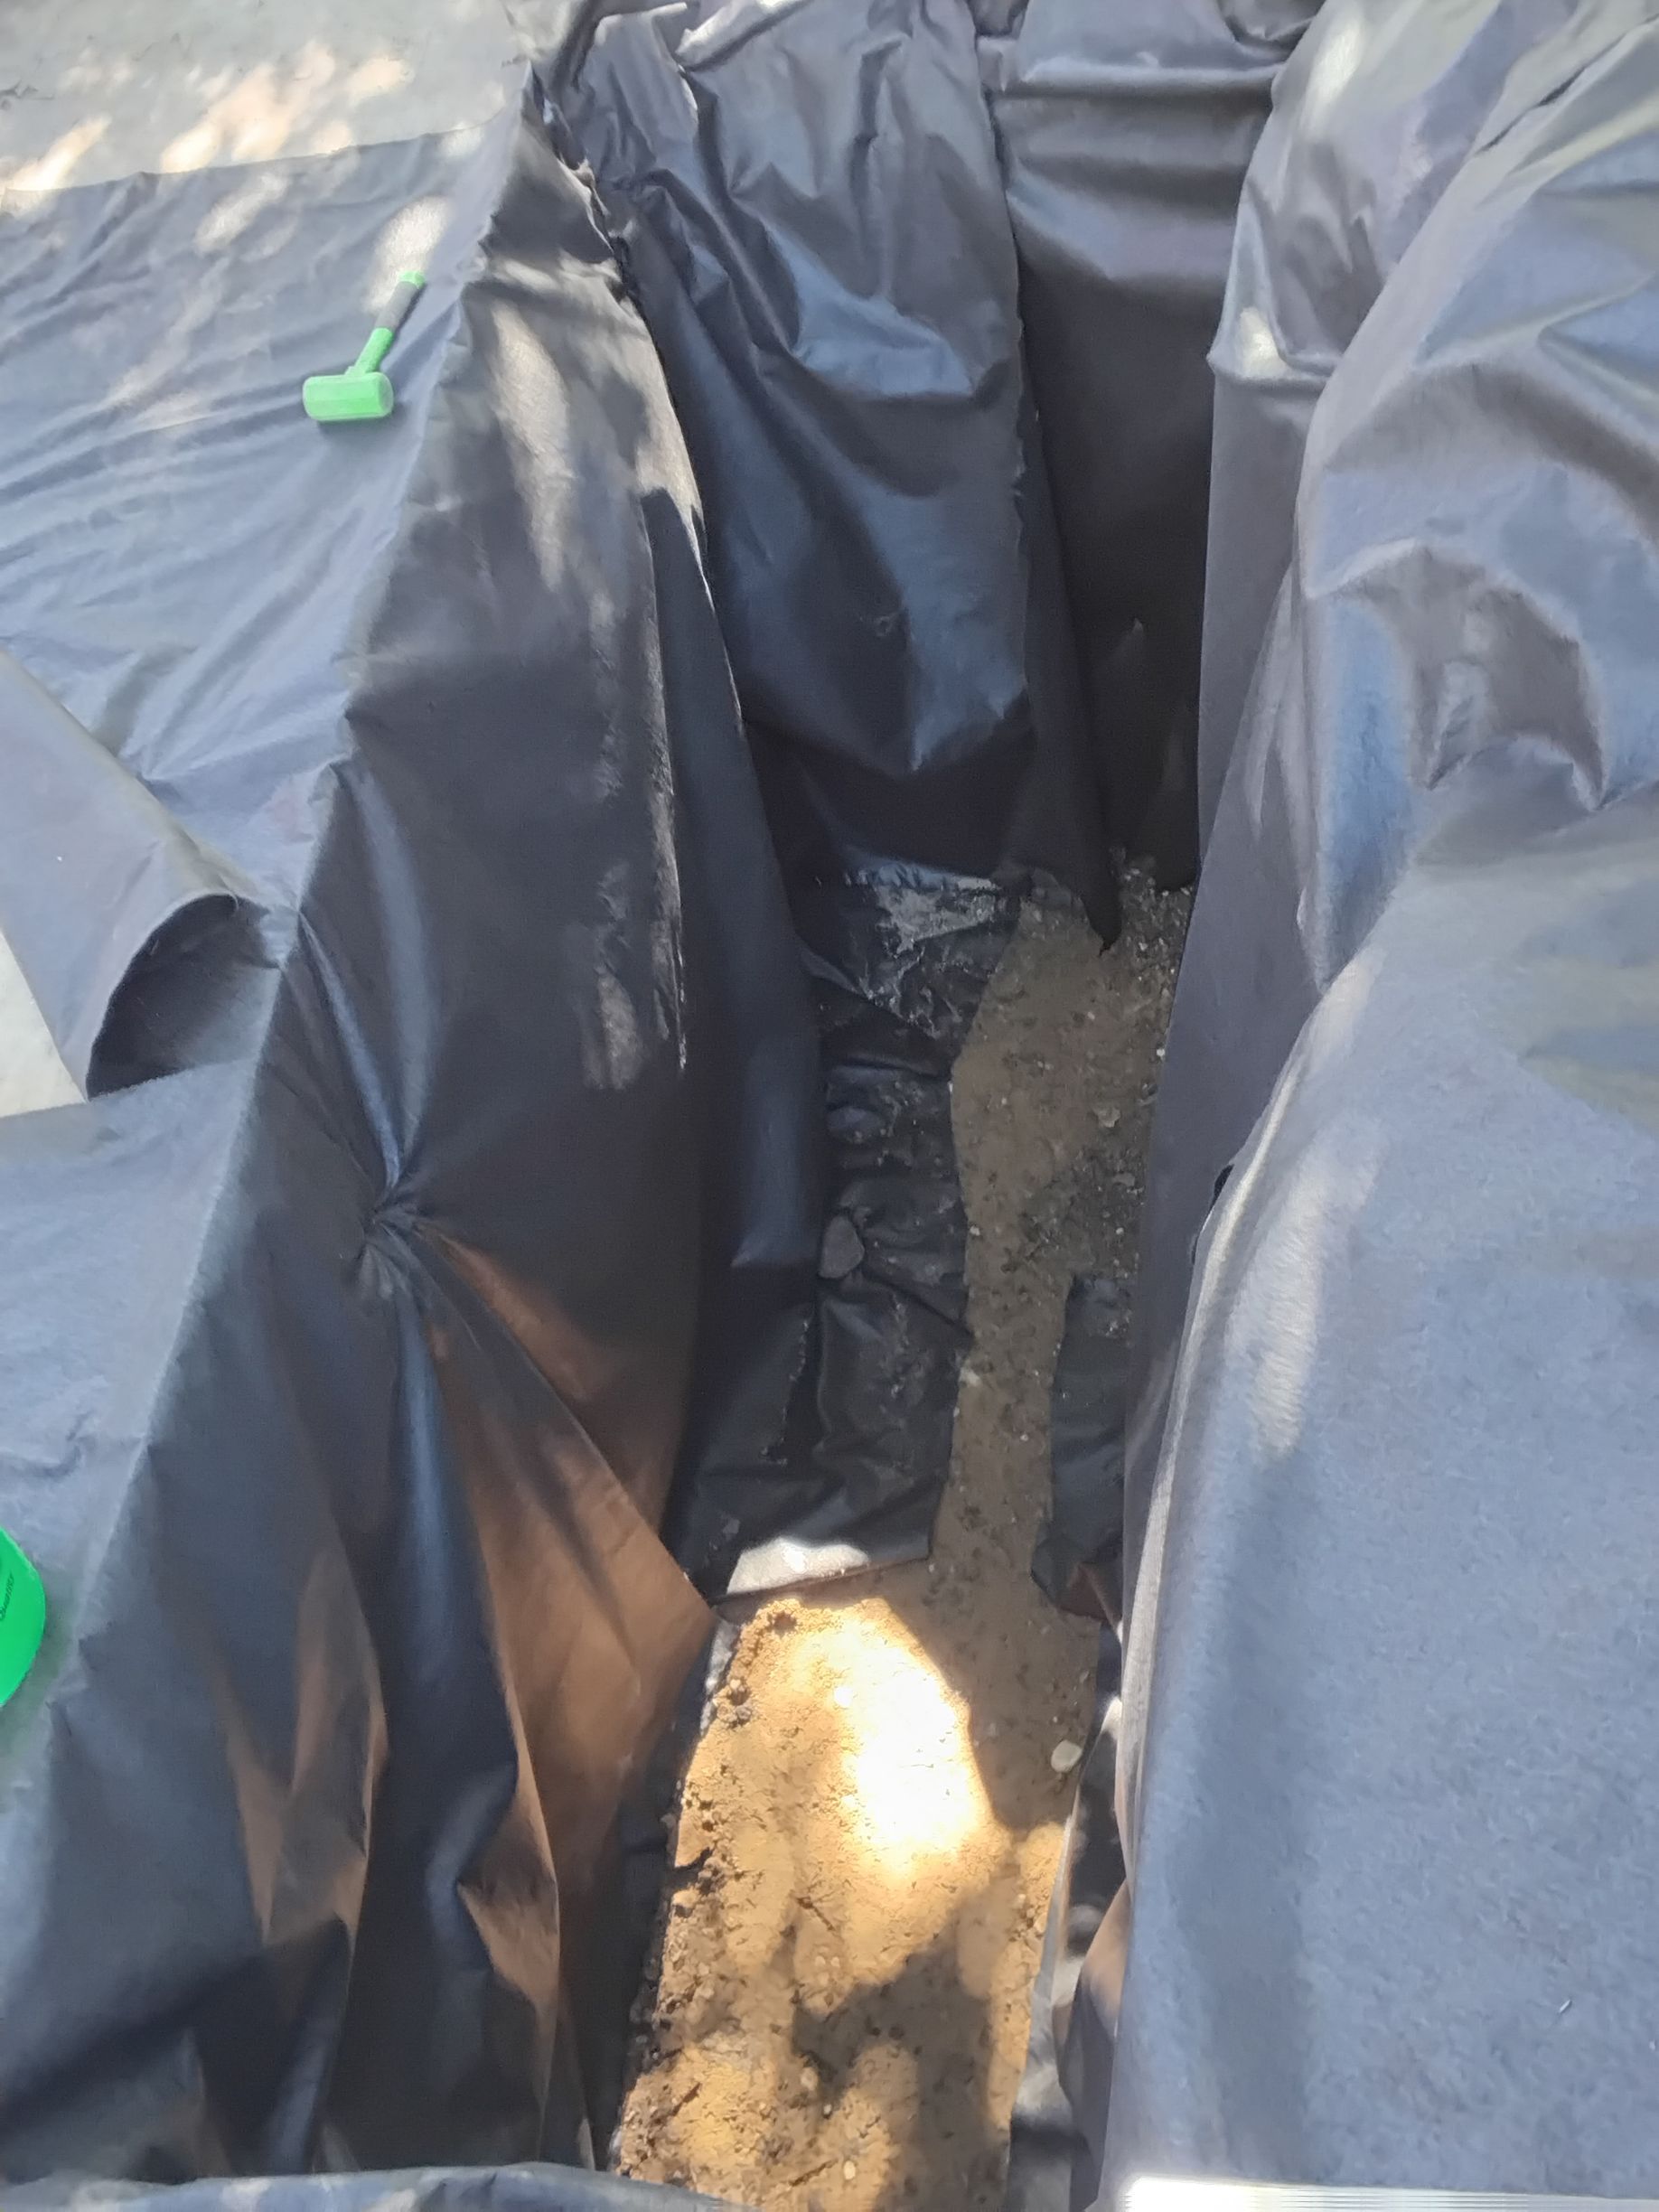
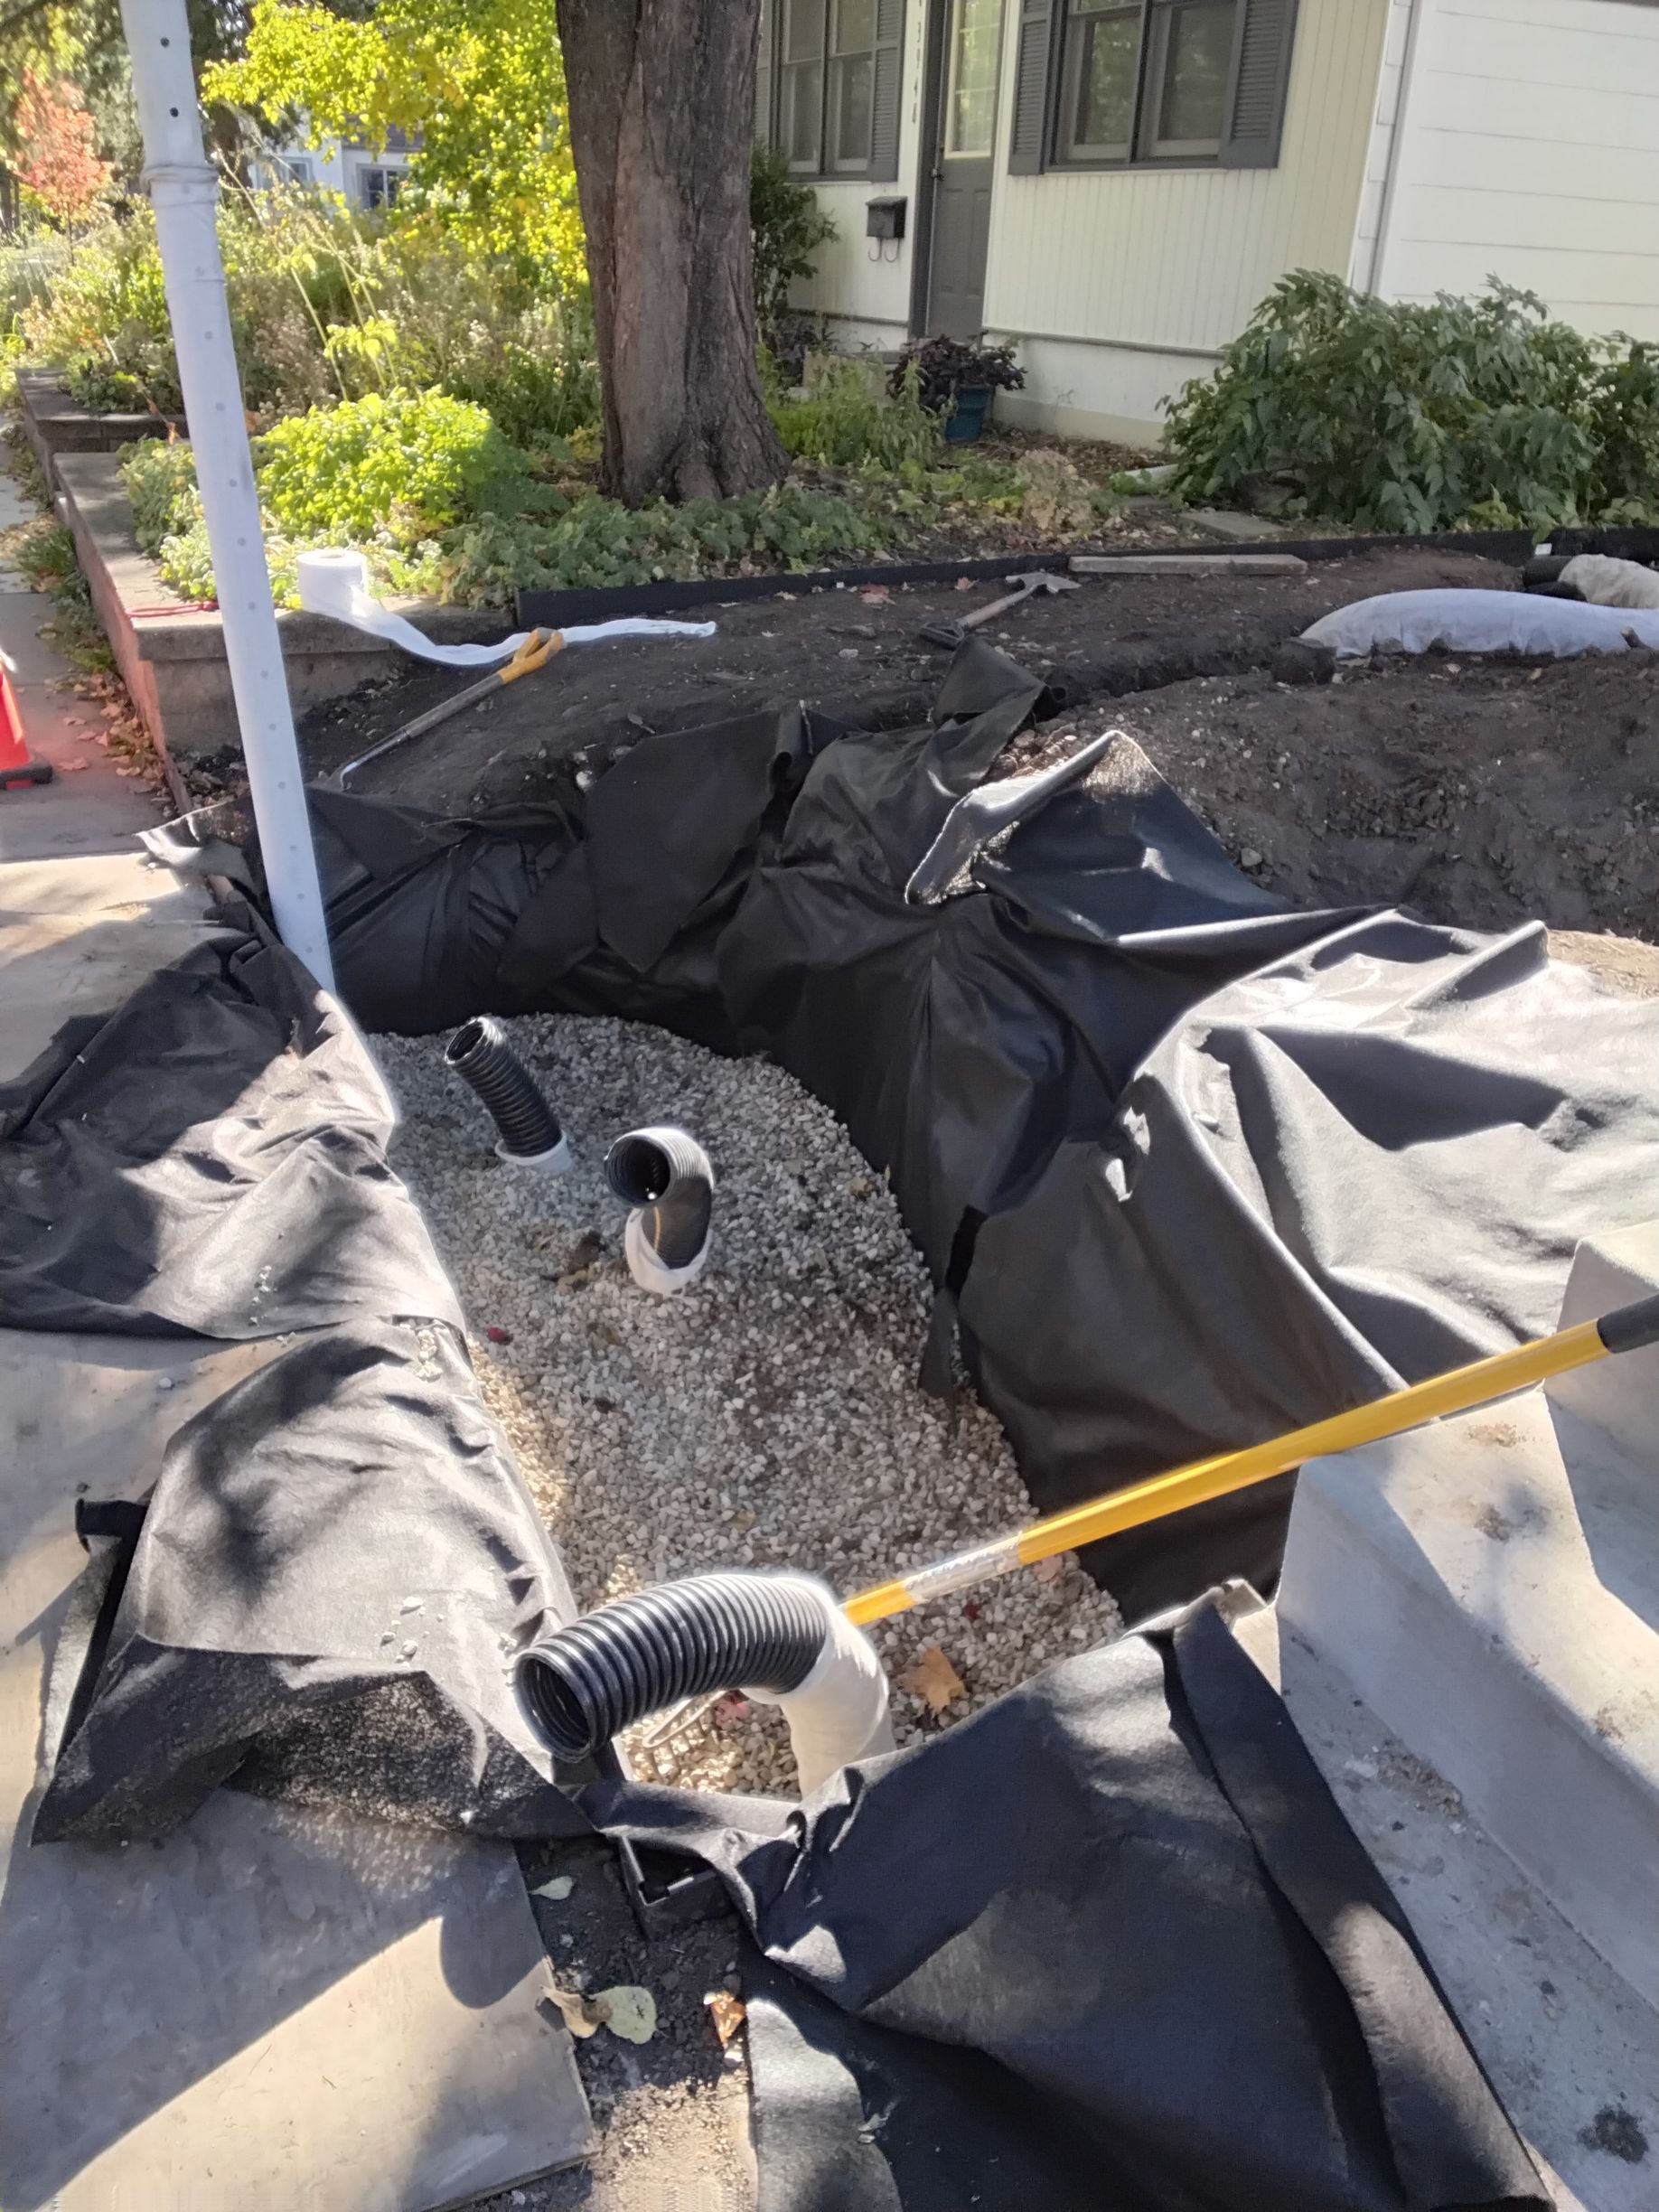
Step 4.2: Line the Pit With Filtration Fabric
The sides of the dry well are lined with thick, durable 8-millemeter filtration fabric, the thickest most durable fabric available. This fabric prevents surrounding soil and silt from migrating into the system and clogging the clean drainage rock over time, significantly extending the life of the dry well.
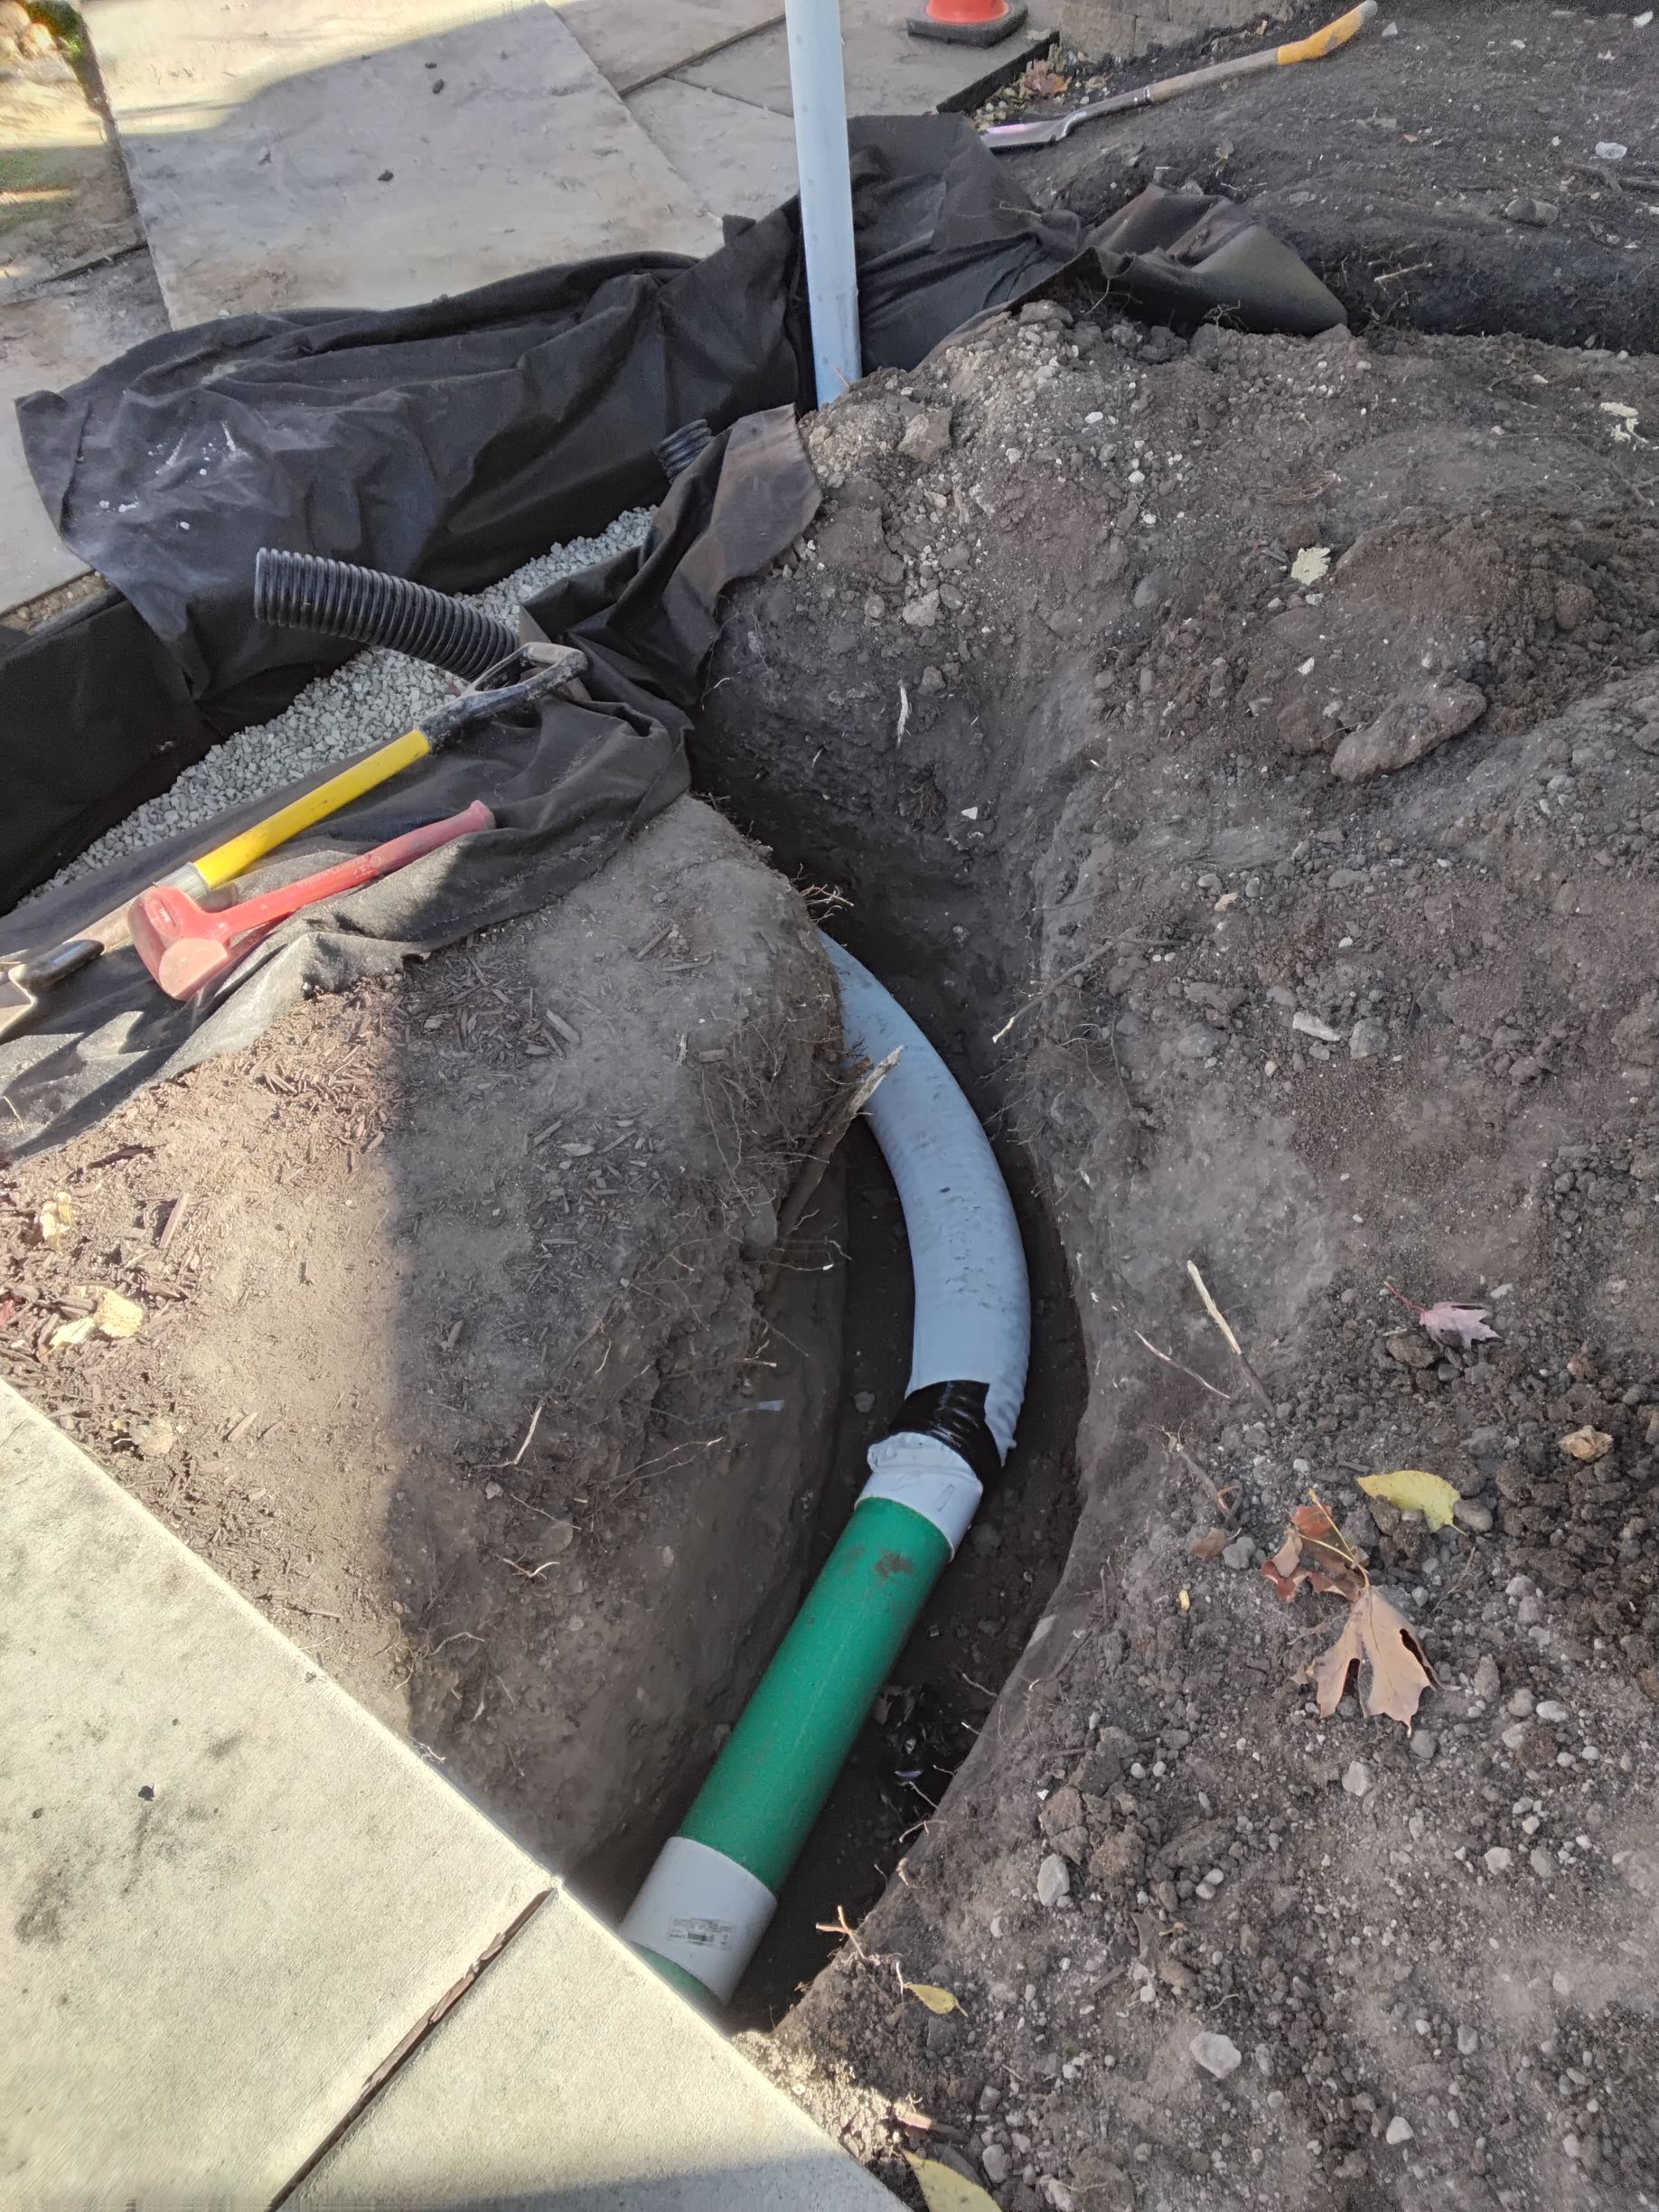
Step 4.3: Install the Internal Distribution Pipe Network
A network of PVC pipes is installed inside the dry well. For this project, the system includes three vertical pipes connected to a single horizontal pipe that receives water from the primary underground drain line coming from the sump pump discharge. In this project, we also included a pipe emptying into the dry well system that drains water from the French drain we installed along the South side of the house.
Step 4.4: Extend Vertical Pipes to the Bottom of the Dry Well
The vertical pipe sections extend all the way to the bottom of the dry well. This design ensures water is delivered directly to the lowest point of the system, reducing reliance on upper layers and minimizing the risk of surface-level clogging over time.
Below: See During Pictures of Steps 4.2 - 4.8

Step 4.5: Optimize Long-Term Performance and Longevity
Delivering water to the bottom of the dry well helps maintain consistent infiltration even decades into the future, even if the top layers of drainage rock were ever to be clogged with silt (again we've planned to prevent this), but its another layer of protection. These design refinements reduce the likelihood of silt buildup impacting performance and improve overall system durability.
Step 4.7: Install Drainage Rock Around the Pipe System
Clean drainage rock is placed around and over the pipe network, filling the pit up to the top of the piping. Since water only drains down (gravity), there is no reason in this case to add any more rock higher than than a couple inches over the top of the pipe. The rock creates open void space that allows water to disperse evenly and infiltrate into the surrounding soil efficiently.
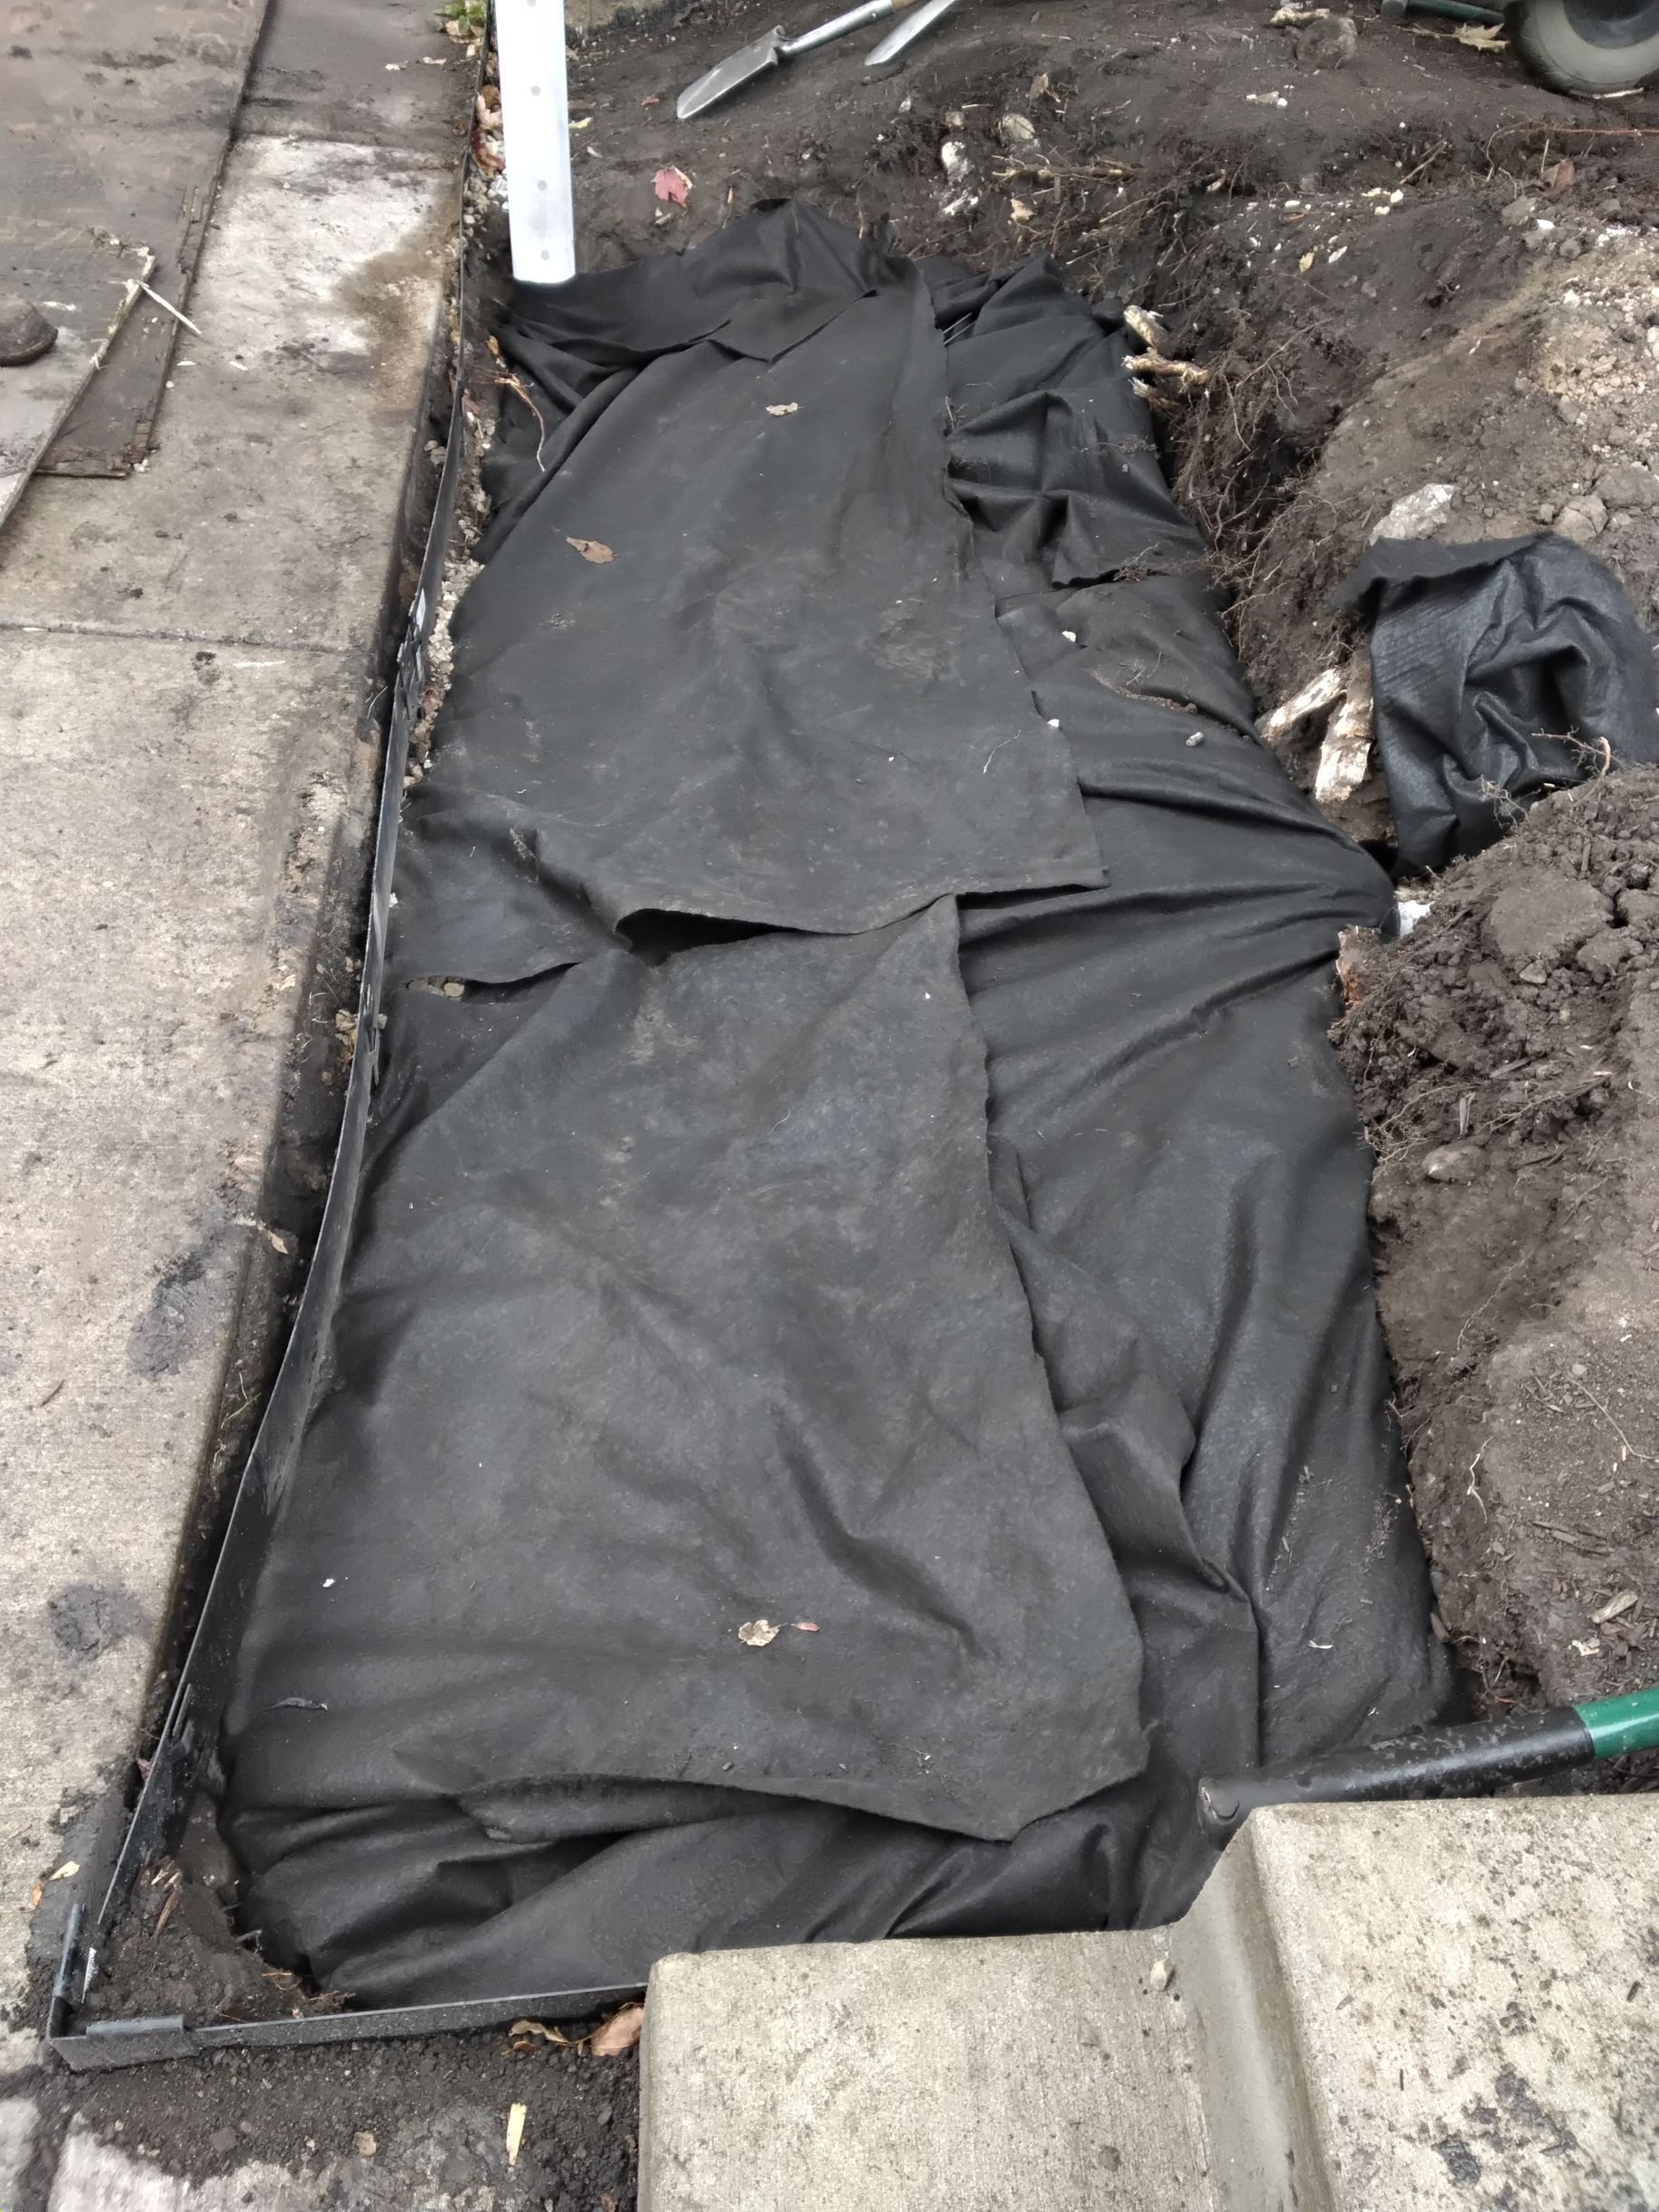
Step 4.8: Cover the System With Filtration Fabric
Once the drainage rock reaches the proper height, the entire system is wrapped with an additional layer of filtration fabric. This creates a complete barrier that prevents soil from above from entering and clogging the drainage rock below.
Step 4.9: Install Vent, Viewing, and Overflow Grate Cap
A vertical 4-inch perforated PVC pipe was installed to serve multiple purposes. It allows the dry well to vent, improving water flow into the system. It also provides a viewing port, allowing future inspection of water levels and system performance.
The vertical perforated pipe also functions as an overflow pathway. In the unlikely event the dry well reaches full capacity during extreme rain events, this pipe provides a controlled outlet for excess water. This added redundancy reflects KG Landscape’s commitment to designing systems that are reliable, resilient, and built to stand the test of time.

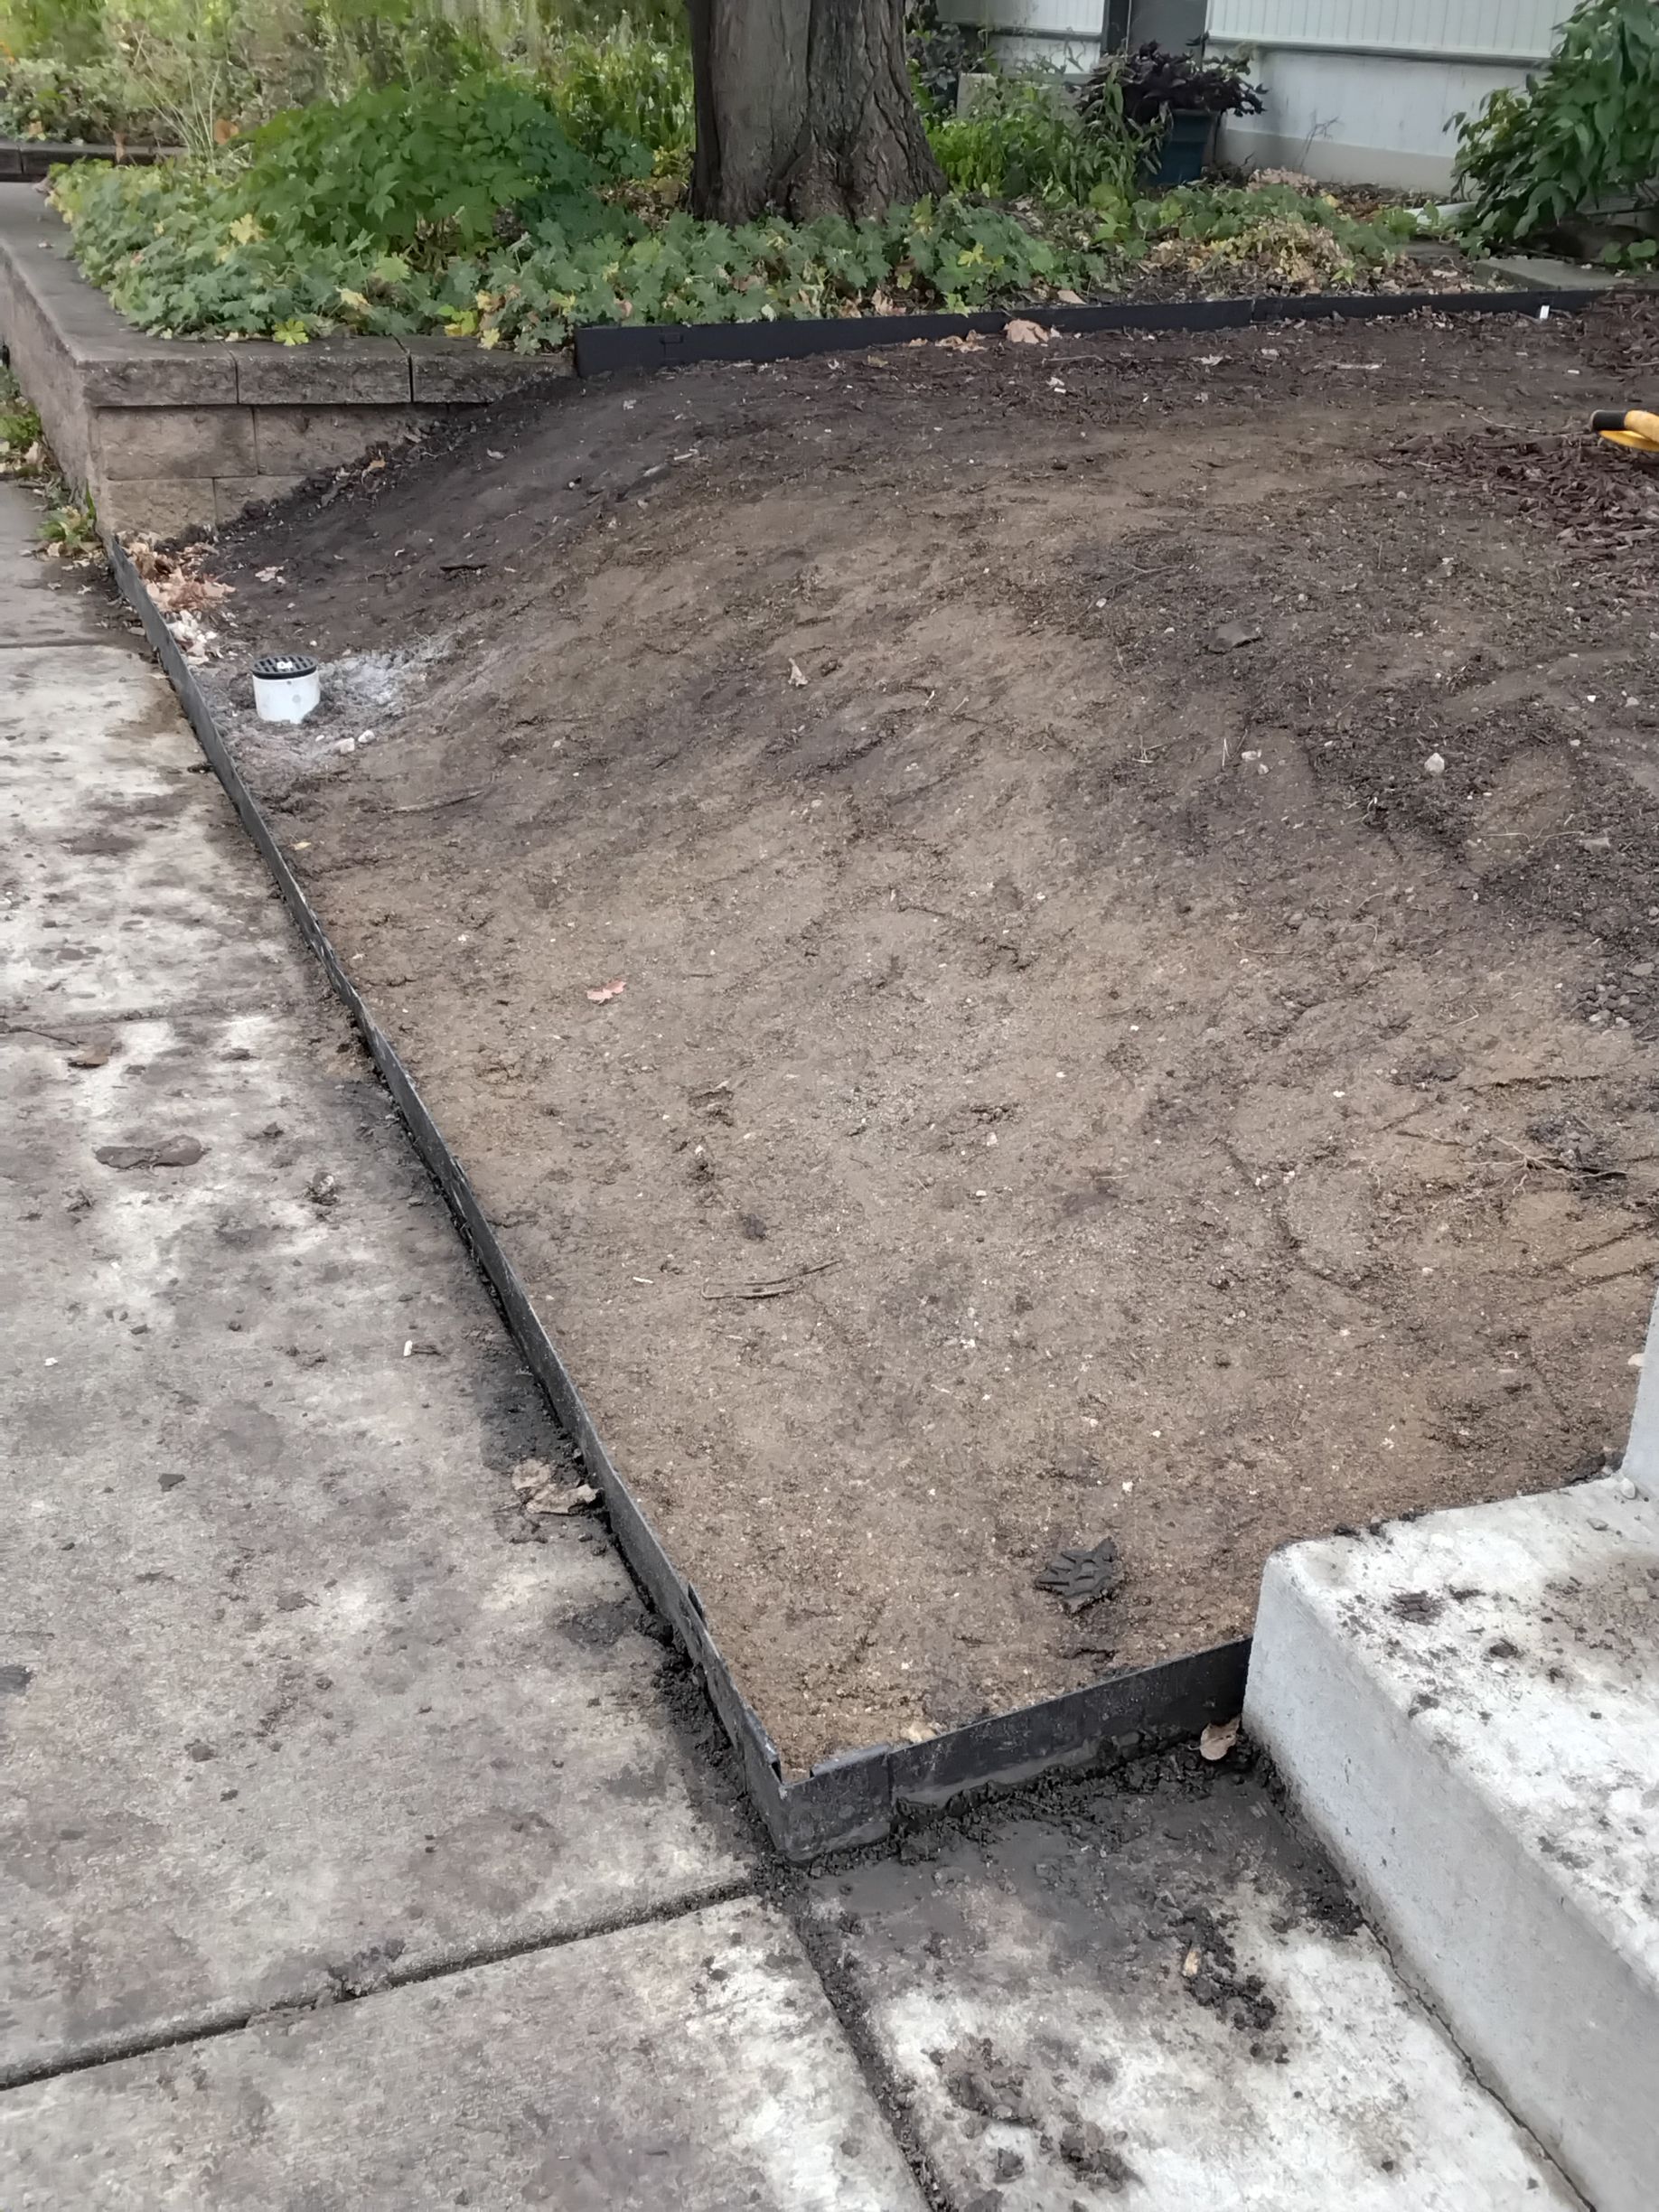

Step 4.10: Finishing Work: Grading, Finishing Work & Tidying Up
After the dry well was covered and all components were complete, our team placed approximately 4 inches of soil over the top to secure the system and establish final grade. We then reinstalled and shaped the surrounding soil to recontour the existing front yard slope, blending it seamlessly with the adjacent side yard.
Because this area was previously mulched, we installed a fresh 4-inch layer of matching mulch to restore the landscape and ensure the finished area looked clean, uniform, and undisturbed.
We also reinstalled the steel edging along the city sidewalk to prevent mulch from washing onto the concrete. The result was a site left clean, polished, and fully restored—looking as though we’d never been there at all.
Why This Solution Worked for This Property
This solution succeeded because it was designed around the specific constraints of the site.
Flat grading, limited space, winter freeze cycles, worked around the location of existing gas and water lines and sump pump output location all influenced the final design. Rather than forcing a generic fix, the drainage system was tailored to how this property actually behaves.
The Result
The Drainage Problem Was Successfully Eliminated
After our installation work was completed, the sump pump water was easily handled by the dry well and zero water now pools on the sidewalk.
The homeowner no longer needs to manage hoses, monitor discharge paths, or deal with winter ice. Sump pump water is handled consistently and out of sight.
The foundation grading and side yard swale we installed along the North side of the house and the Foundation drain tile / French drain we installed along the South side significantly reduced the amount of water making it into the interior drain tile and being pumped out via the sump pump.
Results included:
- Improved year-round drainage performance
- The sump pump has become less active
- Elimination of surface pooling and ice
- Safer sidewalks and yard areas-
- Cleaner, more usable outdoor space
The customer is Very Happy and No Longer Worries About Water Problems
👉See This Customer's Review of Our Work

We had a fantastic experience working with Kent and the team at KG Landscape Management! They helped us install a dry well, French drain, and regrade our yard to address water retention around our foundation. From start to finish, Kent was professional, knowledgeable, and responsive. The crew worked efficiently, kept the area clean, and made sure every detail was done right. We’ve already noticed a big improvement after recent rains. Highly recommend KG Landscape Management for anyone looking for reliable and skilled drainage or landscaping work!
-Paul K.
Learn How KG Landscape Can Help with Your French Drain Project - Our Process
Would you like to have an experienced and specialized outdoor drainage expert come to your home, to professionally evaluate your drainage problem in Minneapolis and make expert recommendations as to how to fix your specific drainage concerns the right way?
Request an Onsite Drainage Consultation
When you schedule a drainage consultation with us, an experienced member of our team will meet you at your home to evaluate your yard as a whole. We take a holistic approach to understanding the drainage issues you’re experiencing and provide clear, practical guidance on how we believe those problems can best be resolved.
During the visit, we’ll walk through good, better, and best drainage options and discuss ballpark cost ranges to help guide the decision-making process. We also take your short- and long-term plans into account — whether this is your forever home or you’re planning to move in the near future. In some cases, we recommend French drains; in others, we don’t.
Our recommendations are always based on the specific conditions we observe and the circumstances unique to your property. No matter what, you can expect thoughtful, professional recommendations for outdoor drainage solutions we believe will best meet your needs.
If the work we recommend falls within our area of expertise, we’ll provide a written estimate with a fixed price for our crew to complete the proposed drainage solution. Should you choose to move forward with the project, 100% of your drainage consultation fee is credited back toward the installation.
Our goal is to perform the drainage work we recommend and keep our talented crews focused on the work they do best. For that reason, we do not offer consultations for homeowners planning to complete the work themselves or for properties located outside of our service area.
Our French Drain Project Steps - From Start to Completion
- Call or complete a Quote Request Form to set up a consultation
- Meet with our expert onsite and discuss options
- We'll make recommendations and provide a written estimate for our team to install the recommended solutions
- To book installation work, submit deposit payment and sign the estimate
- We'll schedule your project for our next available opening
- Our office team will communicate by email with updates on project timing
- We'll call to have all public utilities marked in your yard
- Then we complete project and ensure you are 100% happy with our work
- Lastly, we'll send out the final invoice after work has been completed