
Paver Patio Maintenance Tips & When to Repair vs. Replace
What Type of Maintenance Do Paver Patios Need?
While pavers and stone patios are known for their low maintenance, it is important to understand they do require some level of attention and care. These maintenance procedures should be followed in order to achieve the desired appearance and extend the life of your patio.Patio Maintenance is not just for appearance. Think of it as a proactive approach that will preserve the functionality and value of your outdoor space. To learn more about patio design and installation, visit our patio page .
Keep it Clean - How to Wash Your Patio
To maintain the appearance of your patio, you should regularly clean it to ensure it remains free of organic debris such as leaves, dirt or grass clippings that can leach into your patio over time and cause staining. This can be done be sweeping off or using a leave blower to remove debris.We also recommend a light and careful power washing of your patio once a year to help maintain a clean look. When power washing pavers or natural stone patios, it’s very important to use a wide-angle nozzle instead of a narrow one. Be sure to keep to the tip a safe distance from the pavers/stone. High-pressure cleaning can damage the pavers or “blast” out the stabilizing elements in your patio, such as poly sand if you’re not careful.
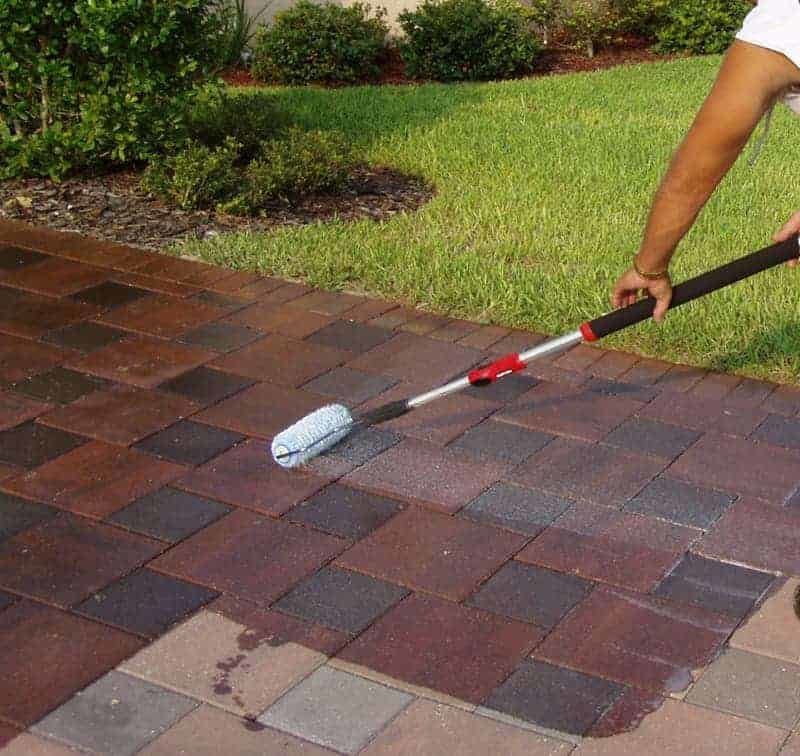
Spraying a cleaner and brushing it with a firm bristle broom is another option for cleaning your patio. Use a low-pressure hose to rinse off the patio after you have brushed it with your cleaner. This takes more “elbow grease” but is the safest way to clean your patio.
Patio Cleaning Tips
1. We recommend using a detergent-based cleaner that can be applied via a backpack sprayer. Don’t have any patio cleaners? Dawn dish soap works fine!2. Acid cleaners are stronger but have a serious risk of etching, staining, or discoloring the stone. We recommend that only a professional apply an acid-based cleaner and test on a tiny section before applying to the entire patio. Read the ingredient label to check for acids.

Protecting Your Paver Patio with a Sealant
A great way to protect your patio from staining and discoloration between washes is to apply a patio sealant. This sealant serves as a barrier against various elements such as UV rays, moisture, stains, salt damage, helping to extend the lifespan of the patio and enhance its overall appearance. Patio sealing can also prevent the growth of mold and mildew, reduce the risk of cracks and erosion, and make the surface easier to clean.Sealants are available in different finish options, with a high gloss providing a “wet look” and a low gloss that will not noticeably change the appearance. It provides a durable and weather-resistant finish that not only safeguards the patio from damage but also enhances its color and texture. The typical steps for application are as follows:
- Decide on the “look” you want (high gloss vs low gloss), any landscape or large hardware store will carry this product
- Thoroughly clean the patio and let dry
- Touch up poly sand by sweeping in new sand where needed.
- Depending on the manufacturer, the product will be spread using a non-aerosol pump sprayer or by pouring it out over your pavers (use a section-by-section approach)
- The final step would be to back-roll the product to ensure a smooth and even coating
- Be sure to clear any poly sand located on the side of your house/trees/etc. as the material can stick/stain
Prevent Patio Settling by Maintaining Poly Sand Between Pavers
Two Basic Approaches to Fixing Poly Sand Issues on a Patio
- Spot-check and fill in the joints between your pavers.
- If you notice some areas where the sand has become displaced you can sweep in new poly sand.
- We recommend poly sand be installed to within 1/8” of the patio surface.
- Once the poly sand has been swept in, use a garden hose to lightly water down the patio and therefore activating the polymers in the poly sand
- Be sure to clear any poly sand located on the side of your house/trees/etc. as the material can stick/stain
- This “spot check” should be performed yearly.
- If needed, you can fully redo the poly sand for your entire patio.
- You would start cleaning the surface of the patio (sweeping off all debris/etc.). You would then purposefully blast out the top ¼-3/4” of poly sand between the paver joints using a power washer with a narrow high-pressure nozzle.
- Be sure to clear any poly sand located on the side of your house/trees/etc. as the material can stick/stain
- After this has been performed, you must wait for the patio to dry. Once dry, you can proceed with sweeping in new poly sand.
- After you have finished sweeping, use a hose or other water option (as opposed to a power washer) to wet down the poly sand therefore “activating” the mixture and sealing it in place.
- We would recommend this be performed every 5-7 years or so as needed.
When to Repair vs. Replace a Paver or Flagstone Patio
If you are noticing issues with your patio, such as settling or unevenness, you might be wondering if your patio can be repaired or if replacement makes the most sense. The first step to take is to identify the root cause of the issue. Start with looking at the patio itself to determine if it was properly built in the first place? Is the edging around the patio perimeter holding everything in place? Have individual pieces been chipped? Here is an easy checklist to follow for checking on the quality of your patio’s original construction.
- Remove damaged pavers by lifting them out of place and settling aside in the pattern they were laid.
- Dig a 6-8” hole to examine base construction
- A properly installed patio will have a 1” layer of leveling sand or crushed rock followed by a 4-6” layer of class 5 (or equivalent base material) with an underlayment fabric below
If you are not seeing this outlined method of construction under your patio, your patio was not properly built and it may not be worth fixing. Instead, replacement would be the more thorough long-term solution. If you’re not sure what to do, we recommend having a professional like KG Landscape out to advise whether the replacement is required or if repairs might make sense.
Reasons to Replace a Stone Patio:
- Improper construction
- Damaged beyond repair
- If you do not like the size or shape of the patio or the style of the pavers
- If the cost to repair is similar to the cost to replace
Reasons to Repair a Paver Patio:
- It’s holding up well, with only a limited amount of issues
- If the repairs will help keep the patio nice for the long run
- You still like the current look, shape and size of the patio
- If your goal is to keep costs low, while at the same doing small fixes prior to selling your home
Drainage Issues Can Damage Patios
If the cause of the issue is outside of the patio footprint such as a drainage problem , that will have to be solved before you move forward with fixing the patio.Signs of improper drainage can be, but are not limited to, water has been pooling in your patio area, washed out poly sand, a downspout emptying right onto a patio, if you are noticing erosion or soil washout around the edges of your patio, stains from mineral deposits on the surface, and/or mold and mildew growth.
Improper drainage can also cause the soil underneath your patio to shift during the freeze thaw cycle and therefore cause the pavers or stones to shift and become unlevel. If you would like to have one of our experts out to access your property, feel free to reach out .
To learn more about drainage, visit our drainage solutions page .
In Conclusion
Proper patio maintenance is essential to ensure the longevity, functionality, and aesthetic appeal of outdoor living spaces . Regular cleaning, sealing, and addressing drainage issues contribute to preserving the patio surface, preventing issues such as cracks, stains, and uneven settling. By incorporating routine inspections and timely repairs, homeowners can create a welcoming and well-maintained patio that enhances their outdoor experience.Investing time and effort in maintaining the patio not only safeguards against wear and tear but also enhances the overall value of the property. Ultimately, a well-maintained patio provides a durable and enjoyable space for relaxation and entertainment, extending the life and beauty of this integral part of your home.
Ready to Start on Your Next Project?
Call us at (763) 568-7251 or visit our quote page.

The legendary architect Louis Sullivan coined a phrase that has driven architecture and design ever since: "form follows function." While aesthetics are critical to buildings and landscapes alike, that physical beauty must always remain secondary to the fundamentals of good design. In Shoreview, Minnesota, just outside St. Paul , we encountered a landscape where, unfortunately, function followed form. Here, the realities and principles of effective drainage were downstream of their original builder's aesthetic choices. That meant water from snowmelt and rainfall was streaming into parts of the lawn where it wasn't meant to be. The standing water that had been allowed to collect in the back and side yards was putting a considerable amount of the property out of play. In order to reclaim usable space and rethink the way the land handled water, this Shoreview homeowner entrusted KG Landscape with identifying key issues, presenting potential solutions, and doing the necessary work the client decided upon to restore their lawn.

On the shores of Lake Minnetonka, perhaps the most famous of Minnesota's 10,000 lakes, an Orono, Minnesota homeowner was struggling with a back yard that was becoming more marsh than yard. The yard was a scenic one. The back porch opened up to the top of a small hill, which rolled down toward the lakefront and the boathouse. This flat space between the hill and the water would be ideal for backyard barbecues, some low-stakes games of bocce and badminton, or simply a spot to lay down a towel and get some summer reading done. Instead, this area was too waterlogged to enjoy. The runoff from the hilltop combined with unfavorable soil composition were limiting the use of the yard, closing off space while even diminishing the quality of the turf. How would this homeowner be able to reclaim this unusable land without disrupting the Lake Minnetonka shoreline that made the property so attractive? To find a solution, they turned to KG Landscape.

Can you use compost as lawn fertilizer in Minnesota? Learn how compost feeds turf, how to apply it, and where it fits. Get a free quote.

Organic weed control for Minnesota lawns: what works, what doesn't, and how to manage weeds without harsh chemicals. Get a quote.

Keep your lawn and your pets safe. Pet-safe lawn care tips for Minnesota yards, from products to timing. Get a free quote.

Looking for the best organic lawn fertilizer in Minnesota? See top options, how they feed your turf, and what KG uses. Get a quote.

Is compost a fertilizer? Learn what compost does for your Minnesota lawn, how it differs from fertilizer, and when to use it. Get a quote.

Compost feeds the soil, fertilizer feeds the grass. Learn which your Minnesota lawn needs, when to use each, and how to apply both. Get a quote.

Eco-friendly lawn care tips for Twin Cities yards: cut chemicals, save water, and build healthy soil naturally. Get a free quote.

Simple, proven lawn care tips for Minnesota yards: mowing, watering, feeding, and building healthy soil that lasts. Get a free quote.