

Outdoor Drainage Project
Pooling Water In Yard in Edina
The Drainage Problem
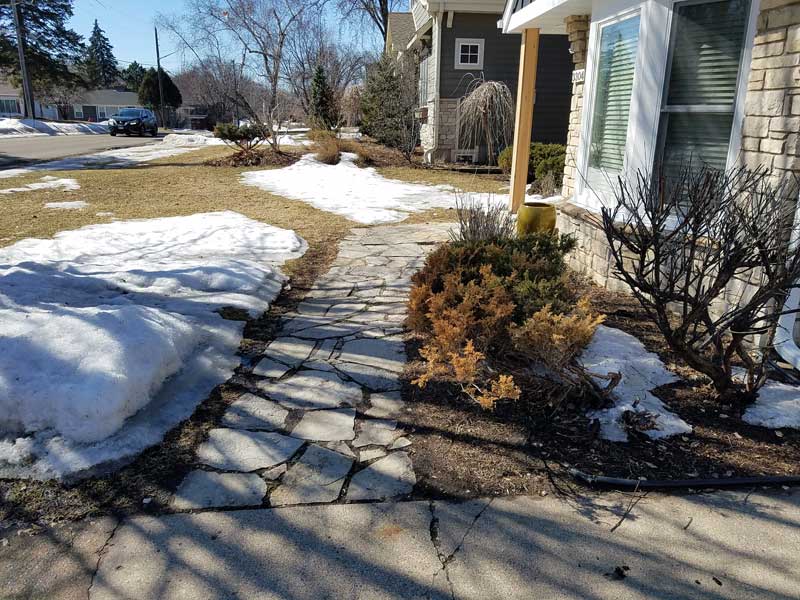
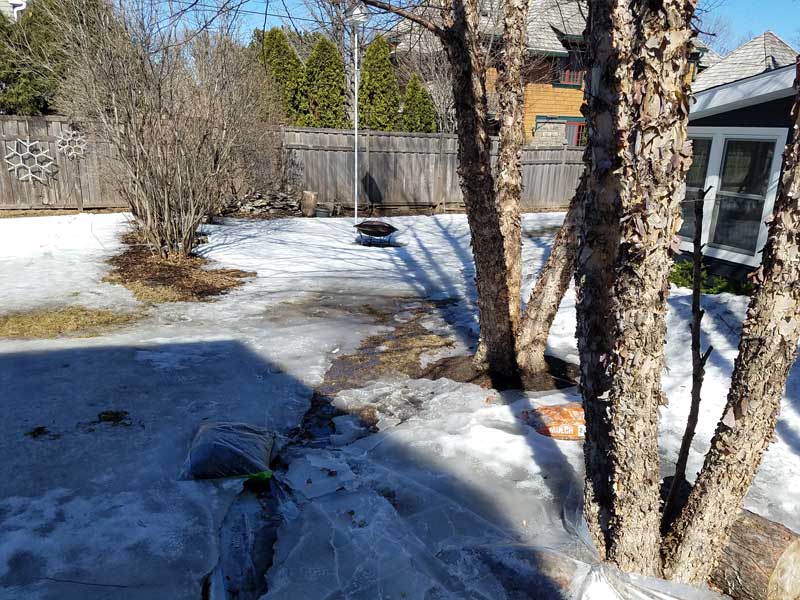
This customer called because this yard was extremely flat, water would pool in their yard every time it rained, and there was no where for the water to go. This water issue caused constant headaches and basically made the outdoor space unusable. The customers also wanted a front yard and backyard patio space for entertaining friends and family. Because KG Landscape is a full service landscape design/build company, we were able to solve their drainage issues and install beautiful outdoor spaces within the same project, completed by the same crew.
Step # 1: Outdoor Drainage Consultation
The customer reached out to us at KG Landscape and scheduled an outdoor drainage consolation with Kent, our owner and lead designer. Kent met with the customer at their home to observe the flat yard drainage issue in person. While there, he collected the site information needed to provide a detailed plan/estimate for a long term solution to the drainage problem and the patio spaces.
Step # 2: A Detailed Proposal
After careful consideration of the drainage problem and the options available to correct the issue, a detailed plan was put together to solve the customer’s exterior drainage problems in a cost effective and dependable way.
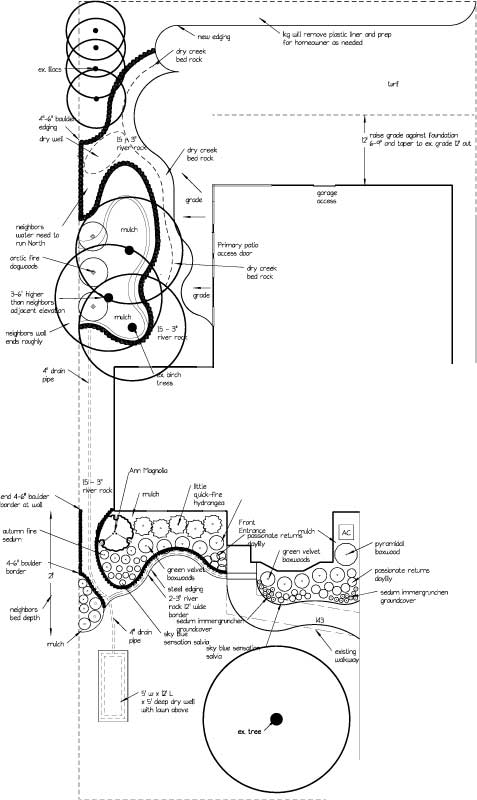
Drainage Solution Objective: The primary focus of the project was to grade the yard so water runs away from the home. This required installing new soil along the home and a lot of digging around the yard. Once the yard was graded correctly away from the home, the water flowing away from the home needed a new place to go. 3 different dry wells will be installed to collect water and let it drain slowly into the ground without erosion. These dry wells will be strategically placed in different areas of the yard and provide a place for water from the patios in front and back to drain to. These dry wells will be connected by underground trenches.
Below are portions of the proposal used to describe our drainage solutions to the customer:
Landscape Service Description
Front Yard Dry Well and Side Yard Drainage:
Remove soil in the side yard along the West side of the house so that there is a 9” slope away from the foundation along the west side. Install a French drain starting at a depth of 12” at the NW corner and dropping ¼” per foot all the way until the French drain empties into the dry well where shown in the design. The French drain will be 12-18” wide reaching a depth of about 24” where it empties into the dry well. A 4” corrugated perforated pipe with a silt sock cover will be used in the bottom of the dry-well to increase flow. The side yard will be lined with a waterproof poly liner to help prevent infiltration of water in the side yard. Fill the side yard bed with river rock so that it creates a flat surface for walking. The dry well dimensions will be approximately 5’ wide by 12’ long by 5’ deep. Around 11 yards of soil will be excavated and removed, then filtration fabric will be installed lining all sides of the dry well. Install ¾” river rock to a depth of 4’, then the top of the rock will be covered with filtration fabric and finally 12” of soil will be installed level/compacted over the top of the dry well. Rake in grass seed and cover the disturbed space with seed blanket.
Front Yard Bed Work/Plantings/Walkway/Step Facing
Remove and dispose of existing foundation landscaping plants/mulch/rock/edging and turf as needed in front yard. Grading work will be performed including removing and adding new soil to create a slope away from the house so that the foundation bed West of the front door will drain toward the French drain/dry creek bed bordering the bed space as seen in design. Bed space East of the front door will be graded to drain away from the foundation. Install 30’ of French drain/dry creek bed bordered with steel edging then outlined with 4-6” field stone boulders. The dry creek bed will be lined with filtration fabric and filled with 1.5-3” river rock. Install 4” of new milk chocolate mulch. The existing sidewalk will be removed and replaced with a new walkway as seen in design using a natural stone product from Orijin stone. The existing step will be faced with matching natural stone on the top/sides/rises/treads and mortar will be used below the stones on the step portion to ensure a flat surface.
Patio Work
Install new paver patio as seen in design using Belgard Catalina pavers, 5-6” of class 5 base material and 1” or course sand for the base below the pavers (heavily compacted and properly sloped for drainage). Install includes a decorative soldier course border using an accent color stone, saw cutting the curvilinear shape seen in design, and securing the perimeter with snap edging and stakes. Install polymeric sand between the paver seams.
Backyard Bed Work and Plantings
Remove and dispose of the existing deck/concrete slab behind the garage East of the door/edging/plants. Soil will be used to raise the grade around the birch trees 12-18” as discussed then tapered back to grade in order to direct the flow of water away from the house and into our dry creek bed dry well using a combination of soil removed during the demo process and new soil as needed for proper contouring. Grade behind the garage as shown in design. Install new poly edging as seen in design. Install 4-6” fieldstone boulders as edging around the dry creek bed as seen in design. Install (8) yards of 1.5-3” river rock to cover the dry creek beds and foundation bed. Install 4” of new milk chocolate shredded mulch in all beds not being rocked. Install weed barrier fabric below all rocked sections.
Backyard Drainage Features
Install approximately 45’ linear feet of French drain as shown in the design in the center of the dry creek that will guide water away from the house and around the patio to the lawn space. Install a 150ft2 dry well 30ft2 x 5’ deep filled with rock and lined with filtration fabric on the bottom and sides. The dry creek bed will be contoured and graded with a slope running toward the lawn space at the East end of creek bed. We will also install a 12” catch basin below the down spout on the back NW corner that will tie into 4” PVC that will run below the walkway and empty into the dry creek bed. A grate cover will be used on the end of the PVC and the output will daylight into the dry creek bed.
Step # 3: Installation of Drainage Solutions


Step # 4: Project Completion
Once all of the work described in the proposal had been completed and thoroughly tested by running water through all components of the system, both we and the customer were 100% confident the drainage issues have been solved in a high quality and reliably way. We’ve kept in touch with the customer and they have had no more puddling and no more erosion issues since this work was completed back in 2019. The homeowner even provided us a review on our google page describing their experience working with KG Landscape, which we appreciate very much!
We’ve never seen an outdoor drainage issue we couldn’t fix. Do you have an exterior drainage problem? Call us today to schedule an outdoor drainage consultation at 763-568-7251. You can also submit a quick quote to our website to get in contact with us!